| |
Plane Rating - Multiplex Hummel
From: Andre McFayden AMCFAYDEN@aol.com
Four (4) Stars
Summary review: Stick-built ARF, Ultracote covering, "old-timer" style.
Speed 480G, 7 cells 500AR, 10x7 prop. Gentle climb-out, excellent thermalling, moderate
aerobatics. Stable and slow flight, easy landings. Five minutes full power, typical flights 7-8
min at partial throttle.
Details: This plane is also known as Elinor or Miss Europa (different color
coverings). It's hard to believe it's an ARF. Covering is transparent, building appears
flawless, structure is super-light. Easy to assemble, except that the "firewall" is
too thick (6mm!) for the average motor shaft length. Strip the covering from the firewall, sand
down to fit, recover (1/2 hr work).
 Great value for the money (~$140, without motor). Should fly
fine with the cheaper Speed 400G motors. An 11x8 prop gives steeper climbouts, 3-4 min full
power. Great value for the money (~$140, without motor). Should fly
fine with the cheaper Speed 400G motors. An 11x8 prop gives steeper climbouts, 3-4 min full
power.
Initially, the plane tended to ground loop on every landing
(asphalt). This is said to be typical old-timer behavior. I replaced the fixed tail skid with a
steerable tail wheel (that didn't help). Then I added toe-in and camber to the main gear, and
bent them back 1 cm or so. This made a huge improvement in ground handling. Now it rolls out
straight and taxis easily.
This is easily the most unconventional plane at the mostly
glow club where I fly. It always draws favorable comments. At least one other person has been
inspired to buy one. It's top speed is slower than the stall speed of some of the ARF glow
trainers. It would be a good primary trainer (with an instructor, it's not EPP foam!). An
aileron version would be great.
Return to "What's In This Issue?"
Letter From A Recent Convert
From: Jeffry G. Brzezinski
email: freethinker@earthlink.net
Dear Ken,
You may be getting tired of these letters (never km),
but I'm feeling so good right now that I just had to write and THANK YOU for the epiphany (no
other word to describe it) I had yesterday, after reading the available articles on your Web
site.
I've been building all types of models since 1959, when I was
five. Plastics, rubber-power airplanes, railroad, military, figures, ships, control-line...
anything and everything. I could always be bribed with a model by my grandmother. I built some
early Top-Flite warbirds for R/C club members, without ever having seen an R/C model fly! I'm a
pretty good modeler. OK, I'm a really good modeler. Friends often find me trimming the flash off
of anything I happen to be holding...
I remember reading M.A.N. in the Jr. High School library,
around 1966, and seeing the America's Hobby Center ads for Electric Airplanes. My friends told
me not to bother, it doesn't work. That kind of first-impression is hard to break through.
Although I have a pretty nice old collection of electric-power plane kits, and a mass of kits
and plans that are suitable (like both Top-Flite Elders,) I went the typical glow route to learn
how to fly.
Our Corona R/C Club (near Riverside where I live) has just
lost their field. Great, another Golf Course! I work on a Middle School campus, with a
fairly-large grass field. I figure now is the time to build that old Leisure Amptique, and fly
slowly and quietly, only a mile from my home. Maybe build some Park-Flyers...
I was getting ready to go through my collection, and sell
every last glow engine and plane... then I landed at your website. I read the articles. I
followed the links. For the first time I UNDERSTOOD the formulas!
I've now seen photos of ARF W.W.II fighters powered by
electric. Do you know how much I've always HATED cutting-up the cowl of a W.W.II fighter for
the cylinder-head and muffler?!? And I HATE fuel-proofing everything!
I'll still be selling all the glow stuff, but I can keep most
of the kits! I really am very excited, having finally realized the potential of electric power.
The anticipation of the discovery and design development has gotten me off to a frenzied
beginning.
Again thanks to you and your contributors for opening-up this
aspect of flying to me. I hope to someday be able to contribute something to the wealth of
material you've made available.
Sincerely,
Jeffry G. Brzezinski
Riverside, CA
PS: The only bummer is that I just sent in my AMA renewal with "R/C Sport" checked as my interest. Next year it will be "Electrics."
Return to "What's In This Issue?"
In Praise of some US Suppliers/Manufacturers
From: Lex Davidson email: ldavidson@xtra.co.nz
Ken,
Thanks very much for the advice. (Referring to an e-fly he’s
planning. Km) In connection with our Fly-In, I sent preliminary notice out to the 30+ clubs
that are within 4 or so hours drive time from our field. The responses have reinforced exactly
what you say in the introduction to your article this month (January 2000 Ampeer Km).
Guys have tried--on their own and relied on kits from big outfits. Generally the items from
these well known manufactures are very good, but while the kits are good, the power combos are
just not up to it. You don't need to do much, or spend much, to make these ships go OK, but
they just don’t have the information to do it.
I must tell you about the excellent service I had from two
US suppliers during 1999.
Aveox - My L160 controller stopped working out of the
warranty period. When you are 12,000 miles from the supplier, you feel a bit lonely when
something like this goes wrong. A phone call to Wayne Tolbert in customer services at Aveox had
me reassured and the controller and motor were on the way to CA. They came back in quick time
-- it can have only been in the workshop 2 or 3 days.
They had done a software and hardware upgrade on the
controller and replaced the bearings in the motor and tested the motor. They air freighted it
back to me. The actual test results were included (Kv, resistance etc.)---all under extended
warranty---very, very pleased.
I did a bit of bench testing and put it in a model but
couldn't fly for a few weeks due to weather. Well, at the field it wouldn't go!!!! I tried
everything and then went home and tried more things.
I sent an urgent Email to Aveox. We are about 20 hours ahead,
so I had to wait until our Tuesday to ring Wayne. Off it went again.
I got an Email back from Wayne: "It works for us."
I don't know how much time they spent trying to duplicate my
problem, but after a week we agreed to just send it back, all no charge again. Even the
airmail postage to NZ is significant (motor and ESC).
It worked fine for me too!!! Until the 1st competition after
it came back. The set-up is in a 7 cell F5B ship and we fly the UK handicap rules. The first 2
rounds went really well, but when I went to light up for round 3 nothing happened. We fly the
best 2 of 3 rounds so it didn't effect my placing, but I was worried.
I didn't look at it until the next weekend when I could take
my time checking. I found the problem and confessed to Aveox. It was a battery pack problem.
I had a "dry" solder joint on one of the wires. The joint allowed normal charging and
discharge cycling BUT failed at the start up current. The joint looked fine on the outside but
actually had a hollow, almost a bubble underneath. Boy did I feel stupid.
The other firm deserving a pat is MEC (Model Electronics
Corp.) and Olson Systems.
Dana Olson looks after the MEC controllers. This was another
stupid mistake on my part. After a good a day flying, I came home and decided I should set up
all of the Sermos connectors on all of my battery packs and motors the same way!!
You can guess what is coming. The 1st set up I tidied up, I
plugged in with the wrong polarity. Fortunately there was no prop on the motor because it
went straight to full throttle. When connected the right way, the controller armed as it
should, but as the throttle was opened one of the FETs glowed very red.
Email and fax to MEC--could they fix it? They thought that
the chances were maybe 50/50 and asked that I send it directly to Olson Systems.
Back it came a while later all fixed and NO invoice. This was
way out of warranty and damage caused by operator error (that is being kind to the operator).
Again great service. Incidentally, I really like this ESC --the MX80. Arming switch plus
software safety BEC up to 10 cell max cells 22.
Safety reminds me of something else. This may have
been on Ezone (have given up on trying to keep up with the list). Early in 1999 there was a
thread regarding a young fellow killed in the UK by an out of control RC model. All the
reports are now in. One of the factors involved, and of real importance for all modellers and
maybe in particular E fliers, was the part played by PCM radios.
The model that crash and killed was "hit" on or
just after take off. The PCM gear whet into "Failsafe hold" being full throttle and
all other surfaces neutral. Maybe a bit of up elevator. It roared off at full throttle,
climbing steeply until it arched over and came down at full throttle. The pilot couldn't do a
thing. The victim couldn't hear the warnings being called because of motors being tuned in the
pits! And there was the frequency control failure, that caused the radio to shut down. Here is
the rub. Failsafe hold is the default for Futaba and JR sets sending/receiving PCM. (Don't
know about Hitec or Airtronics). If a PCM set takes a hit or picks up noise from the motor it
will fail with every channel held. I don't like the idea of that. This would probably
override the lost of signal safety built into most ESCs. Can't test that because - I don't like
PCM and the PCM RXs I have are in gliders where they can't do much damage!!
I understand the UK model association is asking all
manufactures to change the default for the "feature" to be off or disabled/inhibited.
See you,
Lex D.
Return to "What's In This Issue?"
Airborne Video Systems
From: Monte Salot email: mcsalot@home.com
Greetings R/C Flyers
I would like to introduce to you to a new company with a rich history of hands-on
R/C airborne video experience. Our name is "Wireless Video Cameras." We manufacture and sell
affordable, high quality hobbyist and commercial airborne video systems for radio controlled aircraft.
The Right Stuff!
We have 30 years as a FCC Licensed Amateur Radio Operator, plus 25 years
experience in the field of Microwave. We also have 20 years experience flying R/C aircraft and 10 years experience as a pioneer
in the field of R/C airborne video for both hobbyist and commercial uses. We have the experience and the know how to get the
job done right!
Whether you are into helicopters or fixed wings and fly R/C combat, sailplanes,
sport, scale, racing, or just plain Sunday flying we have the right system for you. If you’re business minded and want to start your
own helicopter aerial photo or video service we have the best FCC legal system to put you in business.
We are offering 4 systems that are 100% FCC legal. Our systems will out perform
any other airborne video system on the market today with better quality, performance, durability, price and warranty.
I had once owned a well-known and respected company that had sold airborne
video systems throughout the world, and I held the honor of being “#1 in Customer Satisfaction Worldwide.” Now, I am out to do it again!
Risk Free offer…I Guaranty You Will Love It or I Will Buy it Back!
All I ask is that within the first 30 days if you are not satisfied return it in new
condition, which includes complete original packaging. Shipping and insurance charges are not included.
Our bottom line is this…We will beat anybody’s offer!
Thank You,
Monte C. Salot
Wireless Video Cameras
Dealer’s inquiries welcome
We are an Internet based business.
www.wirelessvideocameras.com
Email MCSalot@home.com
Email MCSalot@yahoo.com
eFax 603-251-8331, Phone: 949-533-3516
Model - HLF11
Helicopter System
Carbon Fiber Rotor Blade Compatible
License Free-Hobby or Commercial usage
1100 feet range
FCC approved FCC ID # MFEMODTX24-01
Power output 50mV @ 3 meters
Two channels FM - 2.453GHz & 2.473GHz
Video Bandwidth - 6MHz
Video format - NTSC or PAL
TV Lines Max - 525
310 line CMOS color camera with focusable lens,
power LED indicator, built in pan & tilt mount
RCA jacks - yellow video, red right audio, white left audio 12vdc AA alkaline battery case with harness and power switch
AV cables
AC/DC power cables
Transmitter antenna-built in downward circular polarized
Receiver antenna-built in
Mounting-Aircraft grade Velcro
Transmitter size 2.5" x 3" x 1 .6"
Total Airborne Weight~15oz
Power requirements for transmitter & camera 12vdc @ 250mA
Power requirements for receiver 12vdc @ 300mA
Price $399.00…Special introductory price $349.00
Model - HAR01
Helicopter System
Carbon Fiber Rotor Blade Compatible
Amateur Radio license required-Hobby use only
1-mile range
Power output 100mW
Two channels FM - 2.434GHz & 2.411GHz
Video Bandwidth - 6MHz
Video format - NTSC or PAL
TV Lines Max - 525
310 line CMOS color camera with focusable lens,
power LED indicator, built in pan & tilt mount
RCA jacks - yellow video, red right audio, white left audio 12vdc AA alkaline battery case with harness and power switch
AV cables
AC/DC power cables
Transmitter antenna-built in downward circular polarized
Receiver antenna-built in
Mounting-Aircraft grade Velcro
Transmitter size 2.5" x 3" x 1 .6"
Total Airborne Weight~15oz
Power requirements for transmitter & camera 12vdc @ 250mA
Power requirements for receiver 12vdc @ 300mA
Price $449.00…Special introductory price $399.00
Airplane or Helicopter
Amateur Radio license required-Hobby use only
1.45-mile range
Power output 100mW
Two channels FM - 2.434GHz & 2.411GHz
Video Bandwidth - 6MHz
Video format - NTSC or PAL
TV Lines Max - 525
310 line CMOS color camera with focusable lens,
power LED indicator, built in pan & tilt mount
RCA jacks - yellow video, red right audio, white left audio
12vdc AA alkaline battery case with harness and power switch
AV cables
AC/DC power cables
Transmitter antenna-21" end feed dipole-omni directional
Receiver antenna-built in patch
Mounting-Aircraft grade Velcro
Transmitter size 2.5" x 3" x 1"
Total Airborne Weight~15oz
Power requirements for transmitter & camera 12vdc @ 250mA
Power requirements for receiver 12vdc @ 300mA
Price $499.00…Special introductory price $449.00
Model - AAR05
Airplane or Helicopter
Amateur Radio license required-Hobby use only
5-mile range
Power output 100mW
Two channels FM - 2.434GHz & 2.411GHz
Video Bandwidth - 6MHz
Video format - NTSC or PAL
TV Lines Max - 525
310 line CMOS color camera with focusable lens,
power LED indicator, built in pan & tilt mount
RCA jacks - yellow video, red right audio, white left audio
12vdc AA alkaline battery case with harness and power switch
AV cables
AC/DC power cables
Transmitter antenna-21" end feed dipole-omni directional
Receiver antenna-external high gain patch with 10 foot cable
Mounting-Aircraft grade Velcro
Transmitter size 2.5" x 3" x 1"
Total Airborne Weight~15oz
Power requirements for transmitter & camera 12vdc @ 250mA
Power requirements for receiver 12vdc @ 300mA
rice $699.00… Special introductory price $599.00
CMOS color camera with pan & tilt mount, camera is removable from mount
Optional equipment:
Ni-Cad battery pack with AC charger............Price $59.00
VR i Glasses.................................………........Price $549.00
12vdc to 6vdc power cord.............…..............Price $19.00
Bright Sunlight Modification............................Price $19.00
Prices and specification are subject to change with out notice. This is a limited time offer.
Return to "What's In This Issue?"
Gordy Cells
From: Gordy Stahl GordySoar@aol.com |
| I have plenty of Gordy Cells right now, just for your information :-) |
Gordy Stahl
9303 LeBeau Ct
Louisville Ky 40299
502-491- 5001 |
Return to "What's In This Issue?"
Hobbyflite Electric Flying Wing
From: Andre McFayden email: AMCFAYDEN@aol.com
Four (4) stars
Summary: 48" span pusher flying wing, similar to Zagi or Razor. Speed 400 6V direct, 4.9 x 4.3 prop, 7 or
8 cells 500AR, Sprite 25 ESC, 17 ounces. Very easy to assemble, flies well on the stock power system. With 7 cells,
consecutive loops from level flight, inverted flight, stall turns, split-S's, spins. Rolls are on the slow side. Floats in on landings.
Typical flights 5-6 min with throttle management. Even better performance on 8 cells, but reduced duration.
Details: I added fiberglass tape top and bottom of the wing, almost full span, while omitting the recommended
packing tape except for leading edge, tips and trim. This added 2 oz over target weight but is very stiff. Be careful with
fiberglassing or taping, I built in a warp and had trouble trimming it.
I did not use the included wheels, used a blue foam hatch cover/landing skid.
The elevon wire looked thin, replaced it with standard threaded rod.
At $65 including motor and prop, with ailerons already taped in place and control
horns glued on, this is a great value. Generates a lot of interest at the glow field.…
Regards, Andre
Return to "What's In This Issue?"
Old Electrics
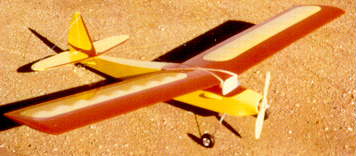
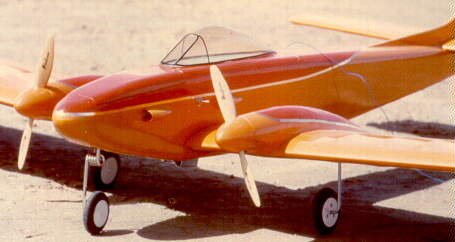
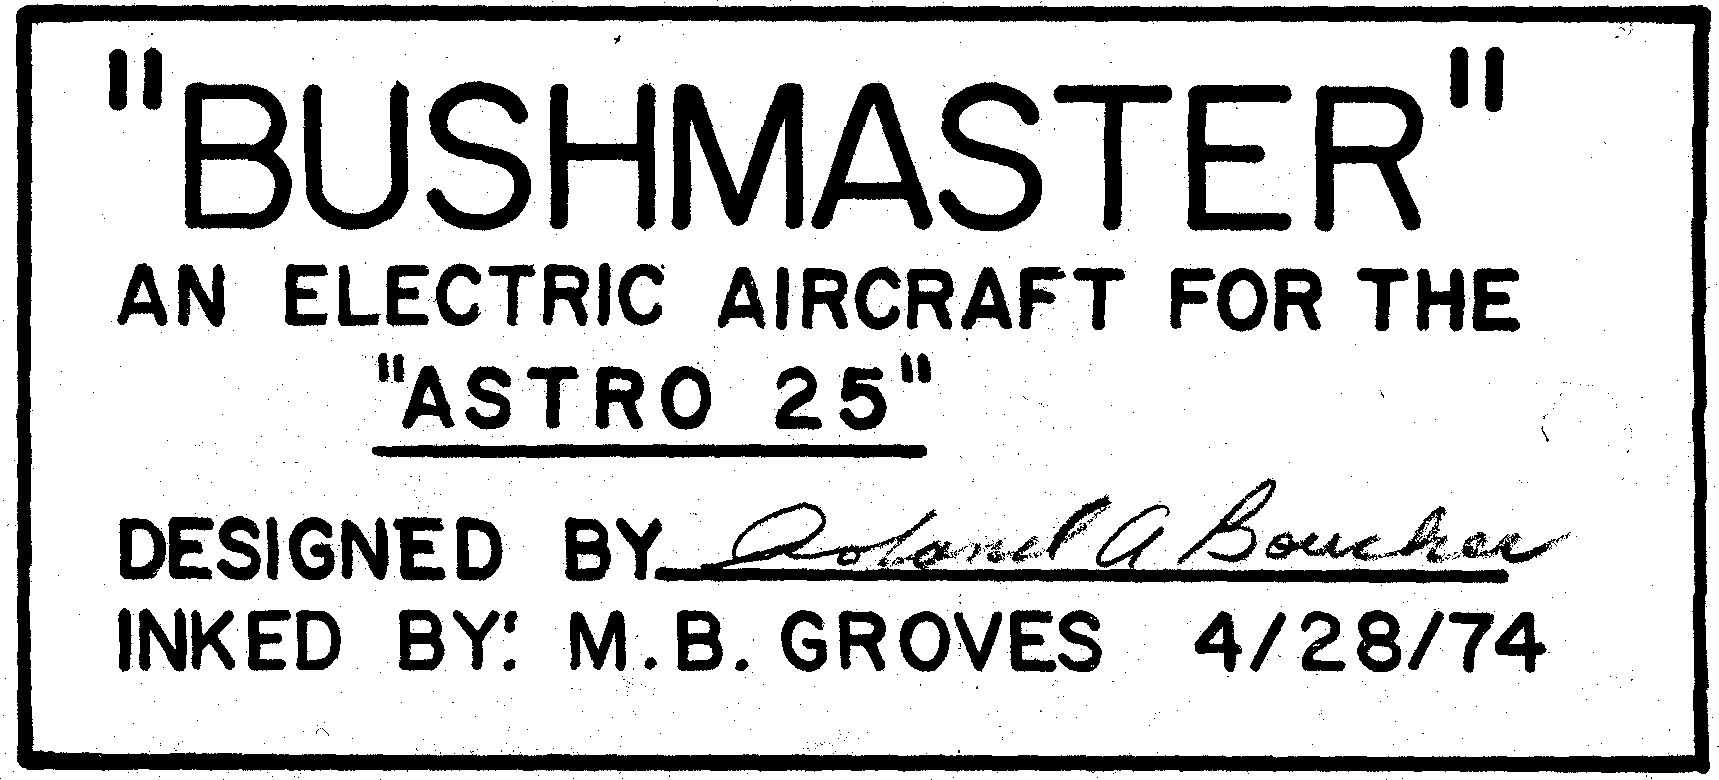
From: Dale Wilde Wildenm@cs.com
Hi Ken,
I hope I'm not the only ancient modeler contributing this old stuff. This particular
batch dates to 1974. I built two planes then, Bob Boucher's Bushmaster, which was powered by the
then new Astro 25. The twin is a Goldberg Skylark, modified to take two Astro 15's. Both of these
planes were built to test a speed control being developed at that time by Hardy Benson of Tucson, AZ. If you look at the
close-up of the Skylark, on the fuselage belly just below the wing LE, you can see a cooling fin
protruding from his control's power transistor. Hardy went on to market speed controls for the next 20 years or so.
Both planes flew reasonably well, particularly considering the weight/power ratio of
that era's NiCad's. The twin was capable of loops and rolls.
The Bushmaster plan was published in RCM. I couldn't
locate the magazine, but still have the plan so I copied the title block. Hope this old stuff is useful. I would like to see more from
others. (ME TOO Km)
Skylark ad May 1969
Return to "What's In This Issue?"
Why Fly Electrics?
From: Fred Seiler email: fmseiler@olypen.com
Ken,
I am an avid reader of your Ampeer Newsletter. I have been flying R/C
"wet stuff" for 35 years and was about ready to hang it up. Than I found the Ampeer. Thanks to your
newsletter and website with so much information, I am now again having fun in the hobby Now with direction. I tried electric
aircraft years ago with not much success. But now I am having a ball!! Thanks again to you and all the other wonderful people
that contribute to the newsletter.
Fred J Seiler
PS. I am flying a Dragonfly, Speed 400 powered. I found some 1300 mAh NiMH quick charge cells, AA size. A 7-cell pack
weighs 1 oz more than 500 mAh NiCad , so now 10 minute flights on my Dragonfly are considered short flights ...
Return to "What's In This Issue?"
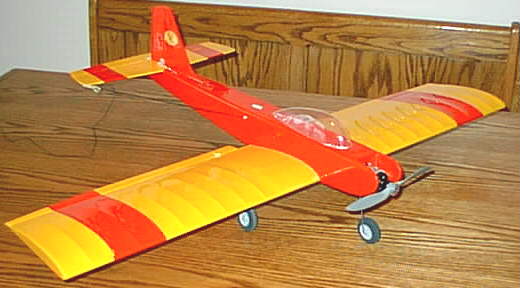
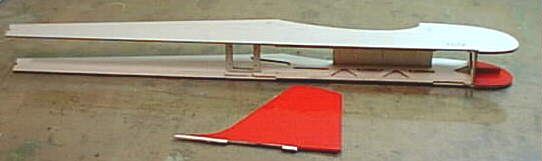
The X250 from SR Batteries
by Ken Myers
The Specifics
| Wing Span: | 36.1875 in. -- 919.2mm |
| Wing Chord: | 7 in. + ailerons -- 177.8mm |
| Wing Area less ailerons: | 253 sq.in. - 16.34dm2 |
| Aileron Area: | 29 sq.in. -- 1.87dm2 |
| Wing Area: | 282 sq.in. -- 18.21dm2 |
| Wing Area minus area covered by fuselage: | 267 sq.in. -- 17.24dm2 |
| Wing weight before covering: | 3.8 oz. -- 107.7g |
| Wing weight after covering: | 4.8 oz. -- 136g |
| Fuselage weight before covering: | 1.6 oz. -- 45.4g |
| Fuselage weight after covering: | 1.8 oz. -- 51g |
| Finished wing weight w/landing gear: | 5.6 oz. - 158.8g |
| Finished fuselage weight w/landing gear: | 2.2 oz. -- 62.4g |
| Finished horizontal stab and elevator weight: | 0.6 oz. -- 17g |
| Finished vertical stab and rudder weight: | 0.2 oz. -- 5.7g |
| Total finished airframe weight: | 9.4 oz. -- 266.5g |
| Total finished plane weight with 7x900SCRs and 450 Turbo motor: | 29.5 oz. -- 836g |
| Wing loading: | 15.9 oz./sq.ft -- 48.5g/dm2 |
| Approx. power loading using APC 7x4 @ 19 amps: |
72 watts input per lb. -- 159 watts input per Kg |
| Estimated approx. airspeed: | 50 mph -- 80KPH |
| Approx. stall speed: | 15 mph -- 24KPH |
| Approx. flight time with Sanyo 900SRCs: | 6 minutes |
| Approx. flight time with Sanyo 1250SCRs: | 8 minutes |
| Motor: | Multiplex 450 Turbo - 4.8 oz. -- 135g |
| Astro Flight prop adapter & 7x4 APC: | 0.6 oz. - 15g |
| Battery (7-cell 900SCR): | 10.4 oz. -- 295g |
| Onboard R/C components: | 3.15 oz. - 89g |
| Hitec 555 Rx: | 0.75 oz. --21.3g |
| 3 Hitec HS-81 servos: | 1.8 oz. - 51g |
| Astro Flight 215D ESC: | 0.6 oz. - 15g |
| Adhesives: | Jet, Super Jet & RC-56 |
| Covering: | EconoKote/TowerKote |
| Note: | The HUGE majority of the hardware used is right in the kit! |
| Weights as Percents of Total Weight (29.5 oz.) |
| Finished Airframe Weight: | 31.9% |
| R/C Components: | 10.7% |
| Battery (7-cell 900SCR): | 35.3% |
| Motor w/prop: | 18.3% |
| Battery & Motor: | 53.6% |
| Unaccounted for weight: | 3.8% |
| Unaccounted for weight is about 1 ounce and would include
rounding errors, pushrods and inaccurately measured components. |
* * * * *
After viewing this attractive little bird at Toledo, I decided that I just had to have
one. After a long phone discussion with Larry about the kit, the order was placed and arrived in short order.
When I inspected the aileron version of this kit, I found all of the components
neatly packaged. There is a great 51 page photo enhanced instruction manual, a four page parts layout sheet, a sheet on using
the gapless hinges provided and very nice plans, plus very complete hardware including the lite wheels.
I gave the manual a good once over and started the actual building on Saturday,
January 15.
Before I get into some more detailed notes, I must tell you that I had shown the
laser cut kit at the January EFO meeting. The members had many favorable comments. It certainly is a very good kit, and Larry
really did his homework on this one. Built stock and with Larry's list of power system and R/C components, it is a very good
plane and extremely easy to build.
Unfortunately, I just can't seem to build a plane stock. (I’ll pay for this later, while
Larry gloats!) I'll note the changes that I made. There was nothing, nothing wrong with what Larry has
done, but I've got a problem and just can't seem to build a stock kit. That is one reason I've never submitted a review to any
national or international magazine. I just have to stick my fingers into and change it.
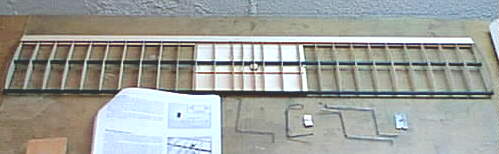
General Notes:
The wing went together easily. The jig works easily. The laser cut parts were easily
removed from the excellent balsa. I could not have hand-picked better balsa myself.
The only part that was a bit tricky was adding the landing gear blocks.
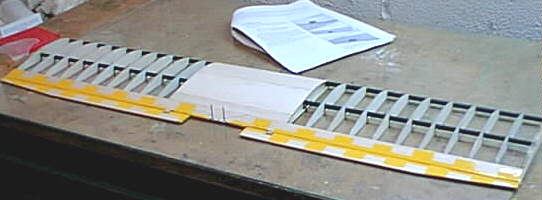
My first modification was that I don't use hinges. The photo clearly shows the
technique that I've used for years on large and small glow and electric planes. It is a bit time consuming, but very easy to do. It
works, and I like it. Larry’s gapless hinges will work just fine and be a lot less work.
The second modification can also be seen in the photo. I moved the aileron linkage
so that it will be inside the fuselage. This also required modification to the fuselage.
One of the very few problems cropped up when I tried to solder the washers on
the landing gear. I couldn't find them, so I had to substitute with some that I had. The only washers that I could find in the kit
appeared to be brass and too small. The manual calls for steel. I guess I could have misplaced them.
The fuselage went together easily, along with the vertical and rudder. Everything
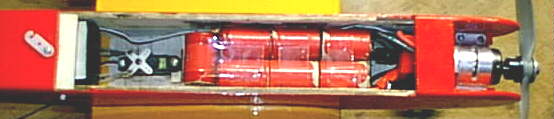
went smoothly. Unfortunately, the battery pack I'm using, didn’t fit quite as nicely as it did on the plan, but that is not the kit's
fault. It's mine. I didn't measure closely enough. I redid the pack, and now it is a nice fit.
I chose to glue on the wing. That’s not a transportation problem for me with this
size plane.
To mount the Permax 450 Turbo, I put 100 grit sandpaper on the Maxx S400 motor
mounts using a spray adhesive called Stix-It. I added another 1/8" to the height of the beam mounts and mounted the motor
using the Maxx S400 mount. I modified the hatch holddown to allow easier access to the battery. The swing latch can be seen
behind the canopy in the finished photo.
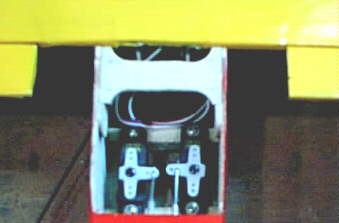
I had originally planned to use the Hitec HS-60's that were recommended, but they
had not arrived by the time I needed them. I went to Joe‘s Hobbies and picked up some HS-81‘s instead. This required
modifying the original mounting for the elevator and rudder servos to use the HS-81's. As I mounted the rudder and elevator
servos, the receiver found itself a home by falling into it. (See photo)
The plane was finished on the eighth day. That was the day I installed all of the
radio components and pushrods. This turned out to be a much longer process than anticipated, as fitting the aileron servo turned
out to be much more difficult than I had anticipated. (My own fault!) It took several tries, and a couple of sets of pushrods, but it
is working great now. Rudder and elevator servos and pushrods were easy. Placement of the receiver was an accident. It fell
into the top area when I was working, and since it wanted to go there on its own, I let it stay there with some Velcro holding it in
place.
It will be at least a month and a half before I give it a try. I'm NOT a winter flier,
but I can be patient. I have plenty of other projects for this winter, but it was nice to know that I had a plane completely finished
before the February Midwest and EFO meetings. Usually I finish them the weekend AFTER the meetings!
Not being satisfied with the landing gear, I purchased some 5/64" piano wire
to use. The 5/64" gear added about 0.2 oz. to the total weight of the plane. Larry has assured me that the 1/16" gear
is just fine. (See his comments later.)
I can’t wait to fly this little gem. It is available from:
SR Batteries, Inc.
Box 287
Bellport, NY 11713
Phone: 631.286.0079 Fax: 631.286.0901
Email: info@srbatteries.com
Website: www.srbatteries.com
Aileron version: $79.95 Rudder/Elevator version: $69.95
Comments from Larry Sribnick:
Larry had asked me to do it stock and told me why. When he found that I
was indeed modifying it, he wanted to tell me, and you, why he’d chosen to do many of the things the way he did. Here
are Larry’s comments. Any of my comments within his will be in italics.
I thought you might be interested in some of the "whys" behind the
design details in the X250.
Like you, I started off with 3/32" wire for the landing gear. (I was
thinking of it, but didn’t use them. Km) When done, the landing gear looked like it was made out of 1/4" steel rod!
Overkill doesn't begin to describe my reactions. My concern was that I wanted to keep the structure light and with the 3/32"
gear, all of the shock loads would be taken by the airframe rather than the landing gear. So, I redid the gear with 1/16" wire.
Although it's very flexible, it doesn't transmit anything to the airframe. The gear takes all the knocks. We've never deformed the
main gear legs but the nose gear leg does tend to be bent back if you fly off of rough surfaces as I do. However, it only takes a
moment to rebend the nose gear back to where it belongs, and I'd much rather rebend or replace landing gear legs than have the
airframe break. That's why I give full size drawings of the landing gear legs on the plans. I figure it will be easy for the builder to
make new gear legs if he has to. The key point is that I'd rather rebend gear than rebuild the airplane.
That leads to why the aileron servo comes out the bottom of the wing. I've seen so
many aircraft with upright aileron servos that in a crash, when the wing shifts on the fuselage, the aileron servo tries to come
through the side of the fuselage. By mounting the aileron servo through the bottom of the wing, the wing can shift all it wants and
again, there won't be any damage to the fuselage or wing.
Monokote type hinges have always been my favorites as they are with you.
However, the tape hinge material we developed with 3M is really great. It's all a matter of personal preference.
I'm sorry your aileron control rod hookups took so long. If you had followed my
design it would have taken minutes instead of hours (he, he, he!). (Okay, gloat. I deserve it! Km) You really should
give my aluminum/steel wire pushrods a try because they really work well and are very light. (I did use them on the elevator
and rudder, and they are very cool and light! Km)
I agree that the X250 really lends itself to being a one piece aircraft. I just had the
minimizing of crash damage in mind, and that's why I did it the way I did. The other reason for being a two piece design is that
we'll be bringing out a float kit for the X250 this summer and with it will be a second rudder/elevator wing that obviously doesn't
have an aileron servo sticking out either side. By making the wing removable, the builder can fly the X250 either way. Of course
doing it your way, I sell another kit instead of just a wing, so maybe I should rethink all of this!
As for the power system you went with, let me know how it works out. With the
stock system we really do get 7 to 9 minutes of aerobatic flight and 12 to 15 minutes of just flying around at partial throttle. We
tried Astro 02 brushless motors with the super box and all we got was a little more vertical performance and half the flying time.
I'm really partial to the system we recommend because I think it's the optimum trade off between performance, flight time, and
total weight. I'll be really curious to hear how your system works out. With the standard system, one of our customers uses his
picnic table as a runway to take off and just lands in the grass.
By the way, thanks for the information on weights with and without covering. It
was something I meant to do but forgot to in the heat of building and taking the photos for the instruction manual.
I sent an email back to Larry asking about the rudder/elevator version,
and he responded with the following.
With the rudder/elevator version you don't join the wing halves with the joiners
inside the spars. Instead, you build each wing half and use a jig we provide to precisely set the root rib at the correct angle. Then,
we provide an angled fixture to go inside the spars and hold them at exactly the right dihedral angle. You glue the two wing halves
together and then wrap the center joint with fiberglass tape. It's easy and it's dead on every time without any wing twist.
The technique is overkill for the X250 because I assume an X250 builder has some
building experience, but it's the technique we're going to use in all the rest of our designs that have a dihedraled wing, so I wanted
to keep everything the same throughout the line.
I can't wait to get another couple of designs done. I want to finish our site first and
then I'll be able to turn my full attention to our kits again.
For even more on the building of Ken’s version of the X250 visit:
http://members.aol.com/KMyersEFO/x250.htm
Return to "What's In This Issue?"
 The Mid-America Electric Flies report is not actually in this
issue. To read the report click here. Use the back button
of your browser to return to this issue. The Mid-America Electric Flies report is not actually in this
issue. To read the report click here. Use the back button
of your browser to return to this issue.
Return to "What's In This Issue?"
To Reach Ken Myers, you can land mail to the address at the top of the page. My E-mail
address is:
KMyersEFO@aol.com
EFO WEBsite: http://members.aol.com/KMyersEFO/
| |
