| |
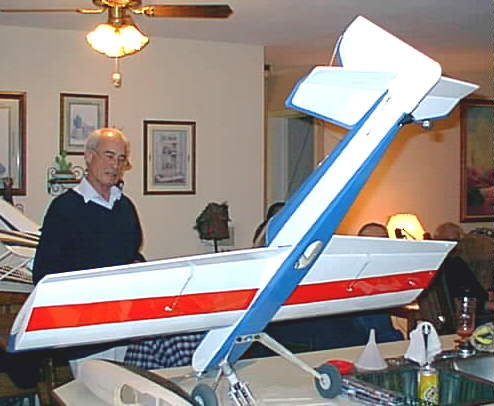
Hobby Lobby FILIP 600 + Ailerons
From: Larry Bailey lnbailey@cox.net
My Filip uses a Speed 500 Gear Plus. (speed 500, 2.8:1 gear box, speed controller),
4 servos and JR radio.
The aircraft flew very well. It had a good climb with an 11x8 folding prop and
seven x 1800 mAh cells. A 12x10 would cause the speed controller to "miss". Over current shutdown I think.
It demonstrated a good thermalling ability, low sink rate glide and very little altitude
loss in turns. There were no flaps or spoilers for landing. The aircraft would settle to a foot or less altitude and go sailing across
the field. It takes some practice in making a long flat approach to bleed off speed for a on the mark landing.
Overall, it is a very nice flier and meets the Hobby Lobby high standard in ARF's.
Rating 5(*****)
One note, read the speed control instructions covering the number of
servos the BEC will handle. The 500+ is rated for three servos. I thought, well one more will be OK. During the Sept, 02 EISS
meet at Blakesburg, IA, my FILIP spun into a wooded area from about 400 feet. The tree landing was impressive! Shredded one
wing, the battery pack launched out of the fuselage as designed, never to be seen again, but the aircraft remained in the tree.
Prior to the spin, several observers said they noticed control surfaces flutter. The cause was never pinned down, but over loading
the BEC with the fourth servo can't be ruled out.
With the permission of the field owners, we cut the tree down the following day
and recovered the remains.
Return to "What's In This Issue?"
"Getting Started"
From: Dave Segal Ddavesegal@aol.com
I just read your piece "Getting Started...." and it is the best thing I have ever read on the subject. I meet beginners and I feel frustrated that in a couple of sentences I can't tell them what they should do.
I spent a great deal of time trying to think of the most simplified set of guidelines intended to keep a beginner from failing. I boiled them down into a generalized set of principles which (I think) were printed in the KRC newsletter last year. For what it's worth:
How to Succeed in R/C Flying
The Goal:
To learn how to fly R/C in a reasonable amount of time and with the least pain.
The Guiding Principle:
EVERY DECISION AND ACTION YOU TAKE SHOULD AIM AT
INCREASING THE PROBABILITY OF SUCCESS.
- Go with the mainstream practices recommended for students.
- Keep it simple.
- See number 2.
Here are a few examples of steps that increase the probability of success:
- Use a trainer with a low wing loading.
- Get a buddy box and fly with a qualified instructor.
- Practice on a computer flight simulator.
- Buy a brand new radio system.
- Break-in your engine.
- Do your homework; read what the experts have written to guide you.
And now for the actions that will diminish your probability of success:
- Get a fast model with a high wing loading
- Try to learn to fly on your own.
- Use your uncle Harry's 17 year old radio system.
- Never run the engine until your first flight.
- Follow the principle that "Everything will come to you naturally."
Success is cumulative. The more times that you choose an action likely to be successful, the more likely you will be to achieve the goal of qualifying as an R/C pilot. If this seems like a rather simple idea, it is. But to ignore it is to invite failure.
Dave Segal
Keystone RC Club
Return to "What's In This Issue?"
How to Plan Build
By Dave Segal Ddavesegal@aol.com
I offer this article if it can be of use to readers of your web site. I did a
presentation last year to KRC summarizing all that I had read and learned of building from plans. Probably the key point is
various methods of creating patterns. It is posted on the KRC web site now. You are welcome to reprint it.
Regards for the new year,
Dave
Building From Plans
Why build from plans?
- Not limited to current kits on the market.
- Many thousands of plans are still in print.
Where to find plans:
Magazines
Catalogs are available from Radio Control Modeler, Model Airplane News, Model Aviation, Flying Models and others
including British magazines..
Vendors
Bill Northrop's Plan Service and Cleveland Model and Supply Company.
Construction Articles
Some magazines will provide a photocopy of the original construction article when a plan is purchased. The AMA Library
contains 250 titles of magazines and can supply photocopies.
How to do it?
The main difference in such a project is that you have to create your own kit. Once
that is done you can proceed just as you would with a purchased kit.
Steps to follow:
- Create a list of the materials needed.
With a ruler and notebook in hand, study each component of the model and list the type and sizes of material needed and the
quantities.
- Buy the materials listed
This means that if you are careful you won't be stuck with poor quality wood.
- Layout the parts
This is probably the most intimidating aspect of the whole process and will be the focus of this presentation.
- Cut out the parts
Isn't this fun?
- Now you can start building.
How To Create Patterns on Wood
Layout the pattern directly onto the wood.
Use a pencil, straightedge and drafting tools such as a compass and French curves.
This is simplest with straight line shapes.
Pinpricks
Place the plan atop the wood and use a pin to make a series of holes through the plan and into the wood. Remove the plan and then "connect the dots" on the wood. This seems a low-tech method but in practice is very accurate, especially for curves.
Tracing shapes
Tracing paper
Tablets of tracing paper are available from CVS and Staples stores. Place the
paper over the plan and trace with a pencil or pen. The pattern can be fixed to the wood by applying a glue stick to its back or
using a removable-type spray cement. The pinprick method can be used or you can simply cut directly through the paper into the
wood. This is a fragile pattern not intended for multiple parts. For greater durability the tracing can be glued to light card stock
and then cut out for a template.
Mylar drafting film
This is a sturdy plastic with a roughened surface to take pencil and ink. A brand
called "See-Temp" is sometimes advertised in modeling magazines. The Mylar is easily cut with scissors or knife and
can then be placed on the wood and traced around the edges.
Photocopying
This sounds like a great way to go but there is a hidden danger in the inability of
the ordinary office copier to make an accurate same-size copy. If you use a copying machine, first place a scale on the glass
window and make a copy. Then place the scale alongside its photo image and measure the discrepancy. Even a one percent
error means you will be off by 1/4 inch over 25 inches. Try to adjust the copying magnification on the machine to get the most
accurate result. If you come back and choose another machine at the print shop you will have to do the calibration test all over
again.
Once you have made the photocopy it can be copied to the wood by pinpricks,
cutting through the paper or transferring the ink onto the wood.
Ink transfer
Tests must be made for any brand of copying machine due to variations in their
technology. And practice on scrap will avoid waste of good wood.
Heat transfer
The common process employed by copiers uses heat to fuse a powdered toner
onto the paper. By placing the photocopy face down on the wood it may be possible to transfer the image, in reverse, onto the
wood. Use a household iron for this.
Solvent transfer
The toner may be soluble in thinner such as lacquer thinner or dope thinner. Place
the copy on the wood, image side down, and then dip a cotton swab into the solvent. Don't use too much liquid. Then draw the
swab around the outline of the part and while pressing the swab down.. The liquid will briefly make the paper transparent so you
can see what you are doing. Then lift the copy off. It may be possible to repeat this if enough toner remains on the paper.
Rib templates
When many identical pieces such as wing ribs must be cut it is useful to produce a
rigid template. Lite-ply works well as it is cheap and easy to cut.. The pattern can be transferred from a photocopy by using a
solvent-dipped swab. Then cut out the template- an electric scroll is perfect for this. Sand the edges to the final shape. If
desired, the edges can be hardened by dribbling thin CyA adhesive. Place the template onto the balsa and draw the knife around
the edges. Finger pressure is adequate to hold the template in place but pins can be pressed through the template to secure it.
Note: omit the spar notches from the template so that the cutting movement with the knife will go more smoothly. Afterwards,
the ribs can be stacked and pinned together so that the spar notches can be marked and then cut out.
Dave Segal
Keystone RC Club
Return to "What's In This Issue?"
Comments on "Getting Started" Editorial
January 2003 Ampeer
Richard Flinchbaugh
7 Avon Ln.
South Dennis, MA 02660-2929
I was delighted to have you get the load off your chest regarding so many of the
offerings that are just terrible and definitely turn good folks away from our hobby. I gave Xxxxx Xxxxxxx management a piece
of my mind on this subject. For some stupid reason, in a weak moment, I purchased one of Xxxxx Xxxxxxs’ Sxx Rxxxx outfits
from their scratch and dent sale for half price, still about $150. This after having built about 5 successful electric planes. It was a
disaster from the start.
- It had no motor control
- Wouldn’t even gain altitude with the batteries supplied. Would not even begin to takeoff.
I was finally able to get 1 flight, using 2 additional batteries. After landing the motor
failed to restart. I ended up sending it back for a credit, but what happened to the many young dads that had to face their son in
hopeless despair?
I liked your recommendations. A well thought out presentation. Nice job.
(Thanks for your input Rich. I received many, many positive comments
regarding the January editorial. I was quite overwhelmed with everyone’s support of my thoughts. Thanks folks. Now
we need to figure out some way to get the word out to those beginning fliers!
Rich asked me to mail that issue to a couple of folks he knows who are
starting out. I did!
As you can see, Rich burned up his motor by adding two more cells, but at
least he was able to get a credit for something he could actually use. I’m sure that you also noticed that I did not name
the supplier involved. Neither Rich nor I need to be sued for telling the truth! KM)
Return to "What's In This Issue?"
Universal Motor Mount?
Multi Plane Power Plant
From: Armand Hadife armand_hadife@emi.co.ae
Hello Ken,
Very useful site.
My new project is to make a "Multi plane Power Plant" let me explain:
I have several 40" planes and would like to use the same Promax 400 Motor
and Esc. It MUST be quickly removable and quickly installed from a plane to another. Like a cartridge if you want.
Any suggestions?
Thank you.
Kind regards,
Armand Hadife
(Okay folks, can we help him out? I‘d love to print any suggestions with or
without drawings. This could be an interesting "homework" assignment for you. KM)
Return to "What's In This Issue?"
Cool Clamps
From: Walter Thyng docwt@lightfirst.com
Hi Ken,
I'm taking a break from trying to structure the stupefying stacks of sticks that was
supposed to be a Giant Lazy Bee into a humongous Stagger Bee (resulting in a Lazy Giant Staggering Bee??? ).
Anyway, I'm really appreciating the new spring clamps I picked up from Menard's (a giant hardware/building supply store).
They are Tool Shop 22 piece miniature Spring Clamp Set #244-5579. They are
similar in design to the woodworker clamps we sometimes use, but which are usually too robust for our needs. They come in a
round tube and cost less than three bucks. The tube includes 4 one inch and 18 3/4 inch clamps. I've measured the jaw opening
and the one inch opens to about 1 1/2 in., the 1 1/2 inch to nearly two inches. The jaws have neat little swivel pad ends so they
work on angled surfaces. The spring tension is heavy enough to hold most stuff and light enough not to crush the balsa. The
square jaw pads also spread the load over a larger area. and they come in cool psychedelic colors that don’t get lost on your
workbench!
I've smeared some silicon rubber on some of mine so they grip better on slippery
surfaces.
They are a great find.
Return to "What's In This Issue?"
Molybdenum Disulfide Source
From: Rod Woolley rwoolley@sympatico.ca
I see in Ampeer that someone is looking for Molybdenum Disulfide to
lubricate motor gearboxes. Back in the days when I used to run a motorcycle, I remember there was a gearbox additive called
Molyslip G. It worked very well in this capacity, and resulted in silky smooth shifts. It was also very useful for lubricating
Bowden cables. It comes in a small plastic container and is a thick gooey black liquid. Moly does other products as well that
contain this excellent lubricant. I have seen it in recent years in stores that sell car accessories and parts.
Rod Woolley, OREO, Ottawa.
Return to "What's In This Issue?"
Starting Out
from: Howard Hilton hilton@moment.net
Hello Ken,
This is the second time I've written to you, in complete agreement. I'll just have
everyone that wants to know about getting into electric powered R/C aircraft read your article first, then we'll talk.
Our club is 90% wet with a lot of them dipping into electric gliders, (highly
recommend Aspire ARF w/7 cells) Rascals, and Zagis. They’re a great group of guys and will help anyone, anytime.
I was lucky enough to start out in 1988, with a Leisure Amptique, geared motor,
7-cell, 800 mAh packs, and small servos. 95% of my learning was self-taught, (3 Amptiques) before I found out about
washout in wing tips, it really cut down on "death spirals" for no reason and dropping off on one wing while
turning on final.
I haven't flown your other recommendations, but I am familiar with all but the
Cutie and would put them all ahead of the Amptique for first airplanes if for no other reason than durability, (survivability?)
Right now I am flying a Great Planes Spirit wing, little bit of dihedral, ailerons,
rudder, elevator, Astro 15g on 10 1250 mAh, 12x8 Master Airscrew folder, (durable) on my own fuse and tail. Really like it,
slowest rolls in the world but fun and a good glide ratio.
Take care.
I enjoy your site,
Howard Hilton
(Thanks for the kind words. I’ve flown a dozen or more Amptiques over
years, and never experienced the problems you’ve described, but I do know they can exist. All of the Amptiques I’ve
flown were built by others, and all worked very well as trainers. Again, having an instructor would have probably
helped quite a bit, but you made it, and that is the important part. Thanks so much for your input. KM)
Return to "What's In This Issue?"
February EFO Meeting
Oh Whatta Night!
Keith Shaw shows his newly recovered and repowered Bücker Jungmann. It’s beautiful, but also has a
unique personal history for Keith and myself. When it was powered by a ST .56, he flew it in pattern. There’s an interesting story here. Ask
us sometime.
The February EFO meeting was the largest ever with 23 folks attending the
meeting. It was a very interesting meeting with a lot information shared on many topics relating to eflight. Thanks to all of those
who attended and for putting up with the "cramped quarters". It was really good to see the increased interest in
electrically powered planes. Big to small, we had ‘em all.

John Lewis shows off his 20-cell Sig Somethin’ Extra. Hacker B50 11XL 5.2:1 with 18x12 APC thin
electric. Has an Ultimate BEC. Weighs 112 oz. Approx. 45 amp draw.
I still can’t believe that John Lewis drove up from Kansas City just for this
meeting. It was a real pleasure to meet John and his wife.
Roger Wilfong shows off his Estrellita, made from a John Fotiu JM GlasCraft kit. Glass fuselage with
foam wing and balsa tail surfaces.
Norm Dmuchowski shared his knowledge of Li-Poly batteries. I’ve asked Norm to
write up what he told us. He flies a lot of small models, for a long, long time using these batteries.

Joe Bileti shared several of his foam prototypes he’s built over the years.
Starting in April, we will be meeting at the Midwest R/C field on a weekend day, so
be sure to check the Ampeer for date and time. It will not necessarily be the first weekend of the month. Also, check with Ken
if the weather is iffy, as it may be called off for that day and changed to another.
Rick Sawicki shared his Tiny.
If you are in the area, or want to drive several hundred miles ( ;-) ), feel free to join
us.

Richard Utkan shared this flying tiny wing.
Upcoming March Meeting
The last indoor meeting for the year will be held at Ken’s house on March 6 at 7:30
p.m. If we need to get a larger meeting place, it will be in the fall, after the flying season.
Return to "What's In This Issue?"
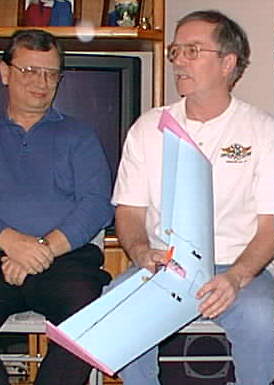
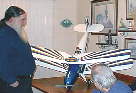
Rich Flinchbaugh’s Dreamboat
South Dennis, MA 02660
Rich scratch built this Dreamboat Flying Boat. It has a 42" wing span and is
powered by a MEGA ACn 16/15/5 brushless motor with a 7x4 prop. I uses a Castle Creations Phoenix 25 Brushless Sensorless
Speed Control and 8 Sanyo AR 4/5 AUP NiMH 1700 mAh cells. It has a flying weight of 34.5 ounces and a wing loading of
17.3 oz./sq.ft. It is already for Spring’s Flying Season!

Stephen Carella, age 12, holds Rich’s Dreamboat. Rich hopes that his grandson will be a great R/C
modeler too.
Return to "What's In This Issue?"
NIRAC
(NATIONAL INDOOR REMOTE-CONTROLLED AIRCRAFT COUNCIL)
COMPETITION NOTICE
FIRST ANNUAL INDOOR R/C CHAMPIONSHIP
DATES: Saturday May 31, 2003
And Sunday, June 1, 2003
Location: Oakland Yard, Waterford, Michigan
(approx. 100 miles north of Toledo, northwest of Detroit and just east of the Pontiac
International Airport)
Facility Size: 240 X 300 feet, with an 82 feet ceiling
Contest Director: Dave Robelen @ aplusfarm@hovac.com
Events: 6 events planned, with trophies to third place
An overall high point Championship Award
Individual Event rules and a registration form can be found on the NIRAC website:
www.nirac.org
Hobby Vendors will be selling on-site
Information on local lodging and a Saturday night banquet can be
obtained from John Worth @ johnworth@cox.net
General information available from NIRAC President
Bob Wilder @ rjwmaw5@attbi.com
And NIRAC Vice President
Bob Aberle @ baberle@optonline.net
Pre-Registration is recommended!
Return to "What's In This Issue?"
Astro 803V - Being Fair to Tower Hobbies
From: Charles Todd hce@cogeco.ca
Dear Ken,
Sir, I don't think you are being quite fair to Tower Hobbies when describing their
customer service upon the "803V" problem.
The Tower site declared the motor which they had in stock as the "old"
sensor version, but you chose to ignore that. It seemed that you assumed the "803V" Astro designation covered only
the sensorless version. This is not so.
My own Astro 803V is sensorless, ordered about the same time as yours, but it
says "803V Sensorless Motor/ w control" on the Astro box! Even the manufacturer doesn't get it right! At various
times Astro has offered sensored and sensorless versions of this motor.
Please don't spoil your wonderful website with slanted vendettas against a retailer
trying their best! It sounds to me like they were liberal in their interpretation of your problem - they could have said "You
ordered the sensored at that price, you keep it!" They didn't, and I think that you do them a disservice in posting such
negative comments.
That aside, keep up the great site, there are such sound ideas there to promote our
wonderful fascination with flight. I agree wholeheartedly with your comments regarding the "right" motivation for this
hobby, long may that philosophy prevail. Mother Nature and Gravity have a way of ensuring that it be so!
Regards
Charles Todd
Canada
My response to Charles follows:
Hi Charles,
Thanks for sharing your thoughts about the 803V problem. I honestly didn't
try to slant it at all, and in response, I'll be happy to print yours, and anyone else's, thoughts and ideas on the topic. I
thought that I quite clearly explained that the Tower Hobbies Web site part description was 803V, but that the text
description was for the 802. I'll be sure to clear that up. The box I received was for the 802. I was only, and I mean
only, trying to point out that when part numbers and descriptions don't match, it is difficult to place an accurate order
on the Web. I was sure that I pointed out that they exchanged it for the correct one. As you point out, I do try to be
absolutely fair and equal to everyone and everything on our site, which I hope makes for a better resource than the
magazines where the review and ad appear on the same or facing pages!
Thanks again,
Ken
Not in my response to Charles:
Tower is a great resource for all of us modelers. I use Tower Hobbies for
purchases and have always been satisfied with their customer service. I hope that I did not indicate that I was
unsatisfied. I only wished that someone had dropped me an email and let me know what was happening. Thanks for
"keeping me honest", Charles! I’ll try to be as careful and impartial as I possibly can to keep our great
hobby moving forward.
Return to "What's In This Issue?"
Receivers, Air Hogs motors & More
From: Cawley, Bernard bernard.e.cawley@boeing.com
Ken,
I see my Tiny-X is in there (Feb. Ampeer)...... I am having a ball with that
airplane, but I should send you another picture now that it has some graphics on it (from Vinyl Graphics by Greg as always).
Besides the cul-de-sac we in the Seattle area now have access to a big hangar on
a regular basis for indoor flying on Thursday nights. A new club has formed for this purpose, which Ben Almojuela has dubbed
the Barn Owls. Plenty of room in there (86000 sq. ft) for Tiny-X and more though the ceiling height isn't what one would expect
for the floor area. Some info here: groups.msn.com/BarnOwls/
On receiver weights. I finally weighed a bunch of them and posted the info on the
Ezone. Here is my latest thread which has a link to the earlier one (that was triggered by the 0.4 ounce M5).
www.rcgroups.com/forums/showthread.php?s=&threadid=88830
(We weighed David’s M5 and my Extreme 5 at the February EFO
meeting. I don’t have the most accurate scale, but it is digital and reasonable. Both weighed 0.4 ounces, but the M5
was a couple of grams lighter when we weighed them in grams. Let me make it perfectly clear that there is nothing
wrong at all with the M5. All the reports I’ve had from folks in the club are very positive. They are thrilled with its
performance in the Oakland Yard’s crowded environment. It is an excellent receiver, with just a small discrepancy in
the weight as posted by the manufacturer. Posting the weights in grams would probably be more accurate. It‘s not a big
deal. M5 or Extreme 5, you should be very pleased with the functioning of your receiver. KM)
I'm looking forward to seeing if this new Plantraco four channel that has a
license-build Sirius GFS! speed control in it lives up to the hype. If so, it's going to be a dynamite value. I also am very much
looking forward to flying the new little Berg 4. At a quarter ounce for a full range receiver, it looks almost unbeatable (except
that there's no positive shift version).
As for the motors from the Air Hogs Intruder - these are suitable for RFFS-100
controlled micro flyers that run on one 145 mAh Li-poly cell. See Bob Selman's site and also Dan Hurd's, among others. I have a
tiny version of the Idealair Elf-1 that will be so powered when I get it finished.....24 inch span, expected all up weight a little over
an ounce.
There is, of course, the Wright Flyer designed by Pat Tritle in Albuquerque and
kitted by Dare. www.darehobby.com/Wright_Flyer.htm
Bernard
Return to "What's In This Issue?"
R/C Photography
From: Kent Williby kwilliby@yahoo.com
Ken,
I see in your February newsletter you talk about using the pencam and mustek
cameras for aerial photography . I have been playing around with the Pencam 1.3 camera and it is a blast! I have found that an
electric sailplane is a perfect fit for taking pictures. I launch my GP Spectra up to about 700', shut off the motor and take some
great pictures! With no motor vibration and very high altitude you can get some great shots. Some of my pictures are posted at
www.geocities.com/kwilliby . These are some of my first pictures and quality isn't perfect but I'm getting better with practice.
There is a ton of info on ezonemag.com and I would be happy to share any information I have with anyone interested.
Regards,
Kent Williby
Return to "What's In This Issue?"
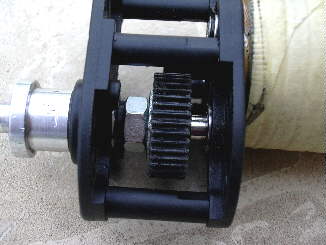
GD600 Gearbox Repair
From: Robert Comerford flyelectric@dodo.com.au
Hi Ken,
I recently purchased a GD600 gearbox. I was happy with the unit. It ran very
smoothly and quietly and tests showed it to be efficient. Running at 200 + watts input the first gear ran well for several flights
until a prop strike on a touch and go into a horse hoof hole broke the driven gear. The next two replacement gears lasted about 3
and 1 flights respectively. I could not find any reason for this. I, at one stage, suspected a frame warp of the gearbox in dynamic
conditions, but I am fairly satisfied it is strong enough at this and perhaps greater power levels. This leads me to believe the
driven gear material is simply too hard and subject to breakage when throttling up or down (I don't have the brake engaged - it is
in a sports model not a glider). If I am correct I hope the manufacturer fixes the problem.
I never had such problems in years of using the old Leisure gearboxes. This brings
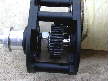
me to a solution I am trying and may be of use to others. I still had an old 38 tooth Leisure gear. I removed the GD600 driven
gear, and punched out the drive shaft in a vice. The gear shattered easily. I pressed the old Leisure gear onto the GD600 shaft to
line up over the 'ears' on the shaft. I superglued the rear ballrace into the back housing and made a spacer from a suitable nut
and washer to keep the gear central and reused the plastic thrust washer to run up against the front ball race. The photo shows
the assembly.
I did think of epoxying the gear onto the shaft but tests so far have not proved it
unnecessary. Once again this is a recent event without long term trial but may help someone. Long term tests may reveal a flaw,
but if someone has the necessary parts this fix may be of some use. On my motor this was only suitable to achieve a 2.5:1
reduction, not enough movement to make use of the small pinion for the 3.8:1. Of course every grubscrew was locked with paint
and the prop holder has a spring washer added to stop propellers floating off in the air. Most silencers on IC motors seem to
remove themselves also due to lack of a spring washer or two. Spring washers must be so expensive!! Hope this is of use to
someone. Also if someone tries this and has a failure let us know. There may be something to learn.
regards
Bob Comerford
Glen Innes, Australia
My response to Robert follows:
Hi Robert,
It seems odd that the first driven gear lasted several flights until the prop
strike and the two replacements only lasted 1 and 3 flights. I too wonder if it might be a "materials" problem.
It sure sounds like it, especially if the Leisure driven gear is holding up well in the same unit "frame", as that
would indicate that there isn't a problem with the "frame" itself.
Many, many, years ago, (1988) there was a supplier that imported gear-drive
units into the US for several years. They worked but were vulnerable to prop strikes and would break just by touching
the prop to the ground slightly. That unit is no longer available here. I wonder how many others have seen this failure
with a unit like you've been using? I'll ask that question in the Ampeer. Maybe, if there are more reported failures of
the driven gear in this unit, we can help out the supplier by letting them know about the problem.
Sincerely,
Ken
Since I wrote to Robert, I found more information on this unit. If you’d like to
read other’s comments on this unit, visit the e-Zone magazine at
www.ezonemag.com and join the discussion forum. You’ll find a link on the
homepage, in the left column listed "discussion". After joining the forum, use the Search feature for the
following threads:
E3D + GD-600
Mounting an Endo with a GD-600 GB?
GD600 or Astro 3.5:1
gd600 problem
Best 30-40 amp ESC?
Return to "What's In This Issue?"
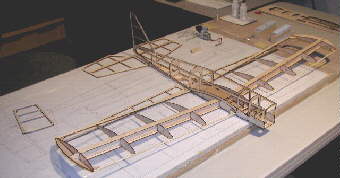
Switchback Framing
From: Michael Pad michaelpad@comcast.net
Hi Ken,
Got my Switchback and I am enjoying the building process. Just taking my time, it is
my first balsa kit. look forward to flying it with you. Should be ready to cover soon.
Michael
Return to "What's In This Issue?"
To Reach Ken Myers, you can land mail to the address at the top of the page. My E-mail
address is:
KMyersEFO@aol.com
EFO WEBsite: http://members.aol.com/KMyersEFO/
|
|