September 2006 Ampeer Correction
Keith Clark, one of the original EFO members, gave me a call recently and let me know that I had made a major mistake in the article "Using Relatively Inexpensive Li-Po Batteries with Typical Mid-size Sport and Sport Scale Planes". On page 3, the second paragraph in the section "Static Testing Your Power System" I stated incorrectly,
"Attach the "load" lead of the Whattmeter to the ESC input lead. The ESC output leads should have been already attached/connected to the motor leads. Turn on the transmitter and then the onboard radio battery. Be sure the throttle stick is in the off position. Plug the charged Li-Po battery into the "source" lead of the Whattmeter."
The incorrect statements are shown in italics above. They are reversed. To find out why this is so, please check the Astro Flight site for the directions to the current version of the Whattmeter.
www.astroflight.com/store/pdffiles/101N.pdf
I have changed the .pdf and html files online for the September 2006 issue.
That part of the paragraph now reads:
"Plug the charged Li-Po battery into the "source" lead of the Whattmeter. The ESC output leads should have been already attached/connected to the motor leads. Turn on the transmitter and then the onboard radio battery. Be sure the throttle stick is in the off position. Attach the "load" lead of the Whattmeter to the ESC input lead."
If you print the Ampeer, you may want to reprint page 3 with the correction.
Thanks Keith. That was a very good catch. Much appreciated!
The Official Mid-Am Birth Date
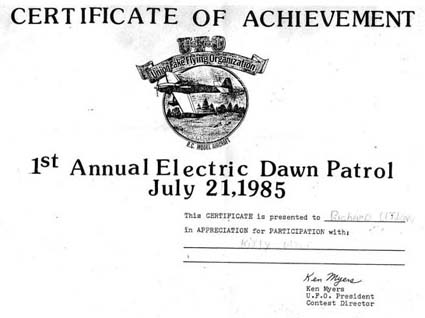
Richard Utkan, EFO V.P., brought the certificate that he earned at the first "Mid-Am" to the PMAC meet in August.
The original meet was sponsored by the Union Lake Flying Organization (UFO) the precursor of the EFO. That gathering was known as the "1st Annual Electric Dawn Patrol". The date can be seen as July 21, 1985. Little did we know at that time there would be twenty more of those meets!
Mid-Am Report Correction
In the August issue of the Ampeer I misspelled Ann Arbor Falcon's member C.J. Wysocki's name. Sorry C.J. I have corrected the August 2006 issues.
Return to "What's In This Issue?"
To Li-Po or Not to Li-Po, That is the Question
EFO and Midwest member Jim Cross made a comment about Li-Po batteries in a recent email. As I was typing up my response to him I thought that it might be a good idea to share my thoughts with the Ampeer readers. I had also recently had a phone conversation with Rich Flinchbaugh, Ampeer reader, about the A123 cells, so I thought the interest was there. KM
JC: "How are your new Skyshark Li-Po batteries holding up? Bill is seriously considering some for his Porterfield I think."
I can say without doubt that the Skyshark RC 3S 2100mAh is doing very well. The 4S 4000mAh #1, that was physically injured in the first crash of the Low-Stik, continues to require constant maintenance and vigilance but it is still useful. The 4S 4000mAh #2 may have been injured in the wipeout of the Low-Stick but is showing little degradation.
I believe that I have become quite disillusioned with Li-Po batteries because they are so fragile. I am very seriously considering the Milwaukee V28 E-moli cells. They have the same characteristics as the Li-Po cells and can be charged on the same type charger. They have a capacity of about 2800mAh. On average, I have been only using 3000mAh from the 4000mAh Skyshark packs before recharging, so that is not significant. The C rating of the E-moli is plenty good for my usage. They are in a metal can and weigh a little more. To replace my 4S 4000mAh Li-Po battery with a 4S E-moli battery would be an additional 2 ounces in weight. I don't feel that that is significant on the size planes I would use them in. The metal can means they are more resistant to crash damage. They also do not burst into flames. Those are a couple of benefits that I believe are worth the slight weight penalty.
Here is a link to a site where a guy sells pre-made packs so that you don't have to buy the Milwaukee V28 packs, tear them apart (there are seven inside) and solder them up. www.bigerc.com. I know absolutely nothing about him, whether he is reliable, or if he can actually deliver as promised or who he is. I just know that I ran across his posts on RC Groups. The prices aren't bad.
According to what I have read, E-moli cells don't seem to need as much "balancing" as Li-Po batteries either, but they can be purchased with taps. That's not a bad idea.
There voltage is about the same as a Li-Po cell both for charging and under load.
There seems to be a lot of press recently on the DeWalt (M1)/A123 cells. At this time, I see no advantage to them, but hey, I've certainly been wrong in the past. They require charging to 3.6v per cell instead of the 4.2v of a Li-Po or E-moli. They also have lower voltage per cell resting and under load than Li-Po or E-moli batteries. Therefore more M1 cells are needed in series to produce the same voltage. They have a capacity of about 2200mAh. Sid Kaufman, (ElectriCalc), likes them. You can check out his article at slkelectronics.com/DeWalt/index.htm
I have also read that Pete Peterson, of Model Electronics Corp., has power tubes for both the E-moli and M1 cells. They are not on his Web site yet, but I am told that a phone call or email can get those folks who don't like soldering some power tubes for them.
For comparison, the M1/A123 cell has a diameter of 26mm (~1 in.) and length of 66.5mm (2.62 in.) and weighs 72g (2.54 oz.). The E-moli has a diameter of 26mm (~1 in.) and length of 70mm (2.76 in.) and weighs 100g (3.53 oz.). The Sanyo HR2600SC NiMH, chosen for like capacity, has a diameter of 22.35mm (0.88 in.) and length of 42.93mm (1.69 in.) and weighs 62.34g (2.2 oz.). Of course they all have different voltages, so that must be taken into consideration.
According to tests I have seen, the M1/A123 cell delivers about 2.6 volts per cell at 33 amps, the amp draw I am interested in. The E-moli about 3.25v per cell at 33 amps. My Skyshark 4000mAh about 3.3v per cell at 33 amps. The Sanyo NiMH about 1.1v per cell at 33 amps.
Keep in mind that all of these numbers are optimistic, and based on a 33-amp draw.
9 Sanyo HR2600SC NiMH = 9.9v 561g (19.8 oz.) $39.15 cheapbatterypacks.com, 4 M1 = 10.4v 288g (10.2 oz.) $64.00 Kaufman said about $16/cell, 3 E-moli = 9.75v 300g (10.6 oz.) $54.95 bigerc.com, or 3 Skyshark RC 4000mAh Li-Po = 9.9v 265g (9.3 oz.) $69.95 Skyshark RC.
If I had to do it over again, I would go with Milwaukee V28 E-moli cells for my big planes, not Li-Po batteries.
On the other hand, I am not at all sorry for starting out with the Skyshark RC Li-Po batteries. They are produced to do the job I've asked of them at a price I could/can afford. Their quality or usefulness to me is not an issue. If I were to use more Li-Po batteries, I certainly would continue to use the Skyshark RC and True RC brands.
Ken
Return to "What's In This Issue"
New From SLK Electronics (Sid Kaufman)
By the time that you read this, the MM7 from SLK Electronics should be available. The MM7 is a Multi-cell Monitor - up to 7S (MM7) for use with Lithium packs having a connector to access individual cells. The MM7 is designed to monitor individual cells during flight and cut the throttle when any cell reaches a preset voltage. The MM7 has many features such as Li-Po and M1 cell programmability, a simple setup, works with 2S to 7S packs, plugs directly into most pack tap connectors, and optical isolation. The device protects each cell from over discharge. The MM7 is available with 0.1" connector or 2 mm Connector or both types of connectors.
More information is available at slkelectronics.com/MM7/index.htm.
Sid has also upgraded his LiPoDapter. The LiPoDapter can be used with many of the older NiCad/NiMH chargers to charge Li-Po batteries. The new unit can charge 2S-8S Li-Po packs or 2S-10S DeWalt M1/A123 packs. The new unit can charge up to ten M1 or eight Li-Po cells. It can handle up to 8 amps to charge 8AH Li-Po packs in an hour or M1 packs in less than twenty minutes if your charger is capable of putting out 8 amps.
There is also a Dual LiPoDapter that will charge two packs at once. It is especially handy for a 2P pack. The Dual LiPoDapter can also charge M1 cells. It is limited to 6 cells per side but is rated for up to 8 amps. You can charge two 6-cell M1 packs in twenty minutes with an Astro 112 Deluxe or twenty-five minutes with a 112D.
More information is available at slkelectronics.com/lipodapter/index.htm.
Return to "What's In This Issue"
Sportsman Aviation Ryan STA 40 ARF
By Ken Myers
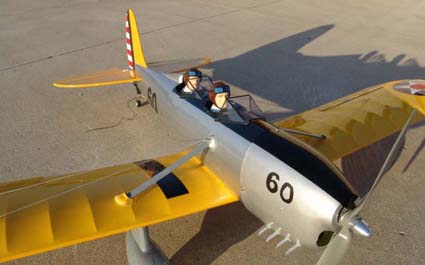
I am not an ARF assembler having only done three in my whole RC life. Because of the early demise of my Low-Stik, I wanted a new plane quickly to get my power system back in the air. I hate to see Li-Po batteries just sitting around "aging."
After figuring out that the information on the Hobby People Web site was wrong for this plane, I went ahead and ordered the Sports Aviation Ryan STA 40 ARF for $129.99. (www.hobbypeople.net/gallery/127598.asp)
I decided to do a build thread on the RC Groups Web site for the Ryan. All of the down and dirty details are there with a lot of photos. (www.rcgroups.com/forums/showthread.php?t=557165) I pointed you to that thread last month.
The Data:
The Plane
Plane: Sportsman Aviation Ryan STA Almost Ready-To-Fly (or in this case, Almost Ready to Fix!)
Supplier: Hobby People
Importer: Global Hobby
Type: Sport Scale
Building Skill Level: advanced to expert
Flying Skill Level: advanced to expert
Approximate scale: 1:6.23 (based on wing area)
Wing area: 460 sq.in. (measured)
Wingspan: 56.625 in. (1438mm) (measured)
Length: 37.75 in. (95.9cm) (measured)
Ready to Fly Weight: 71 oz., 4.44 lb., (2015g or 2Kg)
Wing Loading: 22.2 oz./sq.ft.
Cubic Wing Loading: 12.44 oz./cu.ft. (On the heavy end of my acceptable, which is 13 oz./cu.ft. for this type of model)
Prop: APC 12x6E
*Amps: 32.6
*Volts: 13.70
*Watts in: 447
Watts in per pound: 100.7
*Wide Open Throttle RPM: 8550 (rounded up ever so slightly)
Prop Pitch Speed: 49 mph
Completed Airframe weight: 37.41 oz. (1060.6g) � 52.6% of RTF weight
Power system weight: 24.99 oz. (708.4) � 35.2% of RTF weight
Onboard radio system weight: 8.68 oz. (246g) � 12.2% of RTF weight
Flying area required: RC Club Field
*Data gathered using Hyperion Emeter, components used in test; Skyshark 4S1P 4000mAh Li-Po battery, TowerPro 60-amp ESC, TowerPro 3520-7 (really -6), APC 12x6E thin electric prop.
Croswell, MI 736 ft./224.3m,
Ambient Temperature: 73F/23C, Barometric Pressure: 29.92 in./1013.2mb rising, Dew Point: 63F/17C, Humidity: 71%
5 data points were captured approximately 5 seconds apart near the beginning of the pack use and the numbers represent the average of the five data points.
The Power System:
Battery: Skyshark RC 4 Cell 4000mAh Li-Poly (www.skysharkrc.com/shop/?shop=1&cat=24) $84.95 with delivery and taps, mfg. given weight 12.4 oz. (351.5g)
Measured weight including 2 Anderson Power Pole connectors, Velcro and pull string - 12.7 oz. (359.2g)
Motor:
TowerPro 3520-7 brushless motor/w wire and 3 connectors (APP), measured weight: 9.0 oz. (255g)
Backmount w/screws, measured weight: 0.44 oz. (12.6g)
Prop adapter, washer & 2 nuts, measured weight: 0.89 oz. (25.2g)
APC 12x6E prop, measured weight: 0.81 oz. (23.0g) - Reamed to 8mm and balanced with clear packing tape on the rear side of the light prop blade.
4 mounting bolts, nuts and standoffs, measured weight: 0.6 oz. (17g)
Motor Total: 11.74 oz. (332.8g) w/APC 12x6E
Other: Make/break connector, 4 APP connectors and wire, measured weight: 0.59 oz. (16.6g)
Power System Total: 24.99 oz. (708.4g) w/APC 12x6E
The Onboard Radio Components:
Electronic Speed Control: TowerPro 60A w/5 APP connectors, measured weight: 1.41 oz. (40g)
There is absolutely nothing to recommend this ESC except that it is really cheap. I am only using it because I have it. Do NOT get one!
Receiver: FMA Extreme 5 w/antenna & small strain relief made from servo arm end, measured weight: 0.46 oz. (13.1g) (the Extreme 5 is out of production so I now recommend the FMA M5v2)
Receiver Battery: SR Batteries (http://srbatteries.com/rxpks.htm) 500H Series, 4 Cell Pack, mfg weight: 2.1 oz. (59.5g), measured weight with lead/connector & Velcro: 2.3 oz. (65.3g)
Switch: Horizon Hobby Expert Standard Switch w/Charge Cord, measured weight: 0.38 oz. (10.8g)
Cirrus 12" "Y" harness: 7.2g
Generic 5" servo extension with red wire clipped for ESC measured weight: 2.8g
Servos:
Hitec HS-225 (elevator): measured weight with arm/screw, grommets & brass collets and 4 mounting screws: 1.21 oz. (34.2g)
Hitec HS-81 (rudder): measured weight with arm/screw, grommets & brass collets and 2 mounting screws: 0.64 oz. (18.2g)
Hitec HS-85BB (aileron): measured weight with arm/screw, grommets & brass collets and 2 mounting screws & Horizon Hobby Expert Electronics 12" servo extension Standard, measured weight: 0.91 oz. (25.8g)
Hitec HS-85MG BB (aileron): measured weight with arm/screw, grommets & brass collets and 2 mounting screws & Horizon Hobby Expert Electronics 12" servo extension Standard, measured weight: 1.00 oz. (28.6g)
Total measured weight: 8.68 oz. (246g)
A Hitec Eclipse 7 is the transmitter.
Flying the Ryan YPT-16
The maiden flight took place at the Midwest RC Society 5 Mile Rd. flying field located near Plymouth, MI, in the late morning of August 26, 2006. The sky was totally overcast, as it had been raining not too long before I arrived at the field at about 10:00 a.m. The temperature was in the high 70-degrees F. The wind was approximately 10 mph mostly from the south and southeast. The runway is orientated basically east to west. Therefore, it was pretty much a crosswind. The humidity was quite high.
I stood behind the plane for takeoff to get a good view of the tracking. As it started its takeoff roll, I corrected with right rudder. I let the plane build up speed on the ground and used the elevator carefully to lift it gently into the air.
It took a lot of trimming to get it to fly "hands off." I had to put in what I thought was an excessive amount of right aileron and right rudder. Up trim was also added to the elevator. Once the plane was trimmed out, I gained more altitude, slowed it down and checked the stall characteristics. There didn't seem to be any. The nose just dropped.
I made several passes lining up on the field to practice landing. The one thing I did notice was that none of the "turning" controls, aileron and rudder, are very effective at slow speed. It reminds me of the original Sig Kadet when ailerons were added to it.
I did one loop. It was okay, but I was not impressed with its size. The size of loop is one of my criteria for judging how well an airplane flies. Since I had flown my Fusion sport plane first, which is capable of performing any size loop I want, the Ryan's loop seemed "small" by comparison.
I did one roll and it made my stomach jump. It rolled extremely slowly to the inverted and then "flopped" extremely quickly around from the inverted state back to upright flight.
At the five-minute mark of the flight, my timer started to beep, and I lined up for a landing. I didn't want to over fly the pack, as it was the same pack that I had used to collect the motor data earlier in the week. It was not one of my best landings, but everything had survived, including the pilot on the ground.
The post flight physical inspection showed that the elevator was approximately level with the horizontal stab, so it may have been set a little low and I hadn't noticed it. There was a large amount of right rudder and right aileron showing in those surfaces from the trimming.
Three more flights were flown on the very rough field. Several more loops were completed, inverted flight, more "scary" rolls and stall turns. I felt that the stall turns were not as "tall" as I expected before running out of power.
The plane did not have the speed that I had anticipated in straight-line flight. With its wing braces and rigging wires, it must have more drag than I thought. Inverted flight did not require a great mount of elevator pressure.
The folks at the field, and there were quite a few, both electric and glow fliers, thought that it flew "very well", to quote them. They also commented on how "nice looking" it was on the ground and in the air.
As the pilot/assembler I had a little different perspective. It is certainly not as good as I want it to be.
Unfortunately, I did NOT perform the MOST IMPORTANT flight test. That test is the dive test to check the center of gravity! Dang. After talking with Keith about some of the flight characteristics, we concluded that it might be a bit nose heavy. The C.G. is set up at 2.75 in. from the leading edge at the moment.
All and all this seems to be a pleasant plane to fly, and it does look good in the air. So far, it seems worth the effort, if not the price of the kit.
EFO member, Paul Sockow took the stills I have on RC Groups.
EFO member, Dave Stacer shot and edited some video. You can find it here: RyanSTA.wmv
Getting the plane into better trim.
On August 28 I made the following adjustments.
Thrust Adjustment: I carefully checked the motor thrust using the string method, yardstick method and a building triangle. There was no thrust offset detected either left or right. I added 1mm thick washers between the motor mount and standoff spacers to give a little right thrust.
The triangle, placed against the firewall, indicated there was some down thrust, although I did not measure it in degrees. I also added a sandpaper disk to the prop adapter plate to make tightening the prop easier.
Excessive Right Trim Adjustment: First I used a Robart Incidence meter on each wing panel near the root and tip to determine if I had inadvertently ironed a twist into the wing when putting on the new bottom covering and tightening the top covering. I measured, measured and measured again, over and over, and I could find no twist in either panel.
Next, I checked the lateral balance and added 7g of weight to the right wing tip. Hardly much at all, and probably not the major cause of the excessive right trim need to fly the plane level.
Finally, I found the left elevator half to be 3/16" higher than the right elevator half. This may very well be the major cause for the excessive right trim.
The elevator halves were very, very carefully adjusted so that the transmitter trim could be set back to neutral.
The rudder cables were tightened and the rudder adjusted so that the trim on the transmitter could be set to neutral.
Poor Roll adjustment: Differential was added to the ailerons and the throw increased to try and get a better roll rate. The recommended 3/8" up and down produced an EXTREMELY slow roll to inverted and quick roll out of the inverted. The throws are now 5/8" up and 3/8" down on the ailerons.
I double checked the static center of gravity and found it to be 2.75" back from the leading edge, which is what I had set it at when balancing the plane originally. I need to do the flying/diving CG check. That is the only good way to know if the CG is correct.
Closing the gaps: Since I had the time before the next flying session, I decided to seal the small aileron and elevator hinge gaps with some yellow iron on TowerKote covering. All of the planes I fly use "S" shaped "Monokote" type hinges that are, by the way they are made, gapless. While I thought I did a pretty good job installing the CA type hinges that came in the kit, I decided that gapless certainly couldn't hurt.
Flying After the Adjustments
September 2, 2006 - Flights 5 - 9
When I arrived at the field at about 9:30, the temperature was in the mid-60 degree range. The winds were out of the east at 10 mph to 15 mph. Not the best day for trimming a plane, but since I had set the CWL for this kind of flying, it worked out just fine! Keith arrived about 10 and set up his planes, and then he took up the Ryan.
Keith took it up for the first few minutes of the initial "re-trim" flight. It only took a bit of tweaking and it was flying as well as it can fly, especially considering the pilot. Geese, am I lucky to have him for my "test" pilot. I took over about 2/3 of the way through the flight and made the landing, and yes, it was flying better than compared to a week ago.
Upon landing, Keith noticed I still had the left elevator half up slightly and that just a touch of right aileron correction had been trimmed in (WAY better than last week!), so I took the clevis in one turn and all was sort of well. While looking closely at the horizontal stab we noticed a small twist on the left side of the stab near the tip, also the left elevator half has a "bow" on the edge near the rudder.
All flights were fine now and the rolls are GREATLY improved with the differential I had added to the ailerons. The CG is in the proper place and no equipment was moved.
Takeoffs and landings are this plane's strong suit. They are absolute child's play. It flies okay and looks good in the air. I am satisfied that I have it flying as good as it can now.
I did not fly with the pilot busts on this day, as they had just arrived up in Croswell.
Moving from the APC 11x8.5E, as flown on the maiden flights, to the APC 12x6E was an excellent choice.
The Good, the Bad and the NASTY!
The Good:
1.) 3-inch wheels for good grass field operation.
2.) A decent cowl.
3.) The finished model has a pleasing, somewhat scale-like appearance when completed.
4.) The graphics are already applied.
5.) The covering job was, overall, quite good.
6.) The airframe weight is somewhat reasonable for this size glow plane, but still heavy by electric standards.
The Bad and the Nasty:
1.) It has possibly the worst possible wing structure design. In Keith Shaw's "Building and Flying Electric Sport Scale" he states:
"... Many designers put just a spar on the bottom. That doesn't make sense; it should be on the top. One of the worst designs is:

It's probably the weakest wing design. Putting the spar on top helps a little, but not much. Using a top and bottom spar with shear webs and making an "I" beam jumps the strength by a factor of 10 at least. The shear webs are really important.
Even light 1/16" balsa will work wonders. Make sure that the grain is vertical. It's harder to cut, but they are stronger."
With the possibility of catastrophic wing failure, this plane is really unacceptable. (To see how I tried to fix this problem, check the online build. KM)
2.) The supplier and importer provide incorrect information about this plane. The wing area is almost 10% less than stated in the manual. That means that their published wing loadings are incorrect as well and should have been 18.9 oz./sq.ft. to 21.3 oz./sq.ft. based on their given RTF weights This is not a huge deal, but shouldn't happen. The 288 sq.in. given on both the Hobby People and Global sites is totally inaccurate.
3.) There are several discrepancies between the parts provided in the kit and the parts pictured and noted in the manual.
4.) There are extra parts in the kit, like the black axle "spacers", which were not noted in the manual and they wouldn't have worked even if I had guessed correctly at what their purpose might be.
5.) The landing gear blocks are not wide enough for the provided landing gear straps.
6.) The original wheel fairing/spat attachment is flimsy and the spat covers too much of the wheel for good grass field operation.
7.) The wing brace attachment is a problem as it inhibits easy wing removal.
8.) The way the rigging wires are to be done, according to the construction manual, leaves a lot to be desired.
9.) The elevator pushrod exits were not located in the correct place on the fuselage in my kit.
10.) The provided windscreen is the wrong style for this plane. It should be "rounded", not "squared."
11.) The molded plastic parts, cockpit inserts, fuselage fairing and wing brace fairings are not molded in their appropriate colors. They are painted. When trimmed, they require painting of the "raw" edges so that the white of the molded part is not visible. The white really stands out against the black of the cockpit inserts.
12.) It has a balsa dowel wing leading edge. A birch dowel would be better or a carbon fiber tube.
13.) The wing needed a lot of tightening with a heat gun to add some rigidity to it, even after I "beefed up" the spar.
14.) There was an excessive amount of time to do tasks that should have been easy and quick like screwing on the landing gear, installing the elevator pushrod and the rudder pull-pull rudder system. It was not the "quick" assembly that I had hoped for.
15.) The butted plywood for the center ribs, used to mount the leading edge of the wing to the fuselage, is prone to breakage. I leaned this on my Stik from the same company.
16.) There is only one wing hold down bolt when two would be much better.
17.) The slot for the horizontal stabilizer was approximately 3/16" too long leaving a gap between the horizontal stab and fuselage.
I was very disappointed in the amount of time it took to assemble this ARF, which was well over 60 hours. I was extremely disappointed to find out that I purchased a plane with a built-in possibility of catastrophic wing failure, especially since I will be carrying Li-Po batteries onboard.
Return to "What's In This Issue"
Brushless Motor for a Sig LT-25
From: Dennis Kordes

Image from Sig Manufacturing Web Site sigmfg.com
Ken,
Thanks again for providing Bob Kopski a place to propose and present his ideas for Electric Power. Model Aviation magazine has not been the same since Bob's column is no longer in it. Please encourage Bob to present his Amp Hour Detect circuit. I greatly enjoy using his ideas and projects.
And thanks to you for your very detailed article on using Li-Pos for Sport Planes. However, interestingly enough, it was your "Safety Warning" at the end of your article that had the most meaning to me. It fits me exactly, and so I will continue to use my NiCads, which serve me quite well.
If I could impose on you briefly, I would welcome your suggestion on how to upgrade my LT-25, which flies on 12 2000mah NiCads, with a geared Astro 15, using either 11x7 or 12x6 props. It flies nicely, but I wish it had a little better vertical performance, although I am a very cautious flyer.
I can easily put 14 2400 NiCads or 3000 NiMH Cells in it, but cannot seem to determine which brushless motor and ESC Combo might be my best purchase. If you could give me your recommendation regarding that, I would very much appreciate it.
Sincerely,
Dennis Kordes
CrossWinds RC club
Centennial CO
Ken's suggestions:
It is always hard to determine which motor is the "best" purchase for any given application. That is part of the electric motor problem. There are so many very good motors to choose from that will work and work well. That is why, when I wrote my guidelines in the September 2006 Ampeer, I limited the motor selection.
I can certainly understand your reluctance to use Li-Po batteries. I was/am exactly the same way! However, I believe if you've checked out the information about the other lithium battery choices in this issue, you just might want to consider them, as these are very well suited for use in this application!
You obviously have a charger that is capable of handling a good number of NiCad or NiMH cells, therefore you would only need the LiPoDapter from Sid Kaufman for $39.95 to be able to charge the E-moli cells, which is what I am recommending. (slkelectronics.com/lipodapter/index.htm)
Using my recommendations from last month's article, you would select a the 6S recommendation by wing area, but you have indicated that you are only interested in a small increase in performance and a little better vertical, so the 5S suggestion would do.
I like the Hyperion brand of motors, so I do not hesitate recommending them. The one I recommended in the article last month is an outrunner, so you will need to modify your motor mounting. If the original firewall is still there, you can use a standoff mounting system like I used for the Ryan YPT-16 in this issue, although I would recommend 8-32 machine screws and blind nuts. They, and the standoffs, can be purchased from Hobby Lobby if you can't find what you need at the local hardware or home improvement center. (www.hobby-lobby.com/motormt.htm)
The Hyperion Z4020-14 and Hyperion Titan 50A HI-PRO Brushless ESC OPTO are available from www.allerc.com as a combo for $166.42 plus shipping. You will also need to purchase one of the types of mounts while you are ordering from them.
You can get a 5S e-moli pack from www.bigerc.com made up for $89.95 plus shipping and it includes taps. It will weigh a little over 500g (17.6 oz.) compared to the approximately 910g (32 oz.) of a 16-cell Ni-xx type pack that it would replace. Fitting and balancing the e-moli pack should not be a problem in the large LT-25 fuselage.
The Sig LT-25 does not need the pitch speed indicated by the props I suggest in the article. I am guessing that your elevation is somewhere around 5000 ft. An APC 13x6.5E should be about right and draw right around 30 amps. You should try and prop the system as I recommended in the September article, so you might have to play with props a bit.
If you decide to go the e-moli route, you will want to add the Astro Flight Blinky to your gear as well.
If you decide to stay with Ni-xx chemistry, a 16-cell pack would not hurt the performance on this particular plane, and is what I would recommend. I have been purchasing my Ni-xx cells at www.cheapbatterypacks.com and have been very satisfied with their service and reasonable shipping rate.
Have fun and let us know what you did and how it turned out.
Return to "What's In This Issue"
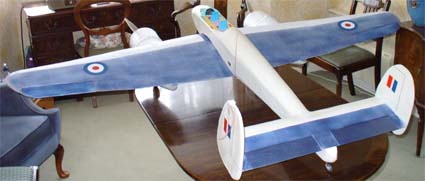
Bristol "Brigand"
From: Robin Andrew robin.andrew1@btopenworld.com
Hi Ken,
Thanks for the reminder of your good magazine. This September issue is full of good tips. I e-mail David Plummer most weeks about his and my latest models. He said this morning that he is going to look at the Airbus, 'biggest' passenger plane, as a model project. That would be some undertaking.
I live in the city of Birmingham, UK and fly scale (own design) electric. I just had enough good weather to fly my latest 7 ft Brigand. It is the last version of the Beaufighter of WW2. It took 3 flights to get the CG right and I will purchase a heavier 10 cell GP4300 battery to use as extra nose weight tomorrow. The new battery will add another 4 ozs.
The Brigand model is constructed along the lines of a talk given by Keith Shaw (reissued on your site) that said build along the lines of a rubber model design, i.e., lots of sticks and very little sheeting; just the top LE of the wing and two short fuselage sides over the wing. All of this reduces the weight but I have used spruce spars to carry the battery weight, and my favorite lightweight NYLON covering and 2 coats of dope.
I have attached a picture of my Bristol 'Brigand' in case I didn't send it last time if you want to mention it. It is has a 7 ft span and is just over 53/4 lb. (Since I have finished test flying it, I use a heavier GP4300 battery).
It is powered by two Vortex motors (brushless) which are quite small and lightweight (needing 3 oz in the nose) to get the CG right at 40% because of the lifting tailplane section I always use. I have had 8 flights so far and it flies very easily, and is possibly my best design except for my 6 ft Chilton DW1A red racer that is a plan in RC Model World.
Data:
7 ft. span
5 3/4 lbs
GP 4300 x10 cells
Two Vortex outrunners 29 type with separate speed/controllers mounted face down under wing in small cutouts to give airflow.
Kavan wide blade (yellow bendy) props 11x7
1 servo in wing connected to ailerons via Sullivan plastic snakes and bell cranks (to avoid the effects of wire on radio reception)
2 in fuselage (elevator and rudder channel connected to tail wheel)
The first tests used APC 11x7 props but the blades were so thin past 5 1/2" cowls that they had little thrust.
For the test flights there was 5 oz of lead in nose and a 2400 NiCad. After 3 flights it seemed trimmed with 3 1/2 oz of lead in nose and the heavier GP 4300 cells.
Notes: The modern brushless motors are so lightweight, I had to open a hole in the 1st bulkhead of the fuselage and slide the flight batteries into the nose area. I am used to the older, heavier cobalt motors. The tailplane has, as my usual, a lifting wing section. To me it looks more scale and works at controlling the power surges at sudden full throttle. I am an old rubber powered modeler (wakefields) so the cambered tailplane follows on from those.
I can get 8-9 minutes safely by cruising on the straights and using full throttle in the turns.
I avoided building in rudder control due to the long body giving extra rearward weight and I find the steering tail wheel better, as it starts working at 1 mph. I have had 8 flights on it so far due to building a 6 ft scale LAPIDAR flying wing.
Return to "What's In This Issue"

