|
Ampeer Paper Subscriber Reminder
When subscribing to or renewing the paper version of the Ampeer, please make the check payable to Ken Myers. We do not have a DBA for the Ampeer or EFO. Thanks, Ken
Porterfield Collegiate For Sale
Complete except for Speed control and receiver battery.
Includes Astro Flight 25G, 7ch Transmitter & receiver
Covered with Micafilm and finished with dope
Asking $100
Richard Fleming
408 Cottage St.
Olivet, MI 49076
269-749-9024
A Good Glue
From Jim Yuzwalk jjy@pop4.net
Hi Ken,
I think I remember reading in a past Ampeer issue that you and Keith were investigating different adhesives with an eye to those that are non-toxic yet effective. Quite a few years ago I developed an allergic reaction to the various CA glues that are on the market. My eyes burn severely and my nostrils become swollen and inflamed after using the CA glues for just a few minutes. Not so good.
My quest for a nontoxic substitute began. A few years ago I came across a non-toxic adhesive called Weldbond at a local Meijer shopping center. It was reasonably priced at $4.99 for 8 oz. It claimed to work on foam, wood, and glass, and much more, so I decided to give it a try.
I've been using Weldbond now for over three years on both foam and balsa models and I must say that it is really a nice product. If you read the bottle's label it almost sounds too good to be true, but it has been my experience that it does what it says. It's waterproof, it dries clear so it can be used to bond canopies, and best of all, it has no objectionable fumes. The bonds are tough; they don't become brittle with age, and you don't have to worry about toxicity. Perhaps the only negative is that it's not instant glue -- bonding takes an hour, 24 hours for full cure.
Here's a link to the manufacturer's website, www.weldbondusa.com
And here's a link to Ace hardware (www.acehardware.com/sm-weldbond-adhesive--pi-1409500.html) -- it seems Meijer doesn't carry the product any longer. The price for an 8 oz bottle is still just $4.99.
Compared to other adhesives it seems to be a pretty good deal. The user testimonials at the Ace site pretty much echo my own experience -- it's a great glue at a reasonable price and it works nicely on electric models!
Best regards,
Jim Yuzwalk
Thanks for the reminder Jim. Keith did note the use of Weldbond in is article about adhesives several years ago. KM
Return to "What's In This Issue"
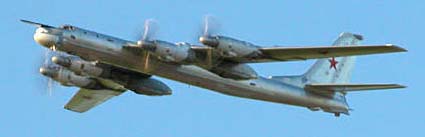
George Maiorana's Tu-95 Takes Flight
From George Maiorana georgegpm@comcast.net
Hi Ken and Keith,
The final act of the Tu-95 build took place on August 8th 2008 at the AMA X pad in Muncie last Friday. Nobody was as thrilled as I was when she finally took to the air. The first flight was about 5 minutes long and, yes, it seemed like an eternity to me. It's been almost 5 years since I began the bird but let me tell you it has been a great ride.
Flight video from the second flight is at www.rcuvideos.com/video/Tu-95-Second-Flight-wmv
Some pictures from the four successful flights can be seen at www.rcuniverse.com/forum/m_7639659
Cheers,
George
Congratulations on another great plane! KM
Return to "What's In This Issue"
A New Fusion Takes to the Air
From Bill Mackey mackey77@gmail.com
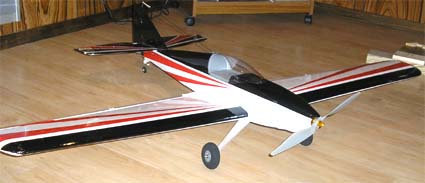
Bill and I have been exchanging emails about Electroflying Models Fusion (www.electroflying.com/fusion.html). I've noted many times in the Ampeer that this is my favorite flying sport plane, and Bill decided to build one. Here are some details and a photo of his project. KM
Well, that Fusion you convinced me to build is finally finished (except for a pilot figure).
Motor: TowerPro 3520-7
Battery: 5S1P "A123"
ESC: 50A
Prop: APC 12x10E
September 5
Ken,
I gave up waiting for no crosswind and flew it twice today. On the first takeoff it pulled pretty hard to the left and I wasn't quite ready for that. The takeoff run was more of an "S" pattern! However, it flew great and was in reasonable trim for a first flight. I didn't time the flight, so I finally decided to land and charge the batteries. Voltage was 16.4v.
For the second flight I was ready for the left turning tendency on takeoff and all went much better. The trim was now really close. I have a new transmitter and can't quite tell where my power is without looking at the stick. It seems like it flies pretty smoothly with reasonable speed at 50-60% throttle. On landing, the crosswind started me drifting a bit, but I got a little too slow and dropped the left wing very close to the ground. It hit a bit hard and the left gear leg bent under a bit. That was no big deal, but it seems that these A123 equipped airplanes are heavier than the kit producers expected and the gear is a bit too soft for my landings!
My beaver also has "modified" gear, as in bent.
Bill
I was really happy to hear about your successful first flights! I'm not using the stock gear on mine, so I don't know too much about it, except yours should be lighter than the original prototype as it used an Astro Flight geared 25 cobalt and 16 2400mAh NiCads. The 16-cell NiCad pack would have weighed close to 36 oz. while your 5S1P "A123" pack should be closer to 14 or 15 oz.
My flying buddy, Dave Stacer, is just finishing up his version. It will use a Scorpion S-4020-12 and 6 "A123" cells. I hope to be reporting more on that soon. KM
Return to "What's In This Issue"
The Scorpion S-4020-12 Tested
By Ken Myers

Innov8tive Designs Photo from Web site
Forward:
As I mentioned previously, Dave Stacer, decided that he would like to build an Electroflying Models Fusion sport plane. He'd seen mine flying for several years, and decided it was time for him to add one to his fleet. I recommended a Scorpion S-4020-12 to him based on the specifications published on the Innov8tive Designs Web site (www.innov8tivedesigns.com). He picked one up at the 2008 Weak Signals Toledo R/C Expo.
He asked if I'd like to check out the motor and verify that it is indeed the right choice.
On August 28, I ran this motor through my typical motor testing, which includes gathering all the data necessary to enter into (www.drivecalc.de) Drive Calculator.
Manufacturer's Specs (from the Web site):
Motor Wind: 12 Turn Delta
Motor Kv: 542 RPM / Volt
No-Load Current (Io) @ 21v: 1.92 Amps
Weight: 304 Grams (10.72 oz.)
Outside Diameter: 48.7 mm (1.917 in)
Shaft Diameter: 6.0 mm (0.236 in)
Body Length: 41.2 mm (1.622 in)
Overall Shaft Length: 96.0 mm (3.779 in)
Measured Specs:
Mathematical Motor Kv using drill press: 532 RPM / Volt
Drive Calculator Kv using computed Kt: 525 RPM / Volt
No-Load Current (Io) @ 13.6 v: 1.50 Amps, 7069 RPM
No-Load Current (Io) @ 20.9 v: 1.97 Amps, 10812 RPM
Motor Weight w/leads: 304 Grams (10.72 oz.) verified
"+" mount w/4 screws: 19.5g (0.69 oz.)
Prop Adapter: 22.0g (0.78 oz.)
Prop Adapter Prop Shaft Diameter: 7.874mm (0.31 in.)
Outside Diameter: 48.7 mm (1.917 in.) verified
Shaft Diameter: 6.0 mm (0.236 in.) verified
Body Length: 41.2 mm (1.622 in.) verified
Overall Shaft Length: 96.0 mm (3.779 in.) verified
Prop Weights:
APC 12x8E 24.1g (0.85 oz.)
APC 12x10E 22.8g (0.80 oz.)
APC 13x8E 27.9g (0.98 oz.)
APC 14x8.5 33.0g (1.16 oz.)
This was one of the most amazing motor tests that I have ever conducted.
I started the testing by weighing and measuring the motor and its components. I believe that this is the very first motor that I ever measured and weighed that EXACTLY matched what the manufacturer/supplier stated.
I realize that I do not have "lab grade" testing equipment, but it is amazing how close my testing results matched the stated Kv and no-load (Io).
For the load test, using various props, a BP Hobbies 70A Brushless electronic speed control (ESC) was used. It was set up as follows:
Cell Type and Number of Cells: NiMh/NiCD Auto Cell Count � 0.8V/Cell Cutoff Voltage
Throttle Setting: Auto Throttle Range
Brake Setting: No Brake
Direction and Cutoff Type: Soft Cutoff
Timing Mode Setting: 1-deg
Pulse Width Modulation (PWM) Setting: 8Khz
Average Results from Prop Tests using a 6S "A123" pack (Equivalent volts to an appropriately sized 5S Li-Po pack):
Note: The results do not represent the maximums obtainable. The pack was NOT recharged after the no load test and it was then used for the APC 14x8.5E test. The other three tests were done using a freshly charged pack. As usual, data for 5 runs, 5 seconds apart were collected using my Emeter to store the data and then it was averaged.
APC 14x8.5E: 16.648v, 38.294 amps, 7518 RPM, 638 watts in (A freshly charged pack would have been much closer to 17v, but I just needed the numbers for Drive Calculator.)
APC 12x10E: 17.43v, 33.552 amps, 8004 RPM, 585 watts in
APC 13x8E: 17.502v, 33.006 amps, 8064 RPM, 579 watts in
APC 12x8E: 17.922v, 29.82 amps, 8358 RPM, 535 watts in
The data was entered into Drive Calculator. Drive Calculator calculates the Kv a few different ways, but I used 1355 divided by the Kt value calculated by Drive Calculator to derive the number presented here.
Scorpion states that the Kv is 542. Using the drill press test, I mathematically arrived at 532, which is less than a 2% difference. Drive Calculator's Kv of 525 is only about 3% different. Nice job Scorpion. You've set a very high standard for others to try and beat. All of the Scorpion measurements and weights were 100% spot on!
Another popular way of "naming" brushless outrunners is using the outside diameter in mm followed by the length in mm and then the Kv. Therefore, when this motor is "named" using this convention it might be called a 4941-540 or maybe a 50-42-540.
Afterward:
I'm using an AXI 4120/18 in my Fusion. That motor is paired with my Hyperion 50-amp OPTO ESC and either a 6S "A123" pack or 5S 4000mAh Li-Po. That power system moves the Fusion extremely well around the sky.
My AXI 4120/18 doesn't pull quite as many amps as the Scorpion because it has a slightly lower Kv of about 515.
I selected data from my AXI testing and Scorpion S-4020-12 testing that shows a comparison between these two motors using an APC 12x10E prop. The two points chosen allow for the slightly higher voltage, lower amp draw of the AXI.
Scorpion S-4020-12, 17.54v, 33.99 amps, 8040 RPM, 596 watts in
Drive Calculator indicates; watts out: 486, eff. 83.6%
AXI 4120/18, 17.75v, 30.8 amps, 7845 RPM, 547 watts in
Drive Calculator indicates; watts out: 447, eff. 83.1%
These numbers indicate that these two motors, when used in the same application, are just about equal. There may be a slight edge going to the Scorpion, depending on how you want to evaluate the data.
Dave's plane should fly great and certainly won't be lacking in power!
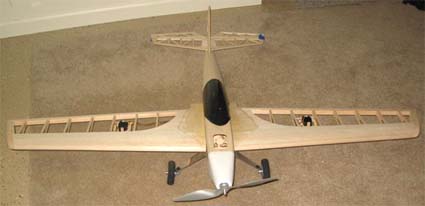
Update:
Just as I was putting this issue together, I received this barebones photo of Dave's Fusion.
 Return to "What's In This Issue"
Photos from the EFO August Flying Meeting
From Jim M. - EFO Member
Jim sent along the following photos from our monthly flying get together in August.
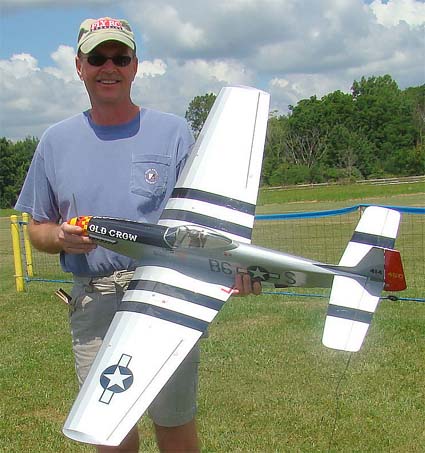
Dennis Sumner with his P-51
Tim Young with his trainers
Return to "What's In This Issue"
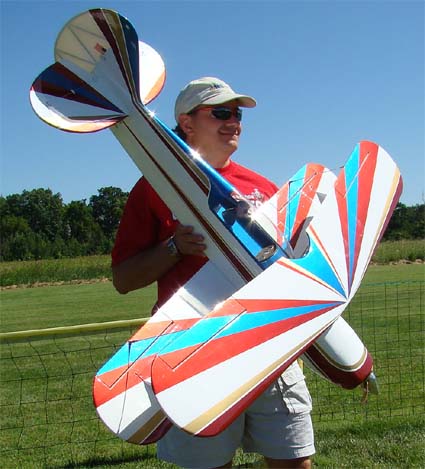
A Super Fly Delta
From John Houvener, Midland, MI

Photo from www.superflyrc.com
The kit is composed entirely of Eperan EPP foam. It is a rubberized foam material. It is a delta wing type with elevons for control. I don't normally go for foam airplanes but a member in our club has a smaller version of this model called the HyperFlea. He is an excellent flier and does amazing tricks with his, including bouncing off the ground into a harrier and hovering 6-inches off the ground.
I bought this kit from www.superflyrc.com complete with the TowerPro 21 brushless outrunner motor, Castle Creations' Thunderbird 18 BL ESC, one 2S 1200mAh Enerland/Polyquest Li-Po and two Blue Bird BMS 380 Metal Gear Servos. I have since purchased two more of the same Li-Po batteries.
The motor is supposed to draw 11 amps at WOT (wide open throttle). That figures out to about 80 to 85 watts in. I still need to make some small connector adapters so that I can use my Astro Flight Whattmeter and verify this.
The so-called wingspan is 27 inches and it has a length 20 inches. Allowing for the delta shaped wing and the cutout for the motor and prop, I come up with about 390 sq.in. of wing area. The model weighs 12.25 oz. ready to fly. This gives a wing loading of about 4.53 oz./sq.ft. and a cubic wing loading of 2.75 oz./cu.ft. (typical indoor loading - almost backyard KM).
With a weight of 12.25 oz., that works out to around 100 watts in per pound using the 2-cell Li-Po. They claim if you really want HOT to go to a 3-cell Li-Po. That�s not for me. At my age, 82, it's HOT enough, though I wonder if I could fit in a 3-cell 1100 mAh "A123" battery.
I easily get ten minutes of flying time.
How to Put This Thing Together
All of the foam parts come in a big block of EPP foam.
I couldn't figure out how to get them out of the block. I emailed SuperFly RC and they said to get a super human grip on the block and rip it apart, as you will not hut any of the pieces. Voila, it works!
The wing comes in two halves and they are airfoil shaped. You build everything with a low heat glue gun. However, I could not see how I could glue the wing halves together without the low heat glue setting up before I could get the wing halves in alignment, so I used Gorilla glue on the wing halves. I used the low heat glue for everything else including hinging the elevons, which you do by laying about a two inch bead at a time on the hinge line and dragging and smoothing over it with a single edge razorblade and repeat until the hinge is complete. This is sure new to me on hinging, but after 20 or so flights it seems to be holding up okay. I don�t think I would use this method on anything else except EPP foam.
You cut in little pockets, as shown, and hot glue in the servos. I wrapped the servos in plastic tape first.
The motor is a stick mount system. The mount is adjusted so that the prop is in the middle of the cutout.
I relieved one side of the EPP foam canopy so that I could slide the battery in and out using a Velcro strap to hold it in place.
I painted the front edge of the wing and canopy with florescent pink Krylon paint.
Flying
Whoopee! Hang onto your jocks! It does hand launch easily and, once trimmed, flies true. Make sure that both elevons, when at neutral, are up about 1/16" or so.
The nose of this thing comes to a point. After about six flights I broke the tip off about 1/2" inch. Instead of hot gluing it back on, I cut a little piece of tennis ball and hot glued that onto the tip. It does not seem to affect the flight quality at all.
Have fun!
Return to "What's In This Issue"
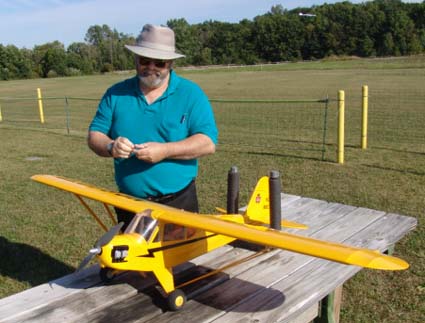
Cal Smith's Sportwagon Conversion from Glow to Electric Power With Floats
From Rich Flinchbaugh South Dennis, MA
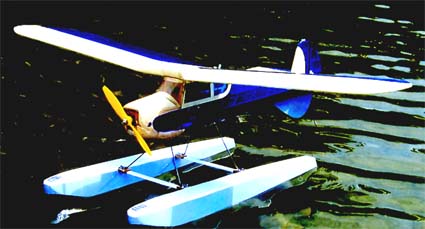
Cal Smith's Sportwagon was developed by Dr. D.B. Mathews for RC and appeared as a construction article in the April 1998 Model Aviation.
The photos were taken on August 5, 2008 and show the conversion from an 0.15 glow engine to electric power with floats. It flies great with a new MEGA RC 600/20/5 brushless outrunner motor. It has a wingspan of 54 inches and 3.3 sq.ft. (475.2 sq.in.) of wing area. At a flying weight of 3 pounds the wing loading is 14.5 oz./sq.ft. with a cubic wing loading of 8 oz./cu.ft. (typical sport) It uses a Castle Creations' Thunderbird 36 BL ESC with a Berg Microstamp 4L receiver. The battery is a 2100mAh Li-Po. It is off in about twenty feet and the flights typically last about 10 minutes.
If you look carefully on the cowl near the blue dot, you can see where the original .15 glow engine exited.
It makes a fine floatplane!
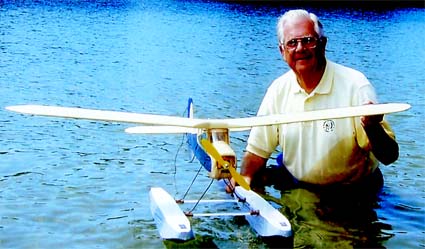
Rich with his Sportwagon floatplane conversion
Return to "What's In This Issue"
In Search of the "Perfect" Aileron Trainer
By Ken Myers
By the end of July I found myself instructing three new RC flight students. Two had previously flown RC and one hadn't.
All three had purchased, or were about to purchase, planes and support equipment and were ready to start training.
The primary training was easy. At various times I took all three up on the EasyStar for their initial flights.
Danton, the new to RC student, had already purchased a 3-function HobbyZone Super Cub RTF (www.horizonhobby.com/Products/Default.aspx?ProdID=HBZ7100).
We transitioned his training from the EasyStar to the 3-function ROG (rise off ground) Super Cub and he was soon soled and flying this plane on his own.
Now we needed an aileron trainer.
My old fiend Jon, from my UFO days, called and said that he was interested and ready to get back into RC flying after a 20+ year layoff and that he wanted to do it electrically with the E-flite J-3 Cub 25 ARF. He purchased the Cub and a Futaba 7C 7-Channel 2.4Ghz radio system. To power his plane he purchased the E-flite Power 25 BL Outrunner Motor, 870Kv motor, E-flite 40-Amp Brushless ESC (V2) and receiver pack. After some discussion about Li-Po versus "A123" cells, he decided to go with a 4S1P "A123" pack.
All of these components went together well and provided a very nice flying plane. The test and trim flights went well, but we lacked the ability to buddy box this plane. As with all "first" planes, it was difficult to "risk" it in the air without the buddy box capability, and it was just a "little more plane" than makes for a good trainer.
Jon with his Cub
Now we needed an aileron trainer.
Chuck approached me at the Mid-Am and asked if the E-Flite T-34 Mentor 25 ePTS RTF would make a good trainer, as he wanted to get back into RC. A vendor had one available at the Mid-Am. I looked at it and read the hype on the box and said that I thought it might be okay.
Unfortunately, I was wrong.
There is a thread on RC Groups about this plane. (www.rcgroups.com/forums/showthread.php?t=807165)
On July 30 I posted to this thread at
www.rcgroups.com/forums/showpost.php?p=10245922&postcount=543
Here is just some of what I had to say about the PTS T-34.
This plane has been a "pain" since our first outing at the field.
On the first day, there was no flying of the T-34 because the ESC would not arm, and on the very, very rare occasion when it would, it did not function "properly" and at WOT could only turn the prop at 5300 RPM. (Bad ESCs were noted in the thread.)
Thanks to a very accommodating manager at Rider's Hobby Shop, the whole fuselage, including a new speed control was "switched" for the defective one. The original fuselage, as received, had a hole in the side of the covering, as well. They did the whole switch and setup in the store. Great Service Riders!
Unfortunately, the second trip to the field had several problems as well, and ended with no stick time on the T-34 for the student.
The student kept the same canopy/hatch and it absolutely does not fit on the new fuselage. No, it is NOT the cowl that is keeping it from fitting, as noted in this thread. The black stripe on the front of the cowl does not line up with the one on the fuselage, which was only an indication of the "real" problem. The canopy/hatch magnets do not line up and the canopy/hatch will not stay on the aircraft. His original canopy/hatch is slightly longer than the one that must have been on the new fuselage.
We did a field fix and used some rubber bands and a hook and loop strap to hold on the canopy.
The first time I took it for a "trim flight", I could do no trimming. The student had the flaps fixed at the maximum deflection and the wing has the droops on. Shortly after takeoff, and with the plane not at full power, it was climbing at what I perceived as a precarious angle. At first I thought it might be very tail-heavy. I had checked the CG against the recommended CG in the manual, which he had thoughtfully brought to the field, and the CG fell within the recommended range, but it sure was flying "tail-heavy." I tried to add some down trim, but I could not find the elevator trim lever/button. Somehow it did not naturally fall where I expected it to be, and with a "handful of plane" I could not look for it. I landed the plane to take a look. The battery had shifted a bit towards the rear. The battery was still under the provided strap, but there was no hook and loop fastener on the battery and the battery tray. We used an object that we had available to "hold" the battery in the farthest forward position.
On the second "trim flight" I made sure I could "find" the elevator trim lever. We also moved the flaps to the second position from maximum deflection. With about 10 clicks of down trim and a couple of clicks of aileron trim, the plane felt a bit more under control, but still felt like I was flying a balloon. It was very unnerving. While I had little confidence in the plane, it did nothing really odd, but just felt odd on the sticks.
After that couple of minutes of flight, I landed and we checked the CG once again. It seemed okay and the battery had stayed in place with our field modification.
I took it up for one more "trimming flight", but it still had a "funny" feel to it. We decided to call it quits and see if we couldn't get some of the problems taken care of before our next session.
We are now faced with a HUGE obstacle. I have absolutely no way to buddy box my student, and he will need it to successfully fly this plane.
(I sent an email to Horizon Hobby on August 5 and received this answer about buddy boxing on August 21. "The DX6i can be buddy boxed with any computerized JR or Spektrum transmitter using a Spektrum or JR trainer cord.")
There is a problem with his charger. It appears to be working okay, sort of, but his does not have the alligator clips that are currently shown on the Horizon Web site for the supplied charger. His has a plug that goes into a "cigar" lighter socket in a vehicle! When I saw him charging his battery on the seat of his $30,000 plus SUV I couldn't believe it.
We have now gone over how to safely charge Li-Po cells. He's going to add some alligator clips to the charger and charge outside his vehicle in a "safe" container. I just can't believe it came with the "cigar" lighter type connector attached to it.
I noted that the supplied charges seems to be "working okay" because when his charger says the pack is full, my CellPro 10S indicates 94% charged. I guess this is a "conservative" charge, set by the supplier of the supplied charger.
Fortunately, my student has gotten many flights on the EasyStar RTF that I bring with me to the field whenever I'm working with new students. He�s doing very well with it now, and not lost total interest in this hobby, yet. I am determined to make this T-34 work for him/us, but the frustration level for both of us has been quite high.
The other posts that I made and comments posted about my posts about this plane in this thread can be found at:
www.rcgroups.com/forums/showpost.php?p=10246471&postcount=544
www.rcgroups.com/forums/showpost.php?p=10248459&postcount=545
www.rcgroups.com/forums/showpost.php?p=10248927&postcount=548
www.rcgroups.com/forums/showpost.php?p=10249119&postcount=549
www.rcgroups.com/forums/showpost.php?p=10249642&postcount=551
www.rcgroups.com/forums/showpost.php?p=10262125&postcount=584
www.rcgroups.com/forums/showpost.php?p=10262526&postcount=587
www.rcgroups.com/forums/showpost.php?p=10262572&postcount=588
www.rcgroups.com/forums/showpost.php?p=10263290&postcount=589
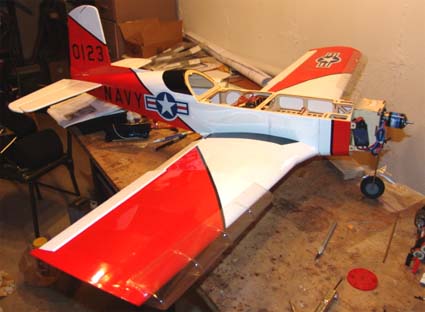
Chuck's T-34 being updated to a 4S1P 2300mAh "A123" pack
Now we needed an aileron trainer.
Since all three of my students now needed an aileron trainer, I purchased the parkzone T-28 RTF on August 5. You can find my full review of this plane via a link at members.aol.com/kmyersefo.
My modified parkzone T-28 RTF
This finally turned out to be the aileron trainer I was looking for. It flies well in this roll and all three of my students have advanced their skills with this plane.
The following is only part of what I said in my review and some of it has been paraphrased because of space considerations. Please check out the whole review.
What I liked about this plane:
1.) It is a lot of fun to fly and, on a relative scale, quite easy to fly.
2.) The supplied power system is more than adequate for flying the plane quite well.
3.) It is a good plane to use with a buddy box as an aileron trainer.
Things that I didn't care for or that I thought could be done better:
1.) I feel that the charger is unsafe to use the way it is supplied.
2.) The charger does not appear to balance the cells well.
3.) The charger does not "fill" the provided Li-Po battery, but this may be an added safety feature.
4.) The original manual does not provide a CG and the updated manual has the CG wrong, in my opinion.
5.) The original manual does not have adequate information for programming the ESC, although that is not really necessary when using the supplied Li-Po battery.
6.) The original manual has some interesting and confusing phrasing and lacks some useful information like where to place the battery.
7.) Many of the photos in the original manual are quite dark and a bit fuzzy.
8.) I my opinion, the receiver antenna, which was originally routed over the rudder and elevator digital servos, is not a good practice.
9.) The main gear are not adequately secured to the wing.
10.) The instrument panel "sticker" looks bad shriveled up in the cockpit.
11.) In my opinion, there is less than adequate airflow through the fuselage to cool the components, especially the ESC.
12.) There was no note about the rudder and elevator servos being "digital" and the "ringing" being normal for digital servos.
13.) There was no indication, anywhere, that the receiver is a single conversion and negative shift.
14.) I felt that the tech support that I received from Horizon Hobby concerning this plane was less than adequate and that both of the tech people that I talked with were less than interested in passing on information that would make this T-28 RTF a better system.
15.) I found the "non-standard" prop adapter size irritating.
16.) The supplied setscrew does not seem to hold the prop adapter to the shaft well and the metal that the adapter is made of does not seem to hold the setscrew threads very well.
17.) The ESC is encased and glued into a foam slot in the fuselage. That doesn't let much cooling air pass by or through it.
18.) The manual needs to have its grammar and sentence structure "cleaned up."
My Recommendations
I highly recommend the PNP (plug and play) version of this plane to anyone who wants a fun, knockabout, low-wing, tricycle-geared plane without putting too much effort into it.
I cannot recommend the RTF version at this time, mostly because of the extremely poor and, in my opinion, unsafe charger and a radio system that glitches constantly. My recommendation is to not purchase the RTF version. That recommendation may change in the near future. I fully expect that the next generation of parkzone T-28s will have the Spektrum DX5e transmitter and the AR500 DSM2 5 Channel Sport Receiver like the parkzone F4U Corsair. I could then recommend the RTF version if the charger is to be "discarded" and replaced with an FMAdirect 4S.
If I were to purchase the PNP version I would set it up for use with a 3S "A123" pack from the beginning. That would require a higher Kv motor and possible modification to the motor mount. I would sell the new stock motor on ebay, RC Groups or wherever and then choose one of the following and fit it to the provided motor mount. Except as noted, these motors are all about the same weight, according to their manufacturers, as the supplied motor.
All's Well That Ends Well
While my T-28 had its share of "teething" problems, it did and is continuing to provide my students with their aileron training.
Jon purchased the Futaba buddy box and cord. We are now using his J-3 Cub as well as the T-28 to get him back into flying form.
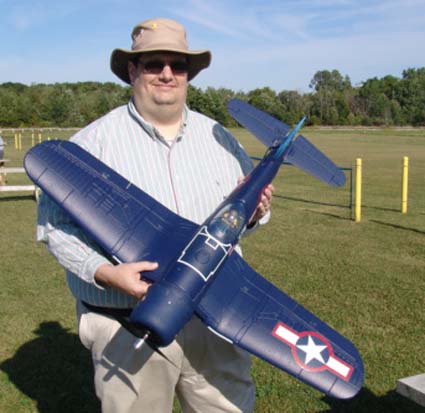
Danton purchased the parkzone F4U Corsair RTF. On September 11, he brought it to the field for its maiden. I took it up for a maiden trim flight. He easily hand launched the plane, as we used the supplied skids instead of the wheels. It flew straight out from the easy launch and needed only a couple of clicks of elevator and aileron trim. It does fly very much like the T-28, but has a slightly slower top end speed, but it is NOT slow! It can fly very slowly when asked to do so. We did several buddy box flights. On the last flight of the day, I hand launched for him and he did the entire flight on his own. This is one nice "aileron trainer" with plenty of power and a decent radio system.
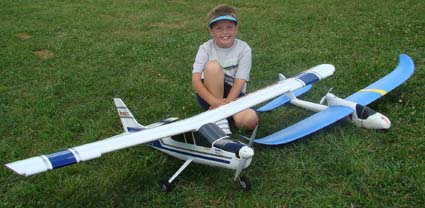
Chuck has added the flap servo to his T-34 and we hope to have it in the rotation with the T-28 soon. He's also purchased an E-flite Beaver to move on with. Danton "loaned" us his Spektrum DX5e transmitter to use as a buddy box.
Return to "What's In This Issue"
| 
