parkzone T-28 Trojan Charge-and-FlyTM Park Flyer
and My Conversion for Using 3 26650 M-1 Cells from A123 Systems, Inc. (AKA A123 Cells)
By Ken Myers
September 2008
Updated 10/01/10
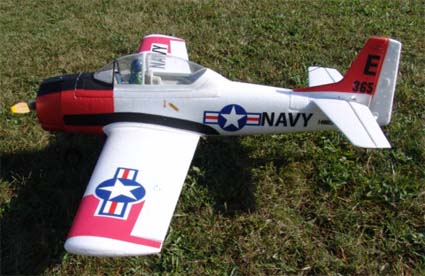
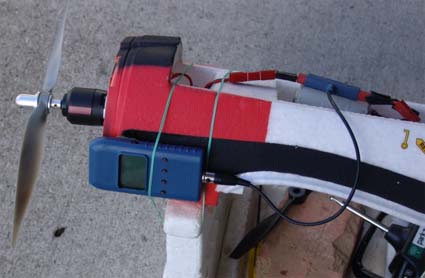
Note the Master Airscrew 11x8 wood prop used with the "A123 pack" and stock motor instead of the supplied PZ 9.5x7.5 "plastic" type which is used with the 3S Li-Poly 1800mAh pack & stock motor
Forward: Sept. 2010
The parkzone T-28 Trojan RTF (ready to fly) that is reviewed here is no longer available. The original parkzone T-28 Trojan is now only available as a PNP (Plug-N-Play) version. The PNP version requires the modeler to supply the transmitter, flight power battery, charger, and receiver. The newer version known as the T-28D Trojan is available as a PNP or BNF (Bind-N-Fly). The BNF version comes with everything to fly the plane except a Spektrum brand DSM2 full range transmitter like the DX5e, DX6i, DX7 or DX8.
Later in the article I note that parkzone came out with a Corsair that uses the same power system. The Corsair is available as a RTF version with everything needed, including a Spektrum DX5e transmitter. It is also available as a PNP.
parkzone has also released a Stinson Reliant in BNF and PNP versions that uses the same power system. If the optional flaps are installed, the ESC (electronic speed control) will need to be one with a "switching type" BEC (battery eliminator circuit) like the supplied E-flite 30-Amp Pro Switch-Mode BEC. If some of the higher amp draw systems for use with "A123" 2300mAh cells are used, a higher power ESC with switching BEC should be used or a stand alone switching BEC (battery eliminator circuit) like the Castle Creations' CC BEC can be added to an economical ESC like the Castle Creations Thunderbird 36 or 54. A linear type BEC should not be used with 5 servos. The wiring diagram and other information about switching type BECs is provided at the link for the stand alone BEC.
While parkzone also has a F4F Wildcat with the same motor, it is a lighter, smaller plane and has a smaller ESC rated at only 18 amps. It is really not suitable for use with "A123" 2300mAh packs.
Since all of these planes use the same power system, my notes on converting the original T-28 for use with "A123" 2300mAh cells also applies to them.
Horizon Hobby has "fixed" the radio problems noted in the original article by deleting the radio from the T-28s and T-28Ds and including a better radio system in the parkzone Corsair, a Spektrum DX5e with an AR500 2.4GHz receiver.
It also appears that they have fixed the main gear coming unglued from the wing problem, as I've not seen or heard any references to that problem showing up in current production T-28s or T-28Ds.
Warning! The stock T-28/T-28D falls under the Academy of Model Aeronautics (AMA) Park Flyer definition - under 32 oz./2 lb. and less than 60 mph. Changing to "A123" 2300mAh cells raises the weight to over 32 oz. The "flyability" is still excellent at the higher weight, but it is no longer a "park flyer" under AMA guidelines. This may or may not affect whether you might consider using "A123" 2300mAh cells in this plane. I just wanted to make that point very clear.
Original 2008 Forward:
I have been training a few new R/C pilots this year. I decided that I wanted a plane with ailerons that could be a follow up to primary training on a Multiplex EasyStar. One of my flight students had purchased the E-flite T-34 Mentor 25 ePTS RTF. The T-34 turned out to be "not the best choice" for an aileron trainer plane.
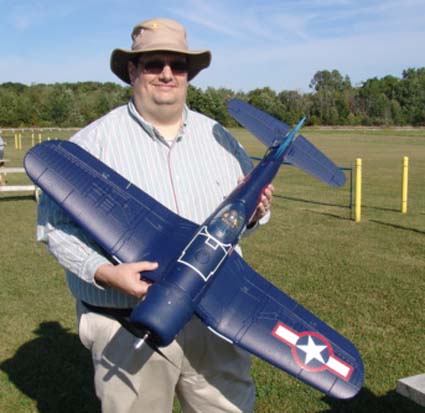
Several of my flying buddies are flying the parkzone T-28 and have given it high marks for flyability. I chose to purchase this plane because they could provide me with a firsthand knowledge base.
Besides being a good flier, I needed a plane that I could use a "buddy box" with so that my students could make the transition to "4-function" flying. I wanted a plane that could use a 3S "A123" 2300mAh pack, so that the charging turnaround time would be fast, really fast, without having to purchase more Li-Poly batteries. (See "The Dilemma When Using the Stock Motor with a 3S Li-Poly Battery and a 3S A123 Pack" section at the end of this article.)
The T-28 was purchased from Nankin Hobby in Farmington, MI on August 5.
Day1:
I removed the manual from the well-packed box and read completely through it. There were a lot of things that I wanted to do and report on that were not part of the "normal" setup. I wanted to get an idea of how quickly this plane could be in the air, if that was the goal. Subsequently, after completing the original airframe, my guess is that it could be ready to fly as soon as the provided 3S 1800mAh Li-Po finished charging via the provided Li-Po "balancing" charger.
I removed the wing from the box and inspected it. Everything was fine with just a couple of small nicks in the foam. I measured the wing area and weighed it without the landing gear and wheels. The wing area and weight are noted in the Measured Specifications and Weights - Out of the Box sections.
I removed, inspected and weighed the pre-hinged horizontal stabilizer and elevator assembly.
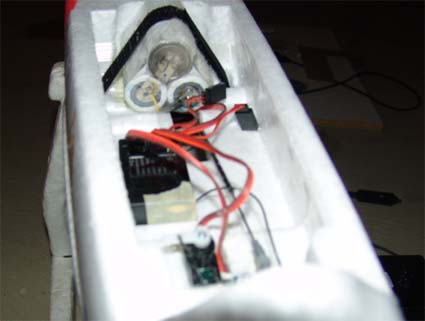
The fuselage was removed from the box, inspected and weighed with all of its installed components except for the battery.
Before turning on the onboard electronics for the first the, the first question I had was, "Where does the battery go?" I double-checked the manual to find the flight location of the battery. It was not obvious to me because there was no text to indicate its placement. In Step 5 on page 6, item 4 it says to plug in the flight battery and later in the same section, in the Note: it says, "b. Plug in full charged battery into fuse". Huh?
After returning to the review thread about this plane on RC Groups and seeing a picture of the battery mounted in that article, it became clear to me that the photo at the bottom left of page 6 of the manual was showing where the battery is placed for flight.
Using a typical receiver battery for power, I tried various combinations of other brand transmitters with the supplied system to find something that would work as a buddy box. None of them worked. Later, I learned about some options that do work. I went online and checked to see what I could use to buddy box this plane's supplied radio system with.
I did find a thread on the Wattflyer Web site. A poster identified as bowers95713 using the title for his post of "T-28 will support slave cord" said, "So, I decided to try it after a friend told me it would work.. and whaddya know it does work. If you buy the JRPA 130 cord (pin to pin), link your radio to a second t-28 (only) radio, then after take-off, just pull up on the momentary switch on the top left of your own radio, then control is turned over to your "student". let the switch go, and your back in control. it works. All of the hobby shops said that Parkzone did not have support for this function in the transmitters, but they do after all...Maybe some of you already knew this, but it was quite a surprise to all of us....
Give it a go!
Jim"
I had previously checked with Pete Waters and we saw that, on his scope, with the JR Quatro used as a buddy box to the supplied transmitter, it was producing the correct signal to work, but the supplied receiver was not decoding it correctly. I hooked up a Hitec 535 receiver (Futaba/Hitec negative shift) to the servos in the plane and tried the supplied transmitter as the master and the JR Quatro as the slave and it worked. That indicated that all I needed to do was either purchase another transmitter, like the one supplied, or possibly use the Hitec 535 receiver.
I called Horizon Hobby and asked whether the supplied ZX10 5-channel transmitter was positive or negative shift and was told, "I think it is positive." Nice answer Horizon!
I was not satisfied with the answer from Horizon Hobby support, especially since the supplied transmitter had worked well, on the bench, with my Hitec 535 negative shift receiver. I called Peter Waters at Kraft Midwest. He tested his ZX10 transmitter and told me that the shift was the same as Futaba, which is negative. I also read on RC Groups that the provided transmitter works with Futaba receivers.
The supplied Li-Po was removed from the packing and the voltages read with the CellMeter-8. The voltages were 3.844v, 3.848v and 3.850v. That was good and where they should have been. I also weighed the pack.
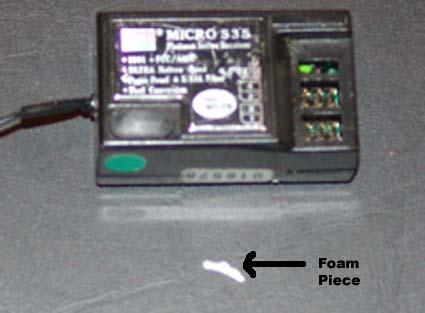
The charger was unpacked and I noted that it has what I consider to be a safety related problem. (See photo) While Step 2 of the manual notes, "Never leave the battery and charger unattended during the charge process." and "When charging, make certain the battery is on a heat-resistant surface.", I do not see how this will help if the battery ignites in a vehicle. Even with the safety statements, the length of the cord and "cigarette" lighter termination plug indicates that parkzone and Horizon Hobby feel that it is safe to charge a Li-Po in a vehicle. I DO NOT RECOMMEND CHARGING Li-Poly PACKS IN A VEHICLE!
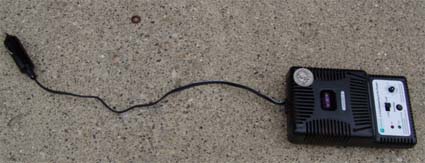
US quarter shown on charger to show scale
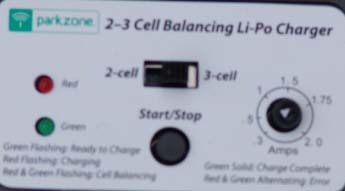
I also noted that the default cell setting on the supplied charger was set to 3-cell, which is correct, and the default charge rate was set to 1.75 amps, which is not noted in the Charge Rate graph on p. 3 of the manual. That setting is correct for the supplied 1800mAh Li-Po, but not being noted in the manual might confuse some folks.
Day 2
I called support a Horizon Hobby with a few questions. Here are the paraphrased questions and answers.
Ken: The two servos in the fuselage are "ringing". The servos in the wing don't do this. Is this something to be concerned about?
HHS: (After checking a model there and asking which servos are in my T-28) The Parkzone DSV130M servos in the fuselage are a digital metal gear type. Digitals ring. The servos in the wing are probably not digital servos.
Ken: Should I be concerned about the BEC not working correctly with a 3-cell Li-Po and two digital and two non-digital servos?
HHS: Most likely the BEC in the ESC should be okay with them.
Ken: There is strapping tape across the holes where the wing pins are placed. Since it is strapping tape, it is probably there for reinforcement. Should I just "open" the holes through the tape?
HHS: Yes.
Ken: Step 3, item 4 says, "Carefully align the two locator pins on the front of the wing into the two small holes in the front of the fuselage." The pins are in the rear of the wing and the holes in the rear of the wing saddle area, as the pictures on p. 4 of the manual shows.
HHS: Okay.
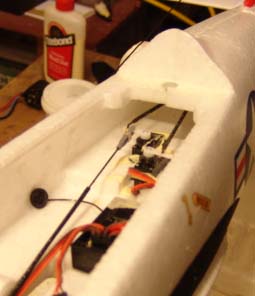
I charged the supplied battery. It took about 37 minutes to complete the charge. (See the photo below of how I set up the charger.) 10 minutes after the charge was complete, the cell voltage readings using the CellMeter-8 were 4.136v, 4.156v, 4.166v. Several hours later the voltages read; 4.133v, 4.152v and 4.159v. The following day they read; 4.130v, 4.152v, 4.158v. About 48 hours later the pack voltages read; 4.130v, 4.148v, 4.158v.
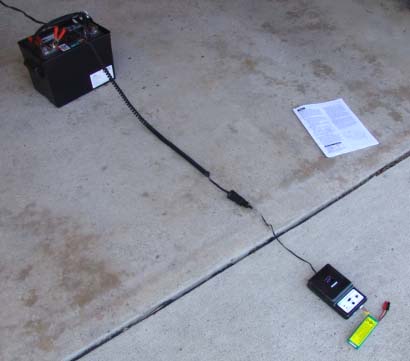
The photo shows the supplied charger with the "cigarette" lighter plug inserted into an alligator-to-cigarette lighter socket extension and then my field battery. The initial charging was done in the middle of my concrete driveway.
Day 3
I started this review/conversion on the computer from my notes.
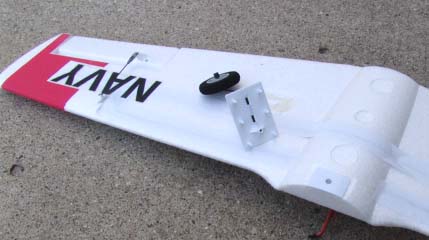
I removed the wheels from the landing gear, measured and weighed them. I checked with several of my friends who are flying this plane to get their opinions on the supplied wheels to see if they will work off of our grass field. They will, but I also got the recommendation that "larger wheels" wouldn't hurt, especially when using the plane as a trainer, which is my intended purpose. I decided that I would replace the wheels with Dave Brown Products 2.25" Lite Flite Wheels. Using the Dave Brown wheels only increases the weight by about 0.6 oz. Also, this allows a larger diameter prop to be used as required when switching from a 3-cell Li-Po to a 3-cell "A123" pack.
My friends also suggested that I do a "pull test" on the gear plate to see if it comes out of the wing, as that has happened to some of theirs. They recommended multipurpose polyurethane adhesive like Gorilla glue or Borden Elmer's ProBond Polyurethane Glue.
Day 4
I weighed the 480 Brushless Outrunner Motor, 960Kv: T-28, prop adapter, prop nut and the supplied T-28 "9.5 x 7.5" prop. The Kv was measured using a drill press by recording the AC voltage for the three leads. Once the data was gathered the Kv was mathematically computed. The data from the drill press test indicated a Kv closer to 900 than the advertised 960 - darn! That makes using a 3S "A123 pack" more difficult.
Anderson Power Poles (APP) were crimped onto the E-flite 25-Amp Pro Brushless ESC leads replacing the stock E-flight connectors. The motor was reinstalled and a tape stripe placed on the bell for the no load tests. Both of the supplied props were balanced using clear acrylic spray paint with several misted coats on the "light" blade. One of the two supplied props was much more out of balance than the other. My 3S 26650 M-1 pack of 2300mAh cells from A123 Systems, Inc. was charged for the no load test. The supplied Li-Po had been previously charged. A spreadsheet was created to log the motor testing data. The no load tests were completed using both batteries. Data for the supplied prop was gathered using both batteries.
The photo shows the plane set up for prop testing. The Hyperion Emeter was only placed under the rubber band for the photo. The stripe on the motor for the no load test is visible.
The no load data and prop data were entered into Drive Calculator to create a preliminary motor setup to see what prop I might want to try next. After playing with props in Drive Calculator, an APC 12x10E was reamed to 8mm and balanced. The 3S "A123" pack was charged. The APC 12x10E was very difficult to fit onto the provided prop adapter. The prop shaft of the adapter is just slightly over 8mm (measured) and this oversize caused great difficulty in fitting the prop. The APC 12x10E hub is much thinner than the supplied prop. A washer was added as a spacer so that the prop could be tightened. The APC 12x10E data was collected and added to the Drive Calculator. The prop data from my spreadsheet for the supplied prop was added to Drive Calculator. All of the data was verified in Drive Calculator against the "real world" numbers that I had gathered. It all checked out.
Drive Calculator calculates the Kt as 1.488648. 1355 / 1.488648 equals a Kv of 910. Drive Calculator also presents a ns rpm/V (see Drive Calculator for an explanation). The ns rpm/V for this motor, according to Drive Calculator, is 896.
With my drill press test and mathematical computation and the data from Drive Calculator, I have determined this example of the stock motor is about 900Kv not the advertised 960Kv. (Note: This also proved true with a second version of this motor that I tested.)
Using Drive Calculator, I also found that an APC 12x8E should yield approximately 200g more thrust than the supplied prop.
I reamed an APC 12x8E to 8mm and balanced it. I had a great deal of difficulty getting it onto the prop adapter shaft, which at this time was still just slightly over 8mm. I decided to remove the prop and see if I couldn't ream it out better. That was the wrong choice, but I didn't realize it at the time! That didn't work out well. After pulling, pushing and prying to get it off, I had either bent the shaft or messed up the motor bell, and now the motor would not spin without a huge amount of vibration. I tried for several hours to see if I could "unbend" whatever I had done. I couldn't.
Disappointment.
I picked up Gorilla glue while I was out, for that "just in case situation."
Day 5
I continued to try and "fix" the motor for several more hours, but I finally gave up and ordered a new one along with a new ZX10 transmitter to be used as the buddy box. In the process of trying to "fix" the motor, I did what I should have done in the first place. I ran the motor up with the prop adapter on and carefully filed a little bit off the slightly larger than 8mm prop shaft of the adapter so that the props would fit correctly when reamed to 8mm, and I was still be able to use the stock prop. I also replaced the setscrew in the prop adapter by re-tapping the setscrew hole to 4-40 and using a 4-40 setscrew from a wheel collar to hold the prop adapter on securely. The original setscrew would not tighten up on the motor shaft very well. (I found out later that the metal used to produce the prop adapter does not hold threads very well.)
Since I was told that the strapping tape should be left over the plastic part where the wing alignment pins go, I poked a pin and then some small drill bits through the tape to allow the wing pins to pass through and secured the wing to the plane with the provided screw.
I installed the landing gear and gave each of the main gear a good tug to see if they needed re-gluing. They didn't appear to need glue at this time. The radio system was turned on with the prop off the motor and the nose wheel centered. (NOTE: The prop should ALWAYS be off the motor when "working" on the radio system. This is NOT noted in the instruction manual.) The cowl was already off for the motor testing, so installing the nose gear was very easy to do. I flipped the plane onto its wheels and found that with a 12-inch prop I had 1.0625 inches/27mm of ground clearance.
The horizontal stabilizer was carefully centered and measured from the rear of wing tip to rear of elevator on both sides and the supplied tape was applied to the horizontal stabilizer fillets and horizontal stabilizer. The picture that attempts to show this in the manual is not helpful. The manual does not note, nor is there a photo, to indicate which hole in the control horn to attach the elevator clevis to. I used the hole furthest from the elevator, as that is the hole used for the rudder.
Once the elevator was adjusted to neutral, the plane was fully assembled for a center of gravity (CG) check. There is no CG listed in the supplied manual that I have, but on the Horizon Hobby Web site it notes, "The optimal CG location for the T-28 is located approximately 2.5" behind the leading edge of the wing when measured at 1" out from the side of the fuselage." (Note: They've changed the manual to include the above information, which I feel is incorrect.) With the supplied Li-Po battery moved as far to the rear as possible without interfering with the stock canopy/hatch, I could only get the plane to balance 2" from the spot noted in the Horizon Hobby tech note. Trying to get the battery moved further back to achieve the "optimal CG" would not allow the canopy/hatch to fit on the airframe correctly.
The plane could have easily been ready to fly before the initial charge on the Li-Po.
The ground clearance with the stock prop is 2.375 in./60.3mm.
Day 6
The next thing I wanted to do was modify the plane to accept a 3S "A123" pack. Since this would involve cutting a slot in the canopy/hatch, I wanted to be sure to have the CG correct! Horizon Hobby's CG point didn't seem correct to me and no one had reported that the plane flew "nose heavy." I had already traced a wing half to measure the wing area. I transferred my dimensions into my CAD program and computed the CG a couple of different ways. The computation showed the typical beginning CG point of 25% of the average chord being about 1 7/8" behind the noted point.
The two small "dots" on the wing show the 1 7/8" and 2.5" marks
Day 7
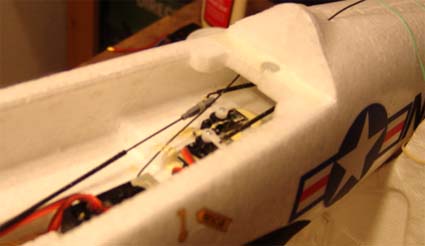
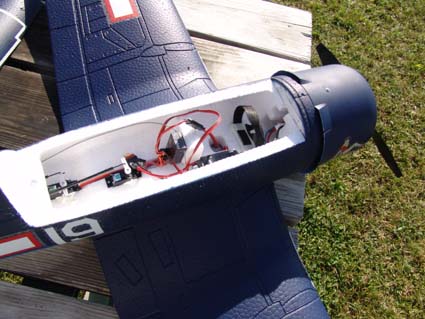
I installed the provided Li-Po to about the same position as shown in the photo on p. 6 of the manual and checked the CG. It appeared that the "default" CG is just about 1 7/8", as I had calculated. I went on the assumption that this is about right and then I used a Dremel rotary tool with a sanding drum to remove about 1/2" of the rear of the area where the Li-Po battery slides into position so that my 3S "A123" pack would balance at about the same CG. The sanding drum was used to relieve enough of the protrusion on the bottom of the canopy/hatch so that it would seat properly with the A123 pack in position. This was done as carefully as possible so as not to sand into the cockpit. Hook-and-loop fastener was added to the left side of the "battery floor" and the left bottom cell of the battery pack. I used a cutting bit in the Dremel to make elongated holes through the bottom of the wing saddle area for the hook-and-loop safety strap to pass through, being sure that it would not to interfere with the nose-wheel steering.
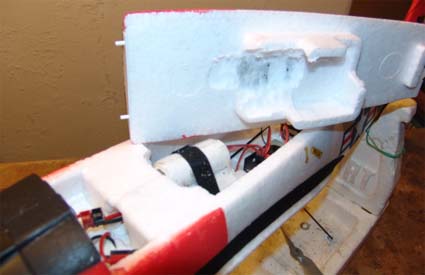
Fitting the 3S "A123" pack
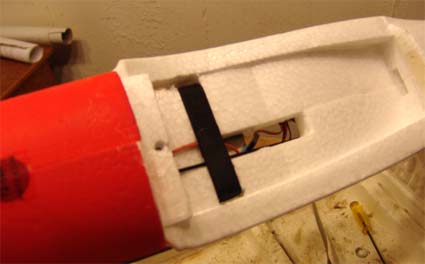
Battery strap placement
I made a balsa plug to cover and hold the crystal in place in the receiver and taped the plug over the receiver crystal. I had read, on one of the threads about this plane on RC Groups, that the crystal might become loose in flight and cause problems, so this was done as a preventative measure.
Day 8
I physically measured the motor.
Day 9
Motor number two arrived last night at dinnertime. This morning, I did the drill press test. The supplied Li-Po resting volt readings were 4.032v, 4.070v and 4.080v. The Li-Po was charged using the supplied charger. The charge took about 20 minutes. The resting voltage readings 10 minutes after the charge were 4.134v, 4.161v and 4.167v. The 3S "A123" pack was Zip charged. One hour after the charge, the resting voltages for the Li-Poly cells were 4.130v, 4.159v, and 4.163v.
I completed the new motor tests to see if the replacement tested the same as the original. The new data was entered into Drive Calculator and I found the motors to be virtually identical.
I was able to complete the APC 12x8E tests with the new motor. I studied the data that Drive Calculator presented as well as my actual data and decided that the APC 12x8E would be a good prop to start with because the APC 12x10E drew slightly over 25 amps on a the freshly charged 3S A123 pack, which is over the limit of the supplied ESC. Horizon Hobby says that the E-flite 25-Amp Pro Brushless ESC has a "Momentary Peak Current: 30A (15 sec)". I didn't want to press it for now, especially since there is almost no cooling for the ESC. The ESC is incased in the foam of the fuselage and glued into place. There is virtually no way that cooling air can pass through it. (It has been reported by some that parkzone is now using the E-flite30-amp ESC in this plane, like in their F4U Corsair.)
I hooked up the buddy box system. It appeared to be working okay.
I checked the voltage readings of the 3S Li-Po pack after the motor tests and buddy box check and found the cells to be "unbalanced" at 4.040v, 4.080v and 4.081v. The same cell had not yet balanced with the other two, and that was beginning to bother me some.
Day 10
I put the cowl back on and the stock prop to do the first trim flight with the supplied Li-Poly battery.
The supplied manual only notes that the ESC settings can be changed, but it does not describe how to actually do it and in what order the options show up in the programming cycle. I downloaded the instructions for the supplied ESC and printed them. I wanted to change the low voltage cutoff (LVC), since I am mostly going to be using the 3S "A123" pack. I set the ESC's LVC to 70% of the initial voltage. The process was fairly easy. Now that I have changed the LVC, I need to carefully time all flights when using either the supplied Li-Poly battery or the "A123" pack. With this change I will not get an early cutoff on the "A123" pack.
The original trim flight, with the Li-Po pack and supplied prop, went very well. The plane was a joy to fly, just as described by my buddies.
Next I flew it with the APC 12x8E and the 3S A123 pack. I was very happy, as it flew very, very much the same as with the stock prop and Li-Po cells. Keith helped me tweak in the trims, and it was flying great. He suggested that I might want to try an 11-inch diameter prop to get a bit more ground clearance, but using the 12-inch diameter prop was not a problem at the Midwest's grass field on that day.
Keith noted that the CG, where I figured it to be, at 1 7/8" is "perfect." I thought so too. I am very glad that I went with that and not the Horizon Hobby recommended 2.5 inches!
I wanted to take my students up on the buddy box with this plane. I noticed that the transmitter batteries were getting low. This was shown by the position of the green light on the transmitter, which was next to the red light. I swapped the fresh Duracells out of the recently purchased transmitter that was to be used as the buddy box, and put them into the original transmitter. I put the supplied SHISU EXTRA HEAVY DUTY cells into the buddy box's battery area and they fell out! They would not stay in the transmitter, and of course provided no electrical contact! Dang.
When I got home, I measured the SHISU cells and Duracells and discovered that the SHISU cells are a little over a millimeter shorter and about 1/2 millimeter less in diameter when compared to the Duracells. The diameter difference meant that there was at least 3.5mm of extra distance across the transmitter battery box, and no end pressure to help hold them in place. The SHISU cells had worked fine in the original transmitter. It is my recommendation that if the cheap Chinese batteries are too loose, change them.
I balanced a Master Airscrew 11x8 standard wood prop.
Day 11
I gathered the data for a Master Airscrew 11x8 standard wood prop.
The supplied Li-Poly was charged. The voltage readings 20 minutes after charge were 4.121v, 4.155v, 4.160v. The CellMeter-8 indicated that this pack was unbalanced. I wanted to see how far the supplied balance charger would allow the cells to get "out of balance", but I just couldn't let it go past this point. I used my Astro Flight Blinky balancer to balance the pack on the way out to the PMAC electric fly.
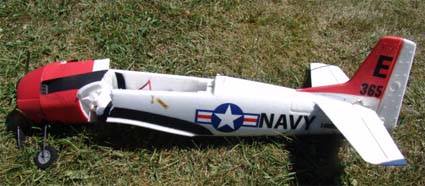
Just a few minutes into the first flight at PMAC, the radio glitched quite badly over the trees on the east side of the field. It had not glitched at all while flying at the Midwest field. I regained control quickly and flew directly in towards the field. I landed rather abruptly and the left main gear departed the wing. The gear leaving the wing was no real surprise.
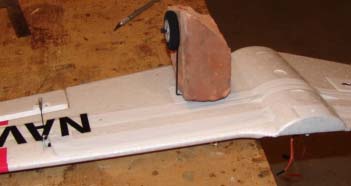
After returning home, I used the previously purchased Gorilla glue to reattach the gear mount after cleaning away what appeared to be a silicone adhesive that had been applied at the factory, and that doesn't hold worth a darn. I also learned that it is a good idea to put waxed paper between the brick and landing attachment! It wasn't going to fly worth a darn with that brick attached.
Day 12
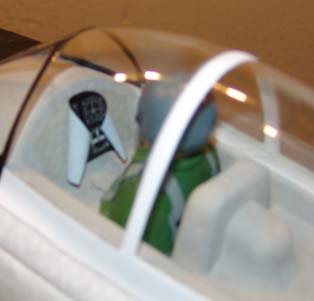
I took photo of curling instrument panel sticker.
Because of the "glitch" problem that had shown up on Sunday, I called Horizon Hobby and asked whether the supplied receiver is single or dual conversion. I was told that it is a single conversion. I asked why the receiver antenna was routed diagonally across the elevator and rudder servos. I was told to move antenna over and tape it away from them. I also asked about the receiver shift again. I was told this time that it has no shift. It is just a parkzone and that word comes directly from parkzone. I told the person that Peter Waters found it to be negative shift like Futaba, and his response was one word, "okay."
Being a single conversion receiver explains the glitching at the PMAC field, and not at Midwest. I was the only flying when the T-28 was up at Midwest and it was an RF rich environment at the PMAC meet.
I also noted today that the online manual now includes the CG as 2.5" back and that the photos are much clearer online than in the printed manual that came with my plane.
Day 13
I rerouted the receiver antenna and added a strain relief button. The double-sided tape on the receiver was replaced with hook-and-loop fasteners so that I could swap out the original single-conversion receiver, at the field, if the supplied receiver continued to glitch.
Original antenna position
New routing for receiver antenna
Strain relief "button" can be seen
Day 14
I took the T-28 to the UFO field in Highland, MI to fly with my friend Jim M. I installed my Hitec 535 receiver (negative shift) and we did a range check. The range check went as expected and was very good. I may, if I have to, switch to this receiver some time in the future. The T-28 was NOT flown with the Hitec receiver, as I wanted to check the supplied single-conversion receiver with the receiver antenna moved.
Unfortunately, once again, I was the only one flying when the T-28 was up, but it never had a glitch on the two flights I made. The first flight was done with the supplied Li-Poly pack and stock T-28 prop and the second flight was done with the "A123" pack and a Master Airscrew 11x8 standard wood prop. The buddy box system was also checked at this time with Jim on the buddy box. It worked great!
Jim noted that he really liked the way the plane flew and thought that it was going to be a good "aileron trainer" for my students.
Day 15
I charged the supplied Li-Poly pack on the CellPro 10S to determine the IR of the cells. They were 10.8mOhm, 10.8mOhm and 13.0mOhm. The cell that has been lagging during the "balance" charge and showing a consistently lower voltage is the one that read 13.0mOhm on the CellPro 10S.
Day 16
My students and I flew the plane using the buddy box. All went really well. The prop adapter became loose after several prop strikes because the crosswind kept getting under a wing and tipping this tricycle-geared plane. Overall, this plane does work very well as an "aileron trainer" even in a bit of wind. The supplied Li-Poly battery and supplied prop were used for the first flight and then the prop was changed to a Master Airscrew 11x8 standard wood prop and 3S "A123" packs were used for the subsequent flights.
Day 17
Three days after using the supplied Li-Poly the voltages were 3.832v, 3.831v and 3.827 volts. The battery was charged using the supplied charger. About two hours later the resting voltages were 4.124v, 4.144v and 4.140v.
Day 18
My students and I took several flights with this plane. The buddy box is working well and it is the "aileron" trainer that I had hoped for.
Day 19
There were a lot of people flying at the Midwest field today. My students got several flights on the T-28. The radio glitched several times while the students were on the sticks. It was a little unnerving for them, but control was never lost for very long and nothing "bad" happened.
Day 20
I installed the Hitec 535 negative shift receiver. I measured the distance from where the leading edge protrusion of the wing mates with the fuselage and found that it is about 2.5-inches from there to the mark I have on the wing showing the correct CG. That must be the 2.5-inches that Horizon Hobby is referring to, but it is not what is described online or in the newer version of the manual.
Day 21
The range was checked with the Hitec 535 receiver. It was fine. I flew the T-28 with the supplied Li-Poly pack and stock prop to once again verify the CG and check out the range in the air. We flew a training flight with the "A123" pack. There was no glitching, but there was never another plane in the air while we were flying. The "other" wing-mounted landing gear fell off when I picked up the plane after the second flight. Both landings were good, and it came as a "surprise" to us. After returning home, the poor, silicone type glue was removed from the wing and the gear plate was glued onto the wing with Gorilla glue. That should take care of the "departing" gear problem.
Motor Specifications for the 480 Brushless Outrunner Motor, 960Kv: T-28:
Outside diameter: 1.385 in./35.2mm
Outside length inc. protrusion past "bell": 1.65 in./42mm
Outside length without protrusion: 1.385 in./35.2mm
Shaft length: 2.36 in./60mm
Shaft diameter: 0.1575 in./4mm or ~5/32 in.
Motor and Prop Weights
480 Brushless Outrunner Motor, 960Kv: T-28 w/leads: 3.76 oz./106.7g
Prop Adapter: 0.18 oz./5.1g
Prop Nut: 0.31 oz./8.7g
parkzone T-28 "9.5 x 7.5" prop: 0.57 oz./16.2g
Total Motor and Prop weight: 4.82 oz./136.7g
Motor Testing - Motor 1:
Drill press test: all leads 1.317v AC @ 1560 RPM
Mathematically calculated Kv = 882
No Load:
0.96 amps @ 10.2v 9135 RPM
1.13 amps @ 12.3v 10980 RPM
(1800mAh Li-Po) PZ 9.5x7.5 - 11.012v, 17.816 amps, 7718 RPM, 196.2 watts in, pitch speed 54.8 mph
(2300mAh A123) PZ 9.5x7.5 - 9.606v, 14.160 amps, 6942 RPM, 136.1 watts in, 49.3 mph
(2300mAh A123) APC 12x10E - 9.066v, 22.300 amps, 5394 RPM, 202.3 watts in, 51.1 mph
Motor Testing - Motor 2:
Drill press test: AC volts - 1.307, 1.314, 1.318, average 1.313v AC @ 1560 RPM
Mathematically calculated Kv = 884
No Load:
0.90 amps @ 9.994v 9012 RPM
1.10 amps @ 12.128v 10872 RPM
(1800mAh Li-Po) PZ 9.5x7.5 - 11.068, 17.896 amps, 7764 RPM, 208.1 watts in, pitch speed 55.1 mph
(2300mAh A123) PZ 9.5x7.5 - 9.418v, 13.854 amps, 6816 RPM, 130.5 watts in, pitch speed 48.4 mph
(2300mAh A123) APC 12x8E - 9.264v, 21.516 amps, 5844 RPM, 199.5 watts in, pitch speed 44.3 mph
(2300mAh A123) APC 12x10E - 9.160v, 23.554 amps, 5424 RPM, 216 watts in, pitch speed 51.4 mph
(2300mAh A123) Master Airscrew 11x8 - 9.260v, 19.8 amps, 6090 RPM, 183 watts in, pitch speed 46.1 mph
Note: The MA 11x8 data was gathered on a different day.
Measured Specifications:
Wing area: ~315 sq.in./20.32dm2
Wing Span: ~43.5 in./1.1049m
Supplied wheel diameter: 1.87 in./47.5mm
Dave Brown Products 2.25" Lite Flite Wheels: 2.17 in./55.12mm
Weights - Out of the Box
Wing w/ailerons installed but not landing gear: 6.41 oz./181.6g
Horizontal Stab & Elevator: 0.77 oz./21.8g
Fuselage: 17.2 oz./487.7g
3 Supplied wheels: 0.38 oz./10.8g
3 Supplied landing gear w/wheel retainers: 0.85 oz./24g
parkzone PKZ1031 1800mAh 3-cell Li-Po: 5.02 oz./142.2g
Total out of the box, ready to fly weight: 30.62 oz./868.1g
Out of the box wing loading: 14 oz./sq.ft.
Out of the box cubic wing loading: 9.46 oz./cu.ft. (typically sport)
Watts in per pound with Li-Po & supplied prop: 105.5
ESC Supplier's stated weight: they said 1.2 oz. and that would be 34g but they also said 1.13 oz./32g
Measured weight with 2 APP connectors: 33.5g/1.18 oz. (08/27/10)
Weights of Modifications: (Revised 08/27/10)
3 Dave Brown Products 2.25" Lite Flite Wheels: 0.96 oz./27.2g - difference + 0.58 oz./16.4g
3S1P 26650 2300mAh from cells by A123 Systems, Inc. - 8.48 oz./240.5g - difference + 3.46 oz./98.1g
Master Airscrew 11x8 standard wood prop: 0.59 oz./16.6g - difference + 0.01 oz./0.4g
Modification total w/MA 11x8: 4.05 oz./114.9g
RTF weight w/Mods: 34.67 oz./983g
With A123 Mods wing loading: 15.85 oz./sq.ft.
With A123 Mods cubic wing loading: 10.72 oz./cu.ft. (typically advanced sport)
With A123 Mods Watts in per pound with 3S A123 & MA 11x8 wood: 84.5
The Dilemma When Using the Stock Motor with a 3S Li-Poly Battery and 3S "A123" Pack
Revised 08/30/10
Back in August of 2008, I originally chose to use the supplied motor and ESC so that I could switch back and forth between the Li-Poly pack and the "A123" 2300mAh pack for in-flight comparisons and to be able to evaluate the plane as "most people" fly it. This is not the "best" way to switch to using an "A123" 2300mAh pack as the prop clearance, with an 11-inch diameter prop, requires either closely cropped grass or pavement.
For a trainer, I find the 84.5 watts in per pound using a 3S "A123" 2300mAh pack more than adequate. Others may want to use the plane with at least the same power loading as the stock plane, which is about 105 watts in per pound.
After about two years of using the plane as a trainer and my windy day flier, I decided that it was time to decrease the prop diameter so that my students would stand a better chance of getting a clean takeoff without 'stubbing' the prop. The 11-inch diameter prop just didn't give them enough ground clearance for consistently good takeoffs.
Solutions for "Upping" the Power with "A123" 2300mAh packs
IMPORTANT NOTICE! - Please read and heed --- The following are possible recommendations only. It is up to the modeller to determine whether any of these suggestions may actually work. A power meter/watt meter/Whattmeter is an ESSENTIAL TOOL when modifying any power system. Do NOT attempt any modification to any power system without a power meter to verify the actual amp draw!!! Be absolutely sure that your ESC with 4 servos and the motor can handle the amp draw shown on the power meter.
Solution 1: Increase the cells to four
Drive Calculator predicts that with a 4S "A123" 2300mAh pack (listed in the program as "M1 (A123 Systems)/(DeWalt 36V)"), the stock motor and ESC, using an APC 10x7E prop should be drawing about 21 amps with about 12.3v being supplied to the ESC for a bit less than 260 watts in at an elevation of 287m with an air temperature of 15-deg C.
A 4S1P "A123" 2300mAh pack with wire, power connectors and balance leads weighs 10.9 oz./309.05g (actual wt. of my 4S pack for my Super Stearman). That is a weight increase of 5.89 oz./166.85g over the original 3S 1800mAh Li-Poly pack (142.2g). The stock plane using a 4S "A123": 2300 mAh pack instead of the Li-Poly pack should weigh in at about 36.5 oz./1035g or 2.28 lb. To achieve the same performance level as the stock system requires about 2.28 lb. * 105 watts in = 239.4 watts in for equivalent performance. At 2.28 lb. and with 260 watts in the ratio is about 114 watts in per lb., which is better than the stock system with the 1800mAh 3S Li-Poly pack. At 36.5 oz. the wing loading increases to 16.7 oz./sq.ft. and the wing cube loading to 11.28 oz./sq.ft.
The Problems
Problem 1: The hatch/canopy has to have an extreme modification to fit the 4S pack and will most likely have to have a new 'floor' added to the hatch/canopy for the pilot figure. (I know this because I tried fitting my 4S pack in my T-28.) This is not a very difficult modification, but will require the ability and tools to do it.
Problem 2: With the expected amp draw of 21 to 22 amps predicted by Drive Calculator, a 25-amp ESC is not adequate, in my opinion. This is only a problem with the early T-28s that were shipped with a 25-amp ESC. It should not be a problem with the new versions that come with the 30-Amp Pro Switch-Mode BEC Brushless ESC. If yours has the 25-amp ESC, I recommend that you get at least an ESC that is rated at 30-amps continuous.
Problem 3: One of the HUGE benefits of the "A123" 2300mAh cells is that they can be charged very quickly at 10 amps or more. A 4S pack of these cells requires a relatively expensive charger to put this advantage to work. One of the least expensive I found is the iCharger 106B+ for $99 plus shipping and appropriate adapter for the balance lead.
While requiring some 'extreme' modification to the hatch/canopy, this is the easiest and cheapest modification for using the "A123" 2300mAh cells if you already own a charger capable of charging these cells at at least 10 amps. Also, the stock wheels can be used, if desired.
Solution 2: Change the Motor and ESC to get more power from the 3S pack
I believe that the 'sweet spot' for the "A123" 2300mAh cells is about 100 watts in per cell, which works out to about 35 amps, give or take a couple of amps. The stock motor using the MA 11x8 std. wood prop was putting only about 183 watts in. That is only about 61 watts in per cell at full power. There was a lot of headroom left for the 3-cell pack to reach my 'sweat spot'. This is NOT the only way to use a 3S "A123" 2300mAh pack! There are several other options as well. See: "Recommended, Commonly Available Motors for use with 3 "A123" 2300mAh cells".
Selecting the ESC: With a target amp draw of 35 amps, I select an appropriate ESC using the following formula: 35 amps (my target amps) * 1.25 (multiplying factor) = 43.75 amps. I like to run my ESCs at 80% of the manufacturer's continuous recommended draw. The multiplier of 1.25 is the inverse of 80% (0.80), therefore 43.75 amps * 0.8 (80%) = 35 amps. I would consider using an ESC rated for at least 40 amps in this application, but an ESC rated at 44-amps or greater would give more headroom.
Selecting the motor: The original motor weighs about 107g. I use the same required amp draw for the motor as I do the ESC, so the motor should be able to handle 44-amps continuous. After some extensive research, I discovered that for all practical purposes, 107g outrunner motors have a maximum current rating of about 35 amps. To hit my 'sweet spot' means that a heavier motor is required to meet the 44 amp continuous amp draw. Remember that it is not necessary to use 35 amps, and there are other motors that I could have chosen that could still have given me equal to or better performance than the stock system with a 3S Li-Poly battery. Again, please refer to the list noted above.
From my previous extensive experience of running outrunners at the 'sweat spot' of 35 amps using a 3S pack of "A123" 2300mAh cells, I knew that I needed a motor with a Kv (RPM/volt out) of about 1200. I did some very extensive research for commonly available outrunner motors with a Kv of about 1200 and weighing about 0.71 oz./20g more than the stock motor. Why 20g? As the motors get bigger/heavier they can handle more current/amps. A 20g increase is where I started finding outrunners that could handle at least a 44-amp load. I found the Scorpion SII-3014-1220.
Supplier's Specs:
Wt.: 129g/4.55 oz.
Kv: 1220
Maximum Continuous Current: 46 amps
Drive Calculator Predicted Performance; SII-3014-1220 (www.litronics2000.de (www.elektromodellflug.de)), 3S "A123" 2300mAh (M1 (A123 Systems)/(DeWalt 36V)), Master Airscrew 10x8 G/F 3 Series (source: K. Myers), Elevation 287m, Temp 15-deg C
| Parameter | Drive Calculator
Predictions | Measured Data
Added 09/08/2010 |
| Current: | 35.4 amps | 34.8 |
| Volts: | 8.73 | 8.4 |
| Watts In: | 309 | 292 |
| Watts out: | 238 | 238 |
| System Eff.: | 76.9% | 78.5% |
| DC Thrust: | 41 oz. | 41 oz. |
| RPM: | 8755 | 8811 |
| Calculated pitch speed: | 66 mph | 66.6 mph |
Stock system using the 3S 1800mAh Li-Poly battery for Comparison
PZ 480, prop PZ 9.5x7.5, motor weight: 107g, amp draw: 18.1, RPM 7750, thrust 29.0 oz./824g, pitch speed 55.0 mph
Based on the data from above, I purchased a Scorpion SII-3014-1220, a Castle Creations Thunderbird 54 and an aluminum mount for the T-28 to replace the cracked plastic/nylon original mount. They were ordered from three different suppliers and all arrived on Friday, August 27.
While I was waiting for the parts to arrive, I was worried about the amp draw of the servos when using the linear 3-amp BEC of the Thunderbird 54. I measured the amp draw of both the analog wing servos and digital rudder and elevator servos, and according to my measurements, even at a stall, the BEC should be able to handle them.
Cost of my upgrade
Scorpion SII-3014-1220 from gobrushless.com $61.41 + ship $6.32 = $67.73
Castle Creations Thunderbird 54 from Todd's Models $40.99 + ship $5.66 = S46.65
HobbyZone* T-28 Trojan & Corsair Motor Mount for the Stock 480/Universal
Item #A100018 from Custom RC Parts $19.99 + ship $1.56 = $21.55
* I found it interesting that Custom RC Parts calls it a HobbyZone mount, when it is for parkzone planes
Total = $135.93 Way more expensive than using a 4S "A123" pack with the stock equipment!
Weight Change: based on actual measurements of the received parts
SII 3014-1220 w/prop adapter: 5.15 oz./140.35g - change: + 0.70 oz./19.85g
CC Thunderbird 54: 1.746 oz./49.5g - change: + 0.57 oz./16.05g
Master Airscrew 10x8 G/F 3 series: 0.78 oz./22.2g - change + 0.20 oz./5.6g
Custom RC Parts HobbyZone T-28 Trojan & Corsair Motor Mount Universal: 0.75 oz./21.3g - change: + 0.56 oz./16g
Total change: 2.03 oz./57.5g
RTF Wt. with changes: 36.7 oz./1040.5
That means that it pretty much comes out as a 'wash' weight wise when compared to adding another cell and using the stock system.
With the weight increase of 57.5g the RTF weight is about 37 oz./1049g or 2.3 lb. At 2.3 lb. and now with about 310 watts in the ratio is about 135 watts in per lb., which is quite a bit better than the stock system with a 3S Li-Poly pack. At 37 oz. the wing loading increases to 16.9 oz./sq.ft. and the wing cube loading to 11.44 oz./sq.ft.
Return to Original 2008 Forward
Flight Tests of the New Power System
The first flight test of the new power system took place on Saturday, Aug. 28, 2010 during the monthly EFO flying meeting. The plane performed exactly as expected. It could be faster, if I chose it to be, it could climb vertically much higher, if I chose to do so, and it still slowed way down for good student pilot training. With the 10-inch diameter prop, ground clearance was no longer an issue and taxiing and taking off was very simple.
I flew three more flights the next day. On the second flight I hooked up the buddy box and had Paul take it around the patch on the buddy box using both the high and low rates. He's a seasoned pilot but it was his first time flying a parkzone T-28. He thought that it flew very, very well. The third flight was the most fun. I would take off, fly out and make a 180-deg turn, do a roll or snap roll and then go into a loop, consecutive loops or an avalanche, fly out of it, set up for a final and do a touch and go. With the 11-inch prop, touch and gos were problematic, but no longer! :-)
The Problems:
Problem 1: It is highly expensive to replace the motor and ESC. Also, the motor mount should be replaced with the aluminum one noted so that swapping to different size motors is as easy as possible.
While this may seem expensive, it is really cheaper than having to purchase a charger that can charge a 4S "A123" pack at 10 amps! All that is needed to charge a 3S "A123" 2300mAh pack is a length of lamp cord and a power meter with the appropriate connectors. It is called ZIP Charging and no charger is required.
Also, by using the list of outrunners for use with 3S "A123" 2300mAh packs, a less expensive motor could be chosen and still provide a performance increase over the stock system.
Problem 2: If required, removing the original ESC takes care and a bit of time. The new ESC has to be fitted with modification to its placement area in the fuselage.
Why Did I Choose the More Expensive Option?
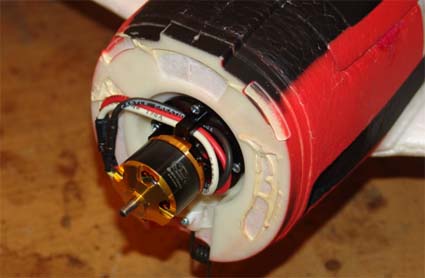
New Motor installed
With over two years of using this plane as a trainer with my students, why did I change the power system? The power itself was way more than adequate for training purposes, as the plane requires very, very little power to fly around sedately training students. It had sufficient power for all typical aerobatics including extended knife-edge flight.
The 11x8 prop gave my students real problems with takeoffs on anything but the ideally mowed grass. I wanted to reduce the prop diameter to give them a better success rate on takeoffs. Since the ESC that came in my version was the 25-amp ESC, adding a cell meant, at least a new 30-amp ESC. That would have been a cheaper alternative for me, as I also have a FMAdirect CellPro 10S charger that can charge a 4S pack or "A123" 2300mAh cells at 10 amps. But the stock motor in my plane had an 'odd' problem. After the last time my student took it up, when we landed and I had recharged the battery in 8 minutes using a Zip Charge, the motor would not start again. I'm not sure why, as when I checked everything out at home after the session, everything was working fine. I'd never had that happen before.
I did find that the original motor mount was cracked from years of not so perfect landings by my students and myself, so I decided to purchase the aluminum one from Custom RC Parts and that would also allow me to fit the new motor as well.
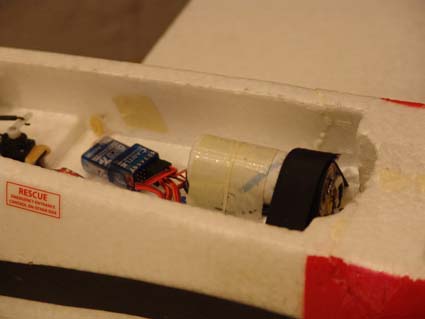
The battery had to be moved rearward to compensate for the added nose weight of the new motor and motor mount. The battery was originally positioned in the cutout to the right of it in the photo.
Returning to the Original Sept. 2008 Review:
What I liked about this plane:
1.) It is a lot of fun to fly and, on a relative scale, quite easy to fly.
2.) The supplied power system is more than adequate for flying the plane quite well.
3.) It is a good plane to use with a buddy box as an aileron trainer.
Things that I didn't care for or that I thought could be done better:
1.) I feel that the charger is unsafe to use the way it is supplied.
2.) The charger does not appear to balance the cells well.
3.) The charger does not "fill" the provided Li-Po battery, but this may be an added safety feature.
4.) The original manual does not provide a CG and the updated manual has the CG wrong, in my opinion.
5.) The original manual does not have adequate information for programming the ESC, although that is not really necessary when using the supplied Li-Po battery.
6.) The original manual has some interesting and confusing phrasing and lacks some useful information like where to place the battery.
7.) Many of the photos in the original manual are quite dark and a bit fuzzy.
8.) I my opinion, the receiver antenna, which was originally routed over the rudder and elevator digital servos, is not a good practice. (no longer applies)
9.) The main gear are not adequately secured to the wing. (might not apply any longer)
10.) The instrument panel "sticker" looks bad shriveled up in the cockpit.
11.) In my opinion, there is less than adequate airflow through the fuselage to cool the components, especially the ESC. (Hasn't shown itself to be a problem even duing the really HOT summer of 2010)
12.) There was no note about the rudder and elevator servos being "digital" and the "ringing" being normal for digital servos.
13.) There was no indication, anywhere, that the receiver is a single conversion and negative shift. (no longer applies)
14.) I felt that the tech support that I received from Horizon Hobby concerning this plane was less than adequate and that both of the tech people that I talked with were less than interested in passing on information that would make this T-28 RTF a better system.
15.) I found the "non-standard" prop adapter size irritating.
16.) The supplied setscrew does not seem to hold the prop adapter to the shaft well and the metal that the adapter is made of does not seem to hold the setscrew threads very well.
17.) The ESC is encased and glued into a foam slot in the fuselage. That doesn't let much cooling air pass by or through it.
18.) The manual needs to have its grammar and sentence structure "cleaned up."
My Recommendations
I highly recommend the PNP (plug and play) version of this plane to anyone who wants a fun, knockabout, low-wing, tricycle-geared plane without putting too much effort into it.
I cannot recommend the RTF version at this time (no longer available), mostly because of the extremely poor and, in my opinion, unsafe charger and a radio system that glitches constantly. My recommendation is to not purchase the RTF version. That recommendation may change in the near future. I fully expect that the next generation of parkzone T-28s will have the Spektrum DX5e transmitter and the AR500 DSM2 5 Channel Sport Receiver like the parkzone F4U Corsair. I could then recommend the RTF version if the supplied charger is to be "discarded" and replaced with at least a CellPro 4S or better charger.
If I were to purchase the PNP version I would set it up for use with a 3S "A123" 2300mAh pack from the beginning.
Afterward:
Some of the problems that I encountered with the RTF version of this plane involved my wanting to set it up for operation using a 3S "A123" pack and use of a buddy box. The bottom line, issues aside, is that this is a fun little plane to add to your fleet!
It now has a cousin in the parkzone F4U Corsair RTF , which is said to fly "about the same."
September 11, 2008:
On September 11, my student brought out his new parkzone F4U Corsair RTF using all the supplied components except for the supplied charger. He has a better, safer charger that he uses. I took it up for a quick maiden trim flight. My student easily hand launched the plane, as we used the supplied skids instead of the wheels. It flew straight out from the easy launch and needed only a couple of clicks of elevator and aileron trim. It does fly very much like the T-28, but has a slightly slower top end speed, but it is NOT slow! It can fly very slowly when asked to do so. We did several buddy box flights. On the last flight of the day, I hand launched for my student and he did the entire flight on his own. This is one nice "aileron trainer" with plenty of power and a decent radio system.
It also looks like a good candidate for conversion to "A123" cells.
September 30, 2008: A New parkzone T-28 "Problem"
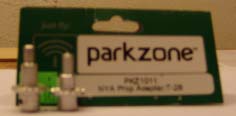
I've had problems with the prop adapter since I first purchased this plane. The original adapter had the setscrew hole drilled at an angle and the threads were stripped. My original fix was to re-tap the setscrew hole for a 4-40 setscrew. That worked for a while, but the threads stripped on it as well. After several field fixes I decided to purchase a new prop adapter. On September 29, I purchased a prop adapter labeled "PKZ 1011 - NYA Prop Adapter: T-28".
Several surprises awaited me when I affixed this adapter to the parkzone 480 motor. First, my 11x8 Master Airscrew standard wood prop reamed to 8mm slid right on the prop adapter. That was good because the original adapter was over 8mm and had to be filed down to use an 8mm hole reamed in the prop.
Unfortunately, with the prop on the new adapter, it became clear that this adapter was much, much shorter than the original.
Original on the left, "new" on the right
The unthreaded part of the original adapter is 10mm long and the threaded part 9mm for a total of 19mm. The unthreaded part of the new adapter is only 6mm long and the threaded part 10mm for a total of 16mm. I sure could have used that extra 3mm.
It appears that parkzone/Horizon Hobby has another "quality control" issue for you to be aware of. The new prop adapter should present no problem to those using the supplied prop, but it caused me a problem when using my selected prop because of the thickness of the prop hub.
Recommended, Commonly Available Motors for use with 3 "A123" 2300mAh cells and the parkzone T-28/T-28D, Corsair and Stinson Reliant
IMPORTANT NOTICE! - Please read and heed --- The following are possible recommendations only. It is up to the modeler to determine whether any of these suggestions may actually work. A power meter/watt meter/Whattmeter is an ESSENTIAL TOOL when modifying any power system. Do NOT attempt any modification to any power system without a power meter to verify the actual amp draw!!! Be absolutely sure that your ESC with 4 servos and the motor can handle the amp draw shown on the power meter.
The following suggestions were created using Drive Calculator and SHOULD Be Verified using a power meter Before actual use! I used my elevation of about 287m and an ambient temperature of 15-deg C for the suggestions. If your elevation is higher and/or your ambient temperature higher, you will see lower amp draws than suggested below. If your elevation is lower than 287m or the ambient temperature lower than 15-deg C, you will see higher amp draws when measured with a power meter.
The following power system suggestions also apply to the parkzone Corsair and Stinson Reliant, keeping in mind that with a 5th servo in the Stinson, a switching BEC or receiver battery pack is required.
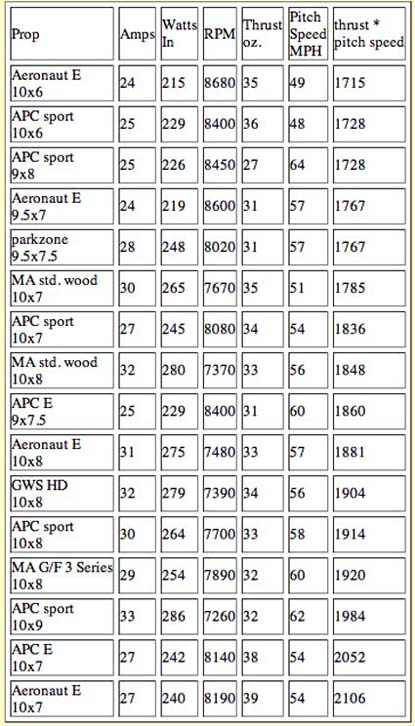
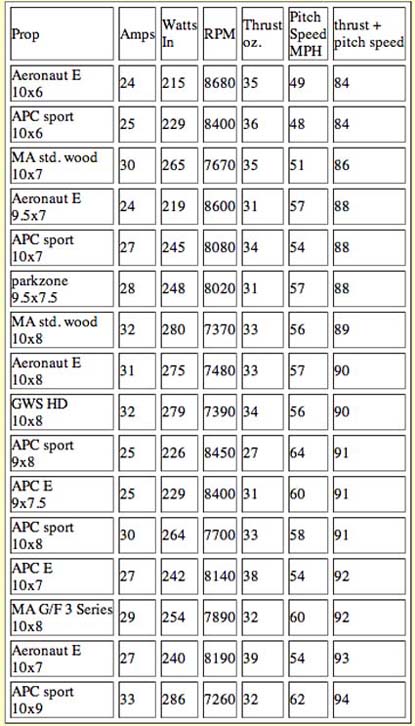
Relative Rating of Props
We have used watts in per pound of the RTF (ready to fly) plane weight to rate expected performance between various power systems for decades. I've included the watts in per pound in the tables, since I can make a reasonably accurate estimate of the RTF weights with various power systems for the T-28.
I've tried various methods to rate the props on the same motor/ESC/battery combination. I have not found one that works perfectly, and since I do not have all the various brands and sizes of props to do empirical testing, I am, at this point, using the Drive Calculator derived thrust plus the pitch speed to give a relative prop rating number. While I was trying various methods, I also tried the Drive Calculator estimated thrust times the pitch speed. When thrust and pitch speed are used as factors, thrust dominates the result. When thrust and pitch speed are used as addends, pitch speed dominates the results. For my purposes, I've decided to go with the higher pitch speed being "more relevant". The tables below illustrate the point.
|