|
Flying High With Electric Power!
The Ampeer ON-LINE!
Fly the Future - Fly Electric! |
|---|
Site Table of Contents
| President: | Vice-President: | Secretary-Treasurer: |
| Ken Myers | Richard Utkan | Rick Sawicki |
| 1911 Bradshaw Ct. | 240 Cabinet | 5089 Ledgewood Ct. W. |
| Commerce Twp., MI 48390 | Milford, MI 48381 | Commerce Twp., MI 48382 |
| (248) 669-8124 | (248) 685-1705 | (2480 685-7056 |
 | ||
| Board of Directors: | Board of Directors: | Ampeer Editor |
| David Stacer | Arthur Deane | Ken Myers |
| 16575 Brooklane Blvd. | 21690 Bedford Dr. | 1911 Bradshaw Ct. |
| Northville, MI 48168 | Northville, MI 48167 | Commerce Twp., MI 48390 |
| (248) 924-2324 | (248) 348-2058 | (248) 669-8124 |
| The Next Meeting: Date: Wednesday, Dec. 13 Time: 7:30 p.m.
Place: Ken Myers' house | ||
| Confessions of a Soldering Hack Ken shares information on how he became a little better at soldering. | Tactic TTX660 6-Channel Transmitter Review Ken reviews the latest version of this Tactic transmitter. |
| AMA Update Joe Hass announces an AMA Update at Ultimate Soccer Arenas on Nov. 20 | 2017/2018 Indoor Flying At the Ultimate Soccer Arenas Announcement for the indoor flying season. |
| The October EFO Flying Meeting Notes and photos from the October EFO Flying meeting | |
By Ken Myers After all of these years, I am still a 'hack' when it comes to soldering. This was pointed out very clearly to me when Mike Russell came over and we rebuilt a 3S2P 2500mAh A123 pack into a 6S 2500mAh A123 pack. While we were eventually quite successful, I was embarrassed by my soldering skills, or lack there of, in front of my flying buddy Following that visit, I started searching the Internet and YouTube to figure out what I'd been doing wrong all these years. Some of the information I found about soldering was new to me, but other bits of information were things that I'd forgotten about over the decades. 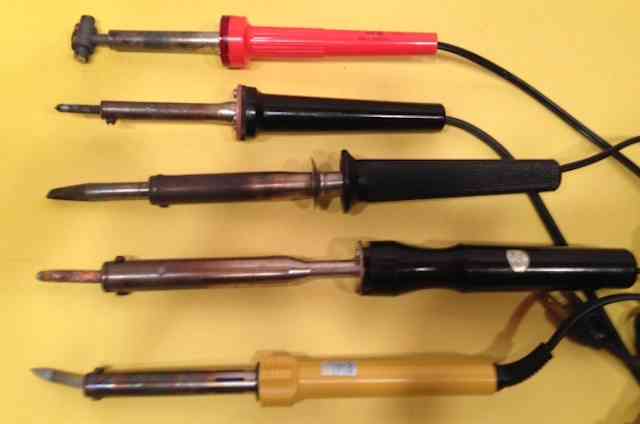 The photo shows my set of irons in May of 2017. Some have served me well over the years, while others not so much. Someone who knows the ins and outs of soldering can immediately see what part of my problem was. The uppermost iron in the photo is a Weller 40W with a Charlie White hammerhead tip. It was used to join NiCads and NiMH cells together into "sticks" for motor power packs. I still used it to solder power leads and cell interconnects onto A123 packs. The 25W iron below it was sacrificed to become a tool to open up pushrod openings and air flow openings in iron on coverings over balsa airframes. The middle iron is actually a high wattage 'leading' iron used for stained glass work. I used it to solder power leads and cell interconnects on NiCad and NiMH cells before I had a hammerhead tip. The K&S 60W iron, second from the bottom, was not taken care of and re-tinned after every use. The bottom iron was supposed to be a 60W iron. I picked it up from a vendor at the Toledo RC Expo for cheap. It was!!! The tip bent into a crescent shape on the first heating. With no decent flying weather at the end of April through the first part of May, and having at least a half a dozen soldering projects in the queue, I decided it was time to improve my soldering skills. One of the first things I ran across was an old (copy write 1998) Weller document on soldering. It presented a lot of good information about solder and soldering. If you need more background about solder and soldering, I recommend that you download and read the document. It provides a good reference regarding proper soldering, and WHY it is proper soldering. "I wondered why it was no longer on the Cooper Tools Web site. They were listed as the authors of the document. Some more research showed at Weller Soldering Products | Weller Distributor | Mouser www.mouser.com/weller/: "Weller distributor Mouser Electronics sells Weller soldering equipment. Weller is part of Apex ToolGroup (Formerly Cooper Tools)." "With a somewhat better understanding, I looked for soldering videos by Bruce Simpson (RC Model Reviews) on YouTube. He is my "go to" guy when beginning research on YouTube. After watching his videos about solder and soldering, I watched videos by other people on YouTube. "In the following section, I've presented Bruce's video segment first. It is followed by other video segments on the same topic, or that disagree with the information provided by Bruce. "The first annotated time indicates where into the video the segment will start and the second annotated time is where that segment ends. Time: 3:07 - 3:54 What is a soldering tip? How it is made. How to protect it.
Clean tip before start soldering
Don't file the tip!!!
Weller on tip cleaning using the 'dry' cleaner
Special Note:
Dry solder sponge - tip cleaning Bruce Simpson's suggestions 5:05 - 7:18 EEVblog #180 - Soldering Tutorial Part 1 - Notes recommended tools
Bruce tries to clarify the difference between the two 10:04 - 12:46 Temperatures that Bruce uses 13:37 - 18:39 Leaded solder 250-deg C to 260-deg C or 482-deg F to 500-deg F He says that 280-deg C (536-deg F) is too hot Another recommendation:
7160F for lead solder and 7250F for lead free, but he also says he uses 6500F for lead solder, but can run as low as 5500 F. Pre-tinning wire and connectors and shrinking heat shrink tubing. Demonstrated using the XT60 connector. 21:00 - 31:10 Soldering connectors
HOW TO SOLDER Beauty and the bolt less than 10 minute video that touches upon the basics in a "Fun With Flags" style How not to solder
After years of hit and miss soldering success with plug-in soldering irons, and poor technique, I decided to purchase a soldering station with temperature control along with several useful size tips for the type of soldering that I do in my RC hobby. Bruce Simpson uses a Hakko brand FX888. I noted that many of the folks in the videos also used a Hakko brand soldering station. I watched a complete review of the current Hakko FX888D by at Sparky's Widgets on YouTube. I checked out a few alternatives before purchasing the Hakko. There was an older version of a Hakko known as the 936. Hobby King sells a 'reengineered' version for $18.34. Bruce Simpson looks at the Hobby King version and shares his opinions. Dave Jones reviews this 'reengineered' version on his EEVblog. http://www.bestsolderingstation.net/ has ratings and reviews for soldering stations in the $50 to $150 range. The Weller WES51 also seemed like a quite usable unit with decent reviews. Both the Hakko FX888D and Weller WES51 analog soldering stations are available through the Home Depot Web site. Hakko FX888D: $96.37
Weller: $88.89 I couldn't find tips for the Weller on Home Depot Web site. I ordered my Hakko FX888D through Home Depot. It is not carried in their stores. I assume that my unit came directly from Hakko USA, as the tape used to seal the shipping box had Hakko printed all over it, yet the packing slip was invoiced through Home Depot. I ordered it on April 27 and it arrived at 5:30 p.m. on May 4. Ordering it through Home Depot, finding Hakko tape used to seal the shipping box, having a colorful consumer information sleeve around the box containing the unit, noting a typical California warning label about lead dangers on the unit's box and the unit's box containing what appeared to be recycled fibers, allayed my fears of it being counterfeit. (See: "The Counterfeit Hakko FX888D Problem" near the end of this article.) The only piece of paper in the unit's box was the tri-folded Instruction Manual, in English. As usual for me, the print was too small for me to read comfortably, so I read the downloaded version, enlarged on my computer. After reading through the manual, I decided that I wanted to get started. I wanted to tin the new tip with 60/40 rosin core solder. In Section 7 of the manual, tip maintenance, it said to set the temperature to 4820F when soldering is finished, which was supposed to be the default preset number. I watched the video on initializing the presets and selecting them. The Instruction Manual noted the default preset temperatures in Fahrenheit degrees were 482, 572, 662, 752 and 842 degrees. That's not what displayed when I had set the base station to preset mode. They were set to; 600, 700, 750, 800 and 850 degrees Fahrenheit. I then had to watch "How To Change the Preset Temperatures". I set all five presets to the Fahrenheit temperatures noted as the default temperatures in the manual. Preset 1, now set to 4820F, was chosen and the temperature was allowed to stabilize. The tip was cleaned using the new sponge and distilled water and then tinned with the solder.
Since then I have successfully soldered an XT60 to APP adapter, several wire extensions, several wires and 1157 light bulbs involved in my battery internal resistance research, two A123 4S 1100mAh battery packs and a cell replacement in an older A123 pack. I previously mentioned that the 936, sold by Hobby King, was 'reengineered' and not a fake or counterfeit, as they did not put the brand name Hakko on the unit, even though it was 'implied' by the number. There are true counterfeit Hakko FX888D units available on the Internet, with a lot of them on eBay. They are produced to look exactly like the real unit and they are marketed as the real thing. The counterfeit units are mostly aimed at the 220V market outside North America. A quick search of eBay, from here in the U.S., showed two obvious counterfeit sellers of 120V units. One of the sellers was located in China and the other in the USA. It seems that most of the sellers of the FX888D on eBay use the same photos, and they are not the photos of the actual product being sold. The photos are no clue, but the price is a fairly good indicator. Luckily, eBay has a money back and no return necessary policy on counterfeit products. The following videos show what to look for when identifying a counterfeit Hakko FX888D. Fake Hakko FX888D on Ebay.
Hakko FX-888D - Real vs. Counterfeit - how to spot a fake
Hakko FX888D unboxing 2
What to look for:
Fake box it came in is not recycled material, even though the graphic shows it to be. Box for genuine is recycled as can be seen from flecks in it and 'wet newspaper' smell.
David Taylor describes what happened to his fake and shows a genuine one.
Tactic TTX660 6-Channel Transmitter Review
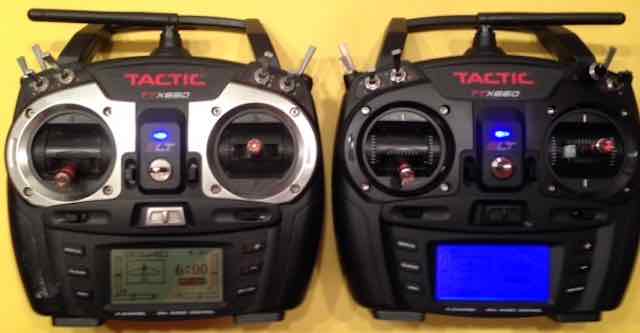
Preface: I'd like to thank Joe Hass for the loan of his new Tactic TTX660 for this review. A note on the photo with the TTX650 & TTX660: The photo shows my 'main' Tactic TTX650 on the left and the borrowed TTX660 on the right. The TTX660 shows the screen right out of the box without any adjustment to the brightness or contrast. I'm not sure why it shows up as blank in the photo. It wasn't.  The second photo shows the TTX660 with the contrast and brightness adjusted. 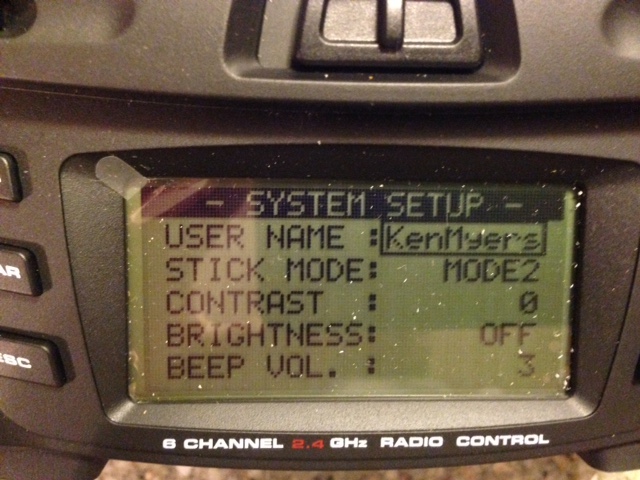 The third photo shows the TTX660 with the brightness off. The flecks seen in the photo are on the protective clear 'plastic' covering the screen. Since the transmitter is not mine, I left the protective clear 'plastic' on. The Tactic TTX660 is the 'replacement' and upgrade for the former Tactic TTX650 transmitter. I have two TTX650s that have been in constant use since my first review in the July 2013 issue of the Ampeer. The 2017 flying season was their fifth year in continual use. I have no complaints or issues to report about them. Tactic uses a protocol known as SLT (secure link technology). Hitec has added the SLT protocol to their newer transmitters along with their own AFHSS protocol. When the SLT protocol is enabled in the Hitec transmitters, with that function, they can control Tactic brand receivers. Tower Hobbies also has a 'house brand' radio system using SLT. It is a simple 4-channel radio that comes with an SLT receiver. Much of the information in previous Ampeers about the TTX650, also applies to the new TTX660. Tactic TTX650 6-Channel 2.4GHz SLT Computer Transmitter and TR624 6-Ch Receiver Review More on the Tactic TTX650 and TR624 Receiver A Better Way to Set Up the Throttle Cut Feature on the Tactic TTX650 to be Used as a Throttle Lock The Tactic TTX850 8CH Transmitter & 8CH TR825 Review and Comparison to the Tactic TTX650 Flyzone Tiger Moth & Tactic TTX850 Update To be able to more clearly note the differences between the TTX650 and the TTX660, I made a comparison chart which can be viewed online. There are a few significant differences. The TTX650 has a 20 model memory. The model memory was increased to 30 models in the TTX660. The TTX650 does not have a backlit LCD screen and the TTX660 does. The TTX660 airplane and helicopter functions remain the same as in the TTX650 but the TTX660 now has multirotor functions that are somewhat similar to the ones found in the discontinued TTX850. In its most recent literature, Tactic notes the case of the TTX660 as "ergonomic". The case molding is exactly the same as the TTX650, but with a hole in the back of the case for the "Flight simulator cable jack" and two slots in the back of the case for the "Two sliding levers". Switch B, second from the left on the left front face on the TTX660 is an unmarked 3-position switch and it is a two position switch on the TTX650. Switch C, second from the right on the right front face, has been replaced by the "Proportional dial". The dial has no center detent. The TTX650 has "chrome colored" plates around the sticks and a "chrome" colored on/off switch. The TTX660 does not have them. To ME, the chrome added a bit of pizzazz that I miss on the TTX660. A well written, easy to read and understand, paper manual is provided. Personally, I like the large font used in the manual, as I have difficulty reading small fonts. Except for noting the sliders and dial on the TTX660, the manual for the TTX650 and TTX660 are identical until page 36 of the TTX660 manual where a note on DRONE MENUS appears. A FLIGHT SIMULATOR USE note appears on page 37. The rest of the TTX660 manual is the same as the TTX650, except for the added CE COMPLIANCE FOR THE EU note on page 45. According to the SPECIFICATIONS, page 43 of both manuals, the LCD screen on both units is 128 x 64 characters with graphing ability, but the TTX660 has a blue backlight. Personally, I prefer the blue backlight to the TTX850Ős red one. In practice, I prefer not using the backlight at all. Entering SYSTEM SETUP for the TTX660 is identical to the TTX650; hold down the Enter button while turning on the unit. Eight characters can be used for the USER NAME. Turning OFF the BRIGHTNESS appears to shut off the backlight, which I did. Unfortunately, the USER NAME does not appear anywhere on the MAIN SCREEN. It is only found in the SYSTEM SETUP menu. I hand copied the values from my TTX650 for the FMS SuperEZ, that I use as the club trainer, to the TTX660 in the MODEL SETUP MENU and SETTINGS MENU. I chose not to adjust the stick tension on the TTX660, since I did not own the unit. Adjusting the stick tension and length is an important step and should not be overlooked on your own transmitter of any brand. Next the TTX660 was linked to the Tactic TR625 dual diversity receiver in the SuperEZ. Tactic uses the term link to describe what other systems call binding. Linking is super, super simple with the Tactic system and described on page 36 of the manual. I use a toothpick to depress the recessed push button in the Tactic receivers. I also use a 4.8V NiMH receiver battery to do the initial link and setup. It is easier, and I think safer, to do so. It is just more convenient for me. Once the receiver was linked, and all of the functions checked, the failsafe was set. How to set the FAILSAFE FUNCTION is described on page 37. This is an extremely important safety step and should not be over looked. While restraining the aircraft, the failsafe was checked for proper operation by applying a small amount of throttle and then shutting off the transmitter. The failsafe worked properly, as the motor shut off when the transmitter signal was lost. The last thing to do before committing aviation, is the range check. I range checked at the flying field following the procedure on page 39 of the manual.
Tower Hobbies sells the Tactic TTX660 for $139.99 with free shipping. A Tower Hobbies' Super Saver Club membership of $4.99 for a year drops the price by $15 to $124.99.
Bind and Failsafe (9 min. 29 sec.) This video includes linking/binding and how to set up a simple airplane model using the various menus. Very important, and pointed out in the video, always reverse the Channel 3 'servo' function on the transmitter when using an electronic speed control (ESC). Channel 3 is the throttle channel for the Tactic systems. I was surprised that this information was not noted in the updated manual. Always remove the propeller when doing a radio setup. While the first video applies only to the Tactic TTX650, and now the TTX660, the next two videos apply to all programable type radio systems. The exact method of 'how to do it' might be different, but the reasons for setting up stick tension and stick length apply to all programable radio systems.
Tactic TTX650 set up video 2 (19 min. 38 sec.) Tactic TTX650 Programming (18 min. 46 sec.) The second video includes setting sub trims, programming aileron differential set up with servo throw or using the DIFFERENTIAL menu, programming high and low rates, and programming exponential. Please be aware that different transmitters use either positive or negative numbers to 'slow' down the movement around center. You must refer to manual for the transmitter you are using. The Tactic TTX660 transmitter, with 30 model memory, would be a great benefit to someone with several Tx-R (transmitter-ready) aircraft or Flyzone Micro aircraft. A newcomer to the hobby should find the price point attractive. The clear and concise manual makes entry into a programmable 6-channel computer radio much easier than several other other brands. There are 'cheaper' 6-Channel programmable transmitters, but many of these cheap radio systems have not been put through the FCC approval process for Part 15 compliance and they do not offer a warranty. Hobbico stands behind Tactic with a 1-year limited warranty in the USA and Canada. Hobbico has a very good reputation in the industry and they want, and go to great lengths, to have satisfied customers. Overall, I have been very pleased with my Tactic transmitters and receivers. They provide a reasonable value, work very well, and they are backed by an outstanding hobby supplier. AMA Update
Monday, November 20, 2017
Ultimate Soccer Arenas
SPECIAL GUEST JAY SMITH
New Products
No Charge to attend. Call or write with questions. See you there Joe Hass
Return to "What's In This Issue" 2017/2018 Indoor Flying At the Ultimate Soccer Arenas, 867 South Blvd., Pontiac, MI
Fall is upon us and we are seeing some of our best flying weather outdoors. But soon the cold winds of change will be upon us and we should begin thinking about getting out our indoor planes and batteries out and checking them over. Skymasters has almost everything in order for a great 25-Week Indoor Flying Season, beginning on Tuesday, October 24 at Ultimate Soccer Arenas from 10 AM to 1 PM. Flying is from October 24 through April 10. Our pricing has remained the same as last year:
You can sign up online now. What's new this year: Mark Freeland is planning on conducting a build class on one of his indoor new planes. That should be fun we will keep you updated when the details are complete. DonŐt forget to support our "Local Hobby Shops", because they support us all year! We have attached a flyer from FlightLine Hobbies listing its Free Fall Seminars. Come down and enjoy. Hope to see you soon,
The October EFO Flying Meeting
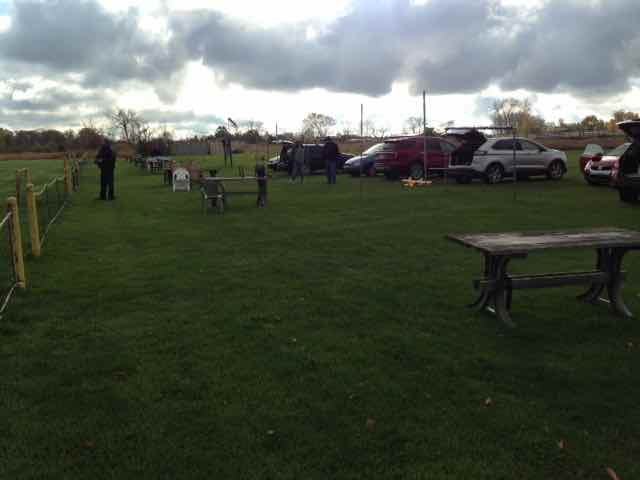
The weather was unkind to us for flying in the month of October here in southeastern Michigan. The monthly EFO flying meeting was postponed for the first three weekends in October. Sunday, October 29 was the 'best' marginal day to come along. The temperature rose to a balmy 43 degrees Fahrenheit. The skies were dark and ominous. The wind was somewhat shifting and very noticeable. Strangely, the turnout was fantastic! There were about a dozen or more fliers. Even Mark Rittinger drove all the way down from Roseville to join us. Thanks Mark! 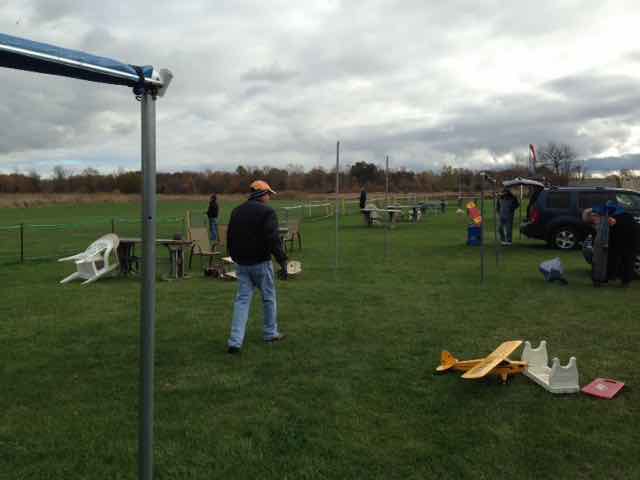 Denny Sumner can be seen enjoying the weather as he walks down the flight line. 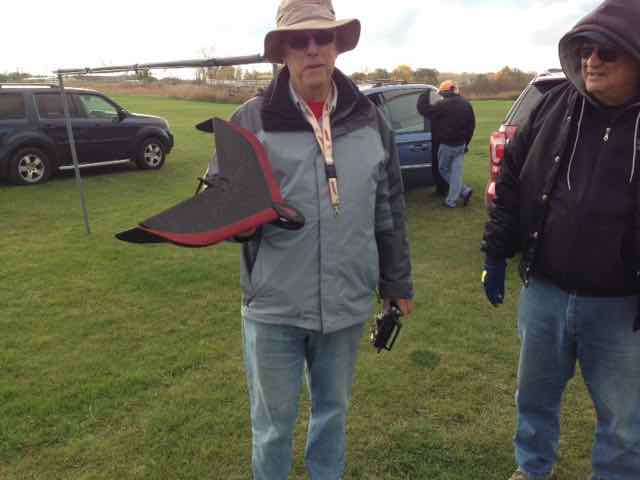 Roger Wilfong did the maiden on his Banggood Black Spirit flying wing. It flew quite well. 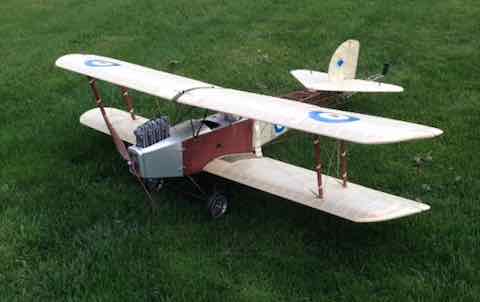 Keith Shaw recently acquired an Antic bipe. He built a beautiful dummy engine for it and did the re-maiden. It can be seen staked down for the range check. 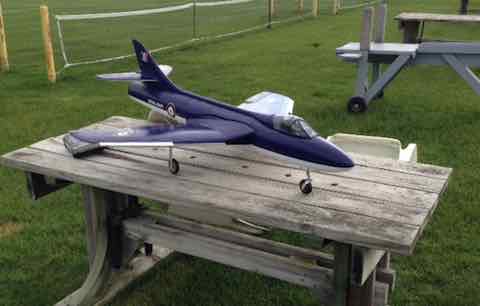 Tom Bacsanyi flew his EPO EDF Panther.
There a lot of 'bellyaching' about the cold, but everyone really seemed to enjoy themselves. Most everyone was probably thinking what I was,"I'd better enjoy today, as it might be the last time we get together for quite awhile here at the flying field." 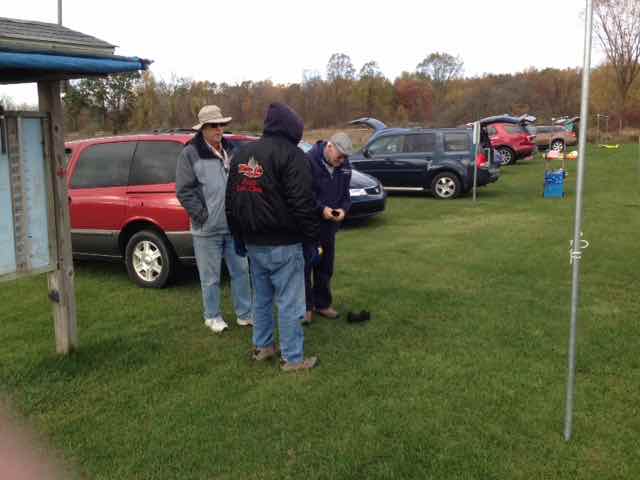
What in the world are those guys looking at? To Reach Ken Myers, you can land mail to the address at the top of the page. My E-mail address is: KMyersEFO@theampeer.org |