|
Flying High With Electric Power!
The Ampeer ON-LINE!
Fly the Future - Fly Electric! |
|---|
Site Table of Contents
| President: | Vice-President: | Secretary-Treasurer: |
| Ken Myers | Richard Utkan | Rick Sawicki |
| 1911 Bradshaw Ct. | 240 Cabinet | 5089 Ledgewood Ct. W. |
| Commerce Twp., MI 48390 | Milford, MI 48381 | Commerce Twp., MI 48382 |
| (248) 669-8124 | (248) 685-1705 | (2480 685-7056 |
 | ||
| Board of Directors: | Board of Directors: | Ampeer Editor |
| David Stacer | Arthur Deane | Ken Myers |
| 16575 Brooklane Blvd. | 21690 Bedford Dr. | 1911 Bradshaw Ct. |
| Northville, MI 48168 | Northville, MI 48167 | Commerce Twp., MI 48390 |
| (248) 924-2324 | (248) 348-2058 | (248) 669-8124 |
| EFO Meeting: Wednesday, Feb. 13 Time: 7:30 p.m.
Place: Ken Myers' house Everyone with an interest is WELCOME | ||
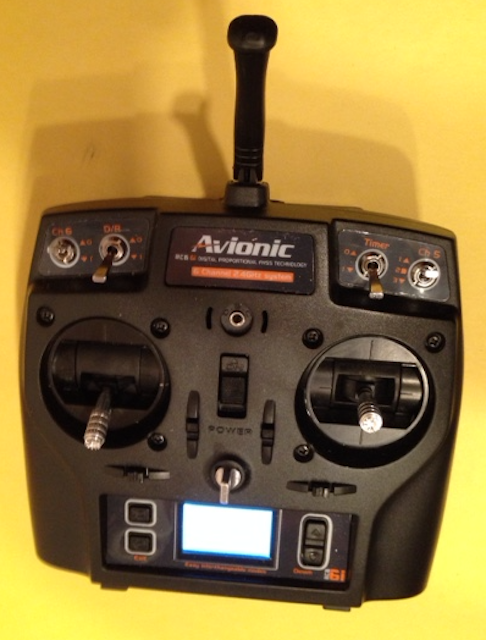
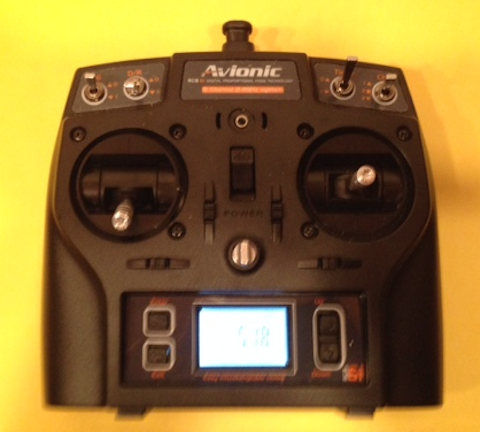
| Avionic RCB6i 2.4 GHz FHSS Radio System Review Ken Myers and Keith Shaw review this very inexpensive 2.4GHz radio system. | Indoor Flying Season, 2018-2019, Southeast Michigan Dates and times for the two venues in our area |
| Avionics Radio System Update Ken Myers discusses how he and Richard Utkan bound his new system using the info from the previous article. | Upcoming 35th Annual Mid-America Electric Flies 2019 First Announcement for this meet for 2019 |
By Ken Myers and Keith Shaw Ken Myers - Day 1, Dec. 7, 2018 Introduction:
In my quest to find a 'good enough', inexpensive radio system for those entering the hobby, I purchased, in May 2018, and reviewed, the FlySky FS-i6X with and iA6B Receiver in the October 2018 issue of the Ampeer. Keith brought the system to me at the December Midwest RC Society meeting. He had also purchased two of the tiny IS 4R 4-channel receivers ($14.76 each plus shipping at Aloft). At the meeting, we noticed that the receiver supplied in the system was the Avionics RZ8, not the expected Avionics RZ6 as stated on the system box, in the Avionic's manual, as well as on the Aloft Hobbies Web site. I downloaded the Avionic's system manual through a link on the the Aloft Website. The electronic manual is in Acrobat Portable Document format, .pdf, and it is searchable in Acrobat Reader. I checked the manual and physically checked the transmitter for the FCC Part 15 certification, but could not find any. The diminutive 4-channel receiver notes on its label that it is CE, FC & RoHS compliant. The supplied Avionic RZ8 8-ch receiver clearly has Avionic on the label. The little 4-ch notes "FD IS-4R" on the label and nothing about Avionic. The instructions supplied with the 4-ch notes the available receivers as FD IS-4R, FD IS-6R and FD IS-8R. The written receiver instruction manual, that Keith received with his 4-channel receivers, referenced a company called Fly-Dream. The Avionic RCB6i transmitter appears to be a Fly-Dream F6TB. There is a certification page on the Fly-Dream Web site that seems to indicate that they do have FCC Part 15 certification for this unit. I did a Google search for FCC ID F6TB. It yielded this Website, https://fccid.io/X6N-F6TB. The Grantee Code can be seen as X6N. I opened the FCC ID Search Website and input X6N in the Grantee Code box and then clicked search. More information about this transmitter is available on the FCC Website by clicking in the Detail and Summary links. I do not know why the Part 15 FCC ID is not on the Avionic unit or its manual as the OEM, Fly-Dream, FCC ID is X6N-B6TB. I downloaded the Fly-Dream F6TB manual and IS-8R receiver manual from the Fly-Dream Website. I wanted to see how the Fly-Dream manual compared to the Avionic RCB 6i manual. The Fly-Dream F6TB manual is in color and it is searchable.
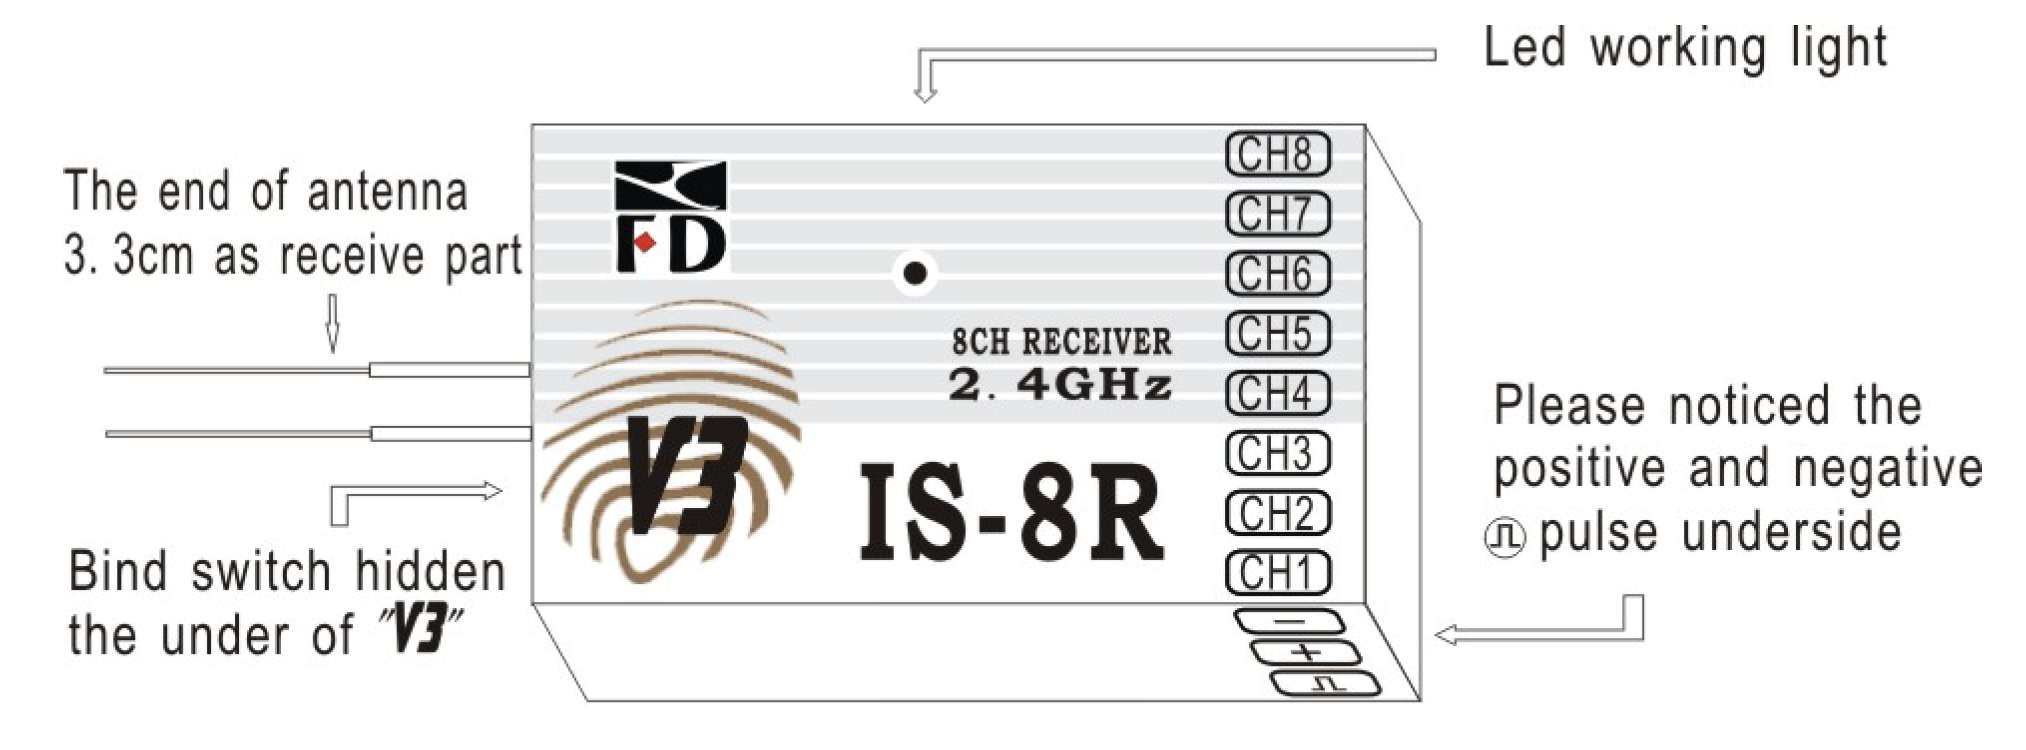
The IS-8R Manual is actually for their transmitter modules and receivers. The information on the back of the Avionic manual notes, "Designed in France and made in PRC (People's Republic of China)". The RCB6i system is/was distributed in India by RcBazaar. Next I read all three manuals to get an understanding of the system. The Avionic's manual is written in excellent English. On the initial reading, without following along on the transmitter, I became confused about how to enter the various menus. I found the term features menu somewhat confusing. Watching this video helped. Avionic RCB6i Transmitter - RCBazaar, Brian's R/C Corner: Oct 2, 2013 The first thing that I noted in the Avionic manual was that an important note about turning on the transmitter was not noted until page 18, "Make it a habit to position the throttle stick at idle and UP the TIMER switch before turning on the transmitter. Also check the position of the the other three switches before using the transmitter." The terms pair or pairing are used in the Avionic's manual for what many call bind or binding or link or linking the transmitter to the receiver. Next I read through the manual for the Fly-Dream F6TB. It was also written in very good English. Entering and navigating menus seemed to be clearer in the manual for the F6TB. Finally, I read the module/receiver manual. Their use of English in the manual/instruction sheet is okay, but it occasionally lapses into a bit of 'Chinglish'. That manual notes that the Fly-Dream system uses Frequency-Hopping Spread Spectrum (FHSS) and that it utilizes 19 separate frequencies in the 2.4GHz band. There seem to be two different 4-ch. Receivers; the IS-40 and IS-4R, and their bind procedures are different and noted on a page about binding in the manual. Yes, it is called binding in this receiver manual. While looking at the manual for the receivers, it was apparent that the receiver that Keith received with his system, the Avionics RZ8, is similar to the Fly-Dream IS-8R shown in the manual, but not identical. Like the Fly-Dream IS-8R there is no BAT connection slot, but unlike the IS-8R the Avionics RZ8 has connector slots that are noted as PPM/CH7 and SBUS/CH8. The connector slot numbering order on the Avionics RZ8 is also reversed from the IS-8R. This had consequences that appeared later. The Avionics RZ8 does not have the hidden bind button shown on the IS-8R, but it does have a hole in the top of the case that appears to go to a push-button switch. The hole is labeled Bind.  The Avionics RZ8 has two connectors on the antenna end of the receiver. The purpose of these connectors is not known or noted. At this time there is no active link to the Avionics RZ8 on the RcBazaar Website nor anything like it on the Fly-Dream Website, therefore, no manual is available. Out of frustration I looked up the Avionic RZ8 using Google. Google led me to a video titled "Avionic RZ8 receiver binding". "Avionic RZ8 receiver binding", Mar 29, 2018 The date indicated that this system is still viable. The link became very valuable when trying to rebind the RZ8 receiver. Next, I took some photos of the system. 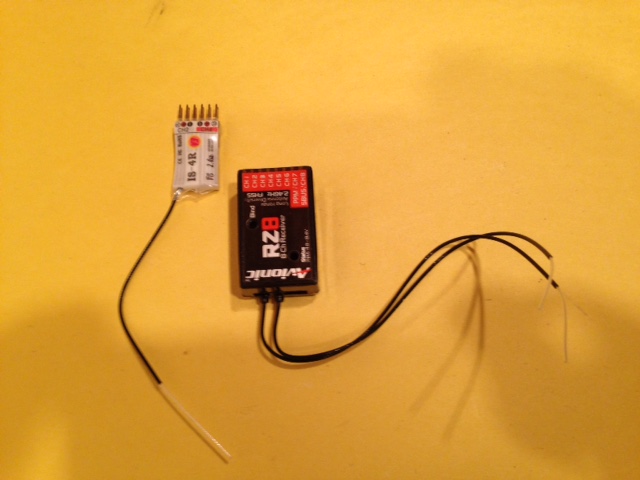
The Two Types of Receivers Keith Received
After I took the photos of the receivers, I weighed them.
My actual measurement weights DO NOT include any hook-and-loop fastener on the receivers.
Keith had already paired/linked/bound both the 8-ch. and one of the 4-ch. receivers. I opened the Fly-Dream manual, on my computer, for the system, as it appeared easier for me to follow. All of the switches were placed in the UP position on the transmitter and the throttle closed. A charged 4-cell NiMH battery was connected through a switch harness and two servos were connected to the Avionic's RZ8 receiver with the negative of their connectors connected to the pins closest to the label, the 'top' of the receiver, per the manual. 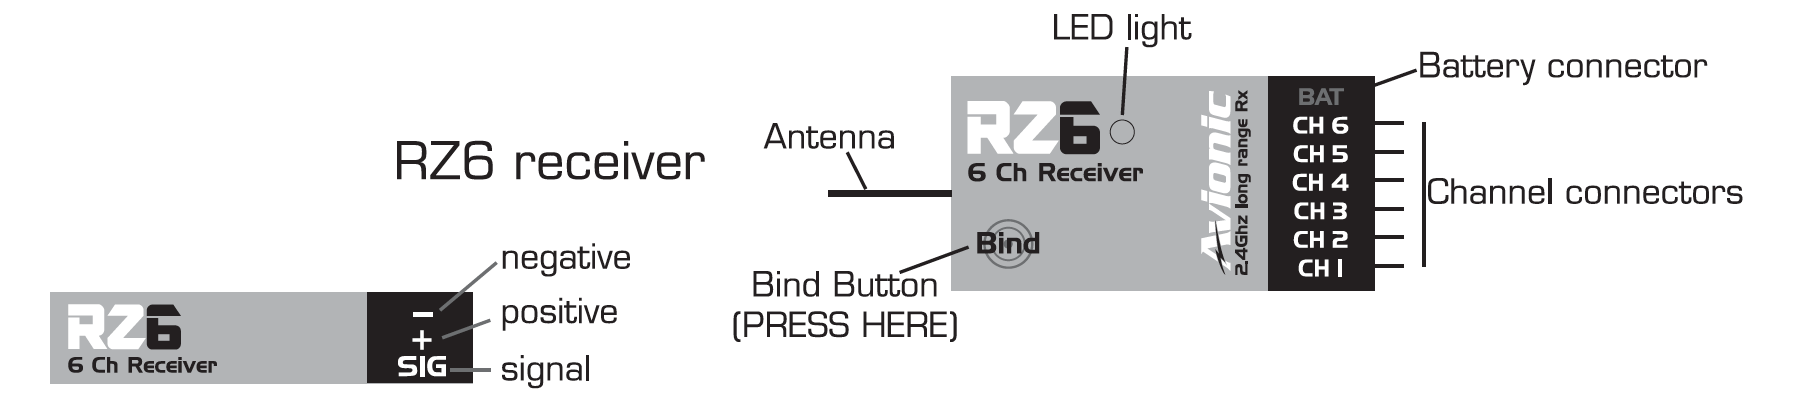
Unfortunately, my polarity guess, based on the manuals, proved to be WRONG!!! The transmitter was turned on and then the switch harness switch was activated. There was no joy. A quick call to Keith, if there is such a thing, noted that he might have lost the pairing/binding/linking between the transmitter and that receiver while trying to set the failsafe. I hooked up the little 4-channel receiver, with the hook-and-loop fastener on the back. That was the receiver that he had test flown. Everything worked as expected. I also found out that he had only used only the Model 1 memory while testing. He had changed some of the parameters in Model 1 already, so I set up a Model 2 and Model 3 for learning how to do setups on this transmitter. Learning how to navigate the menu system was difficult for me until I realize that the menu for a given model is sequential and there is no way to 'back out' of it, without shutting off the transmitter. If I had found the previous "Brian's R/C Corner" video before trying this, it would have been much, much easier to learn the system and navigate the menus. It took several tries to get the unbound 4-ch. to bind. The key to my success was letting go of the bind button almost as soon as I switched the power on with the switch harness switch. The Avionic's RZ8 has the Bind button recessed and accessed through a hole in the top of the receiver. I used a piece of 1/16" dowel to depress the button and followed the same procedure as the 4-ch, but with the Model 3 memory selected. I had no luck at all in binding. I double and triple checked the diagram in the Avionic's manual for plugging in the power and servos. The key to understanding what was going on was in the previously noted video "Avionic RZ8 receiver binding", which I had not found at that time. He said, "I'll be connecting it to the channel three of the transmitter for the binding procedure. And as you can see in this receiver, the signal is on top." That is the opposite of the RZ6 receiver shown in Avionic's manual and even for the other Fly-Dream receivers. Following the directions in the video, the RZ8 appeared to be bound. When it bound there were two colored lights constantly visible, red and blue, not just the red shown in the video. It was bound and working with both lights visible. I later learned that this was the bind for turning on the S-BUS, but I somehow stumbled onto doing it correctly, as only the red light shows at this time, not the red and blue lights. I was able to set the failsafe on the 4-ch receivers but could not figure out how to do it on the 8-ch. I fumbled around with holding the Bind button down in the RZ8, turning on the switch harness, watching the light blink, and then just lucking out in the process. It appeared that the blue light went off when the failsafe was set. Why there was even a blue light at this time, I am not sure. Now, when the transmitter binds to the receiver, only the red light shows when the receiver is turned on. I hooked up the Avionic's RZ8, selected memory Model 3, turned on the switch harness switch and the red light only showed on the RZ8 receiver. I moved the servos into non-neutral positions and shut off the transmitter. The servos returned to the neutral position. I repeated this procedure with memory Model 1 and memory Model 2. When the transmitter was shut off, the servos returned to neutral, which was my chosen setting. The IS-4R receiver, with the hook-and-loop on the back, was tried next. It was bound and the failsafe operated in all three model memories. The other IS-4R was checked next. It too bound quickly and the failsafe worked. I noticed that the IS-4Rs moved to the failsafe position much quicker than the RZ8. It appears that once a failsafe is set for a specific receiver, the failsafe setting for that receiver becomes global to all model memories. There appears to be firmware differences between the Avionic's System (India), the Fly-Dream System and the Avionic's System as supplied by Aloft Hobbies. Even with these differences, I recommend downloading the two system manuals.
Familiarize yourself with the manuals.In MY opinion, neither manual is set up in a logical order. The following is MY recommendation. Place 4 fresh AA Alkaline, or charged rechargeable NiMH, batteries into the battery tray under the back battery cover following the noted polarity. Do this even if you plan to use a 1S or 2S LiPo. Before you start:
Also, the Exit button does not usually Exit a menu but is mostly used as a second button to move or confirm. The programming is linear and cannot be reversed or exited with the Exit button. Place all of the switches in the Up position and the throttle all the way down to the bottom position. Fly-Dream F6TB Alarm przepustnicy - Throttle Alarm Demonstration - Verid1st: Mar 24, 2013 The video shows what happens if the throttle is not fully closed. Turn the transmitter on and note the firmware version number. It is only on the screen for a very, very short time and then the screen shows Model memory number, transmitter battery state and transmitter voltage. When Keith's transmitter is turned on. it shows what looks like a capital U - 34. The U looking symbol means V, for version and 34 is 3.4 for the version number. The screen, as noted in Brian's previously linked video, only has a limited number of characters that it can display. 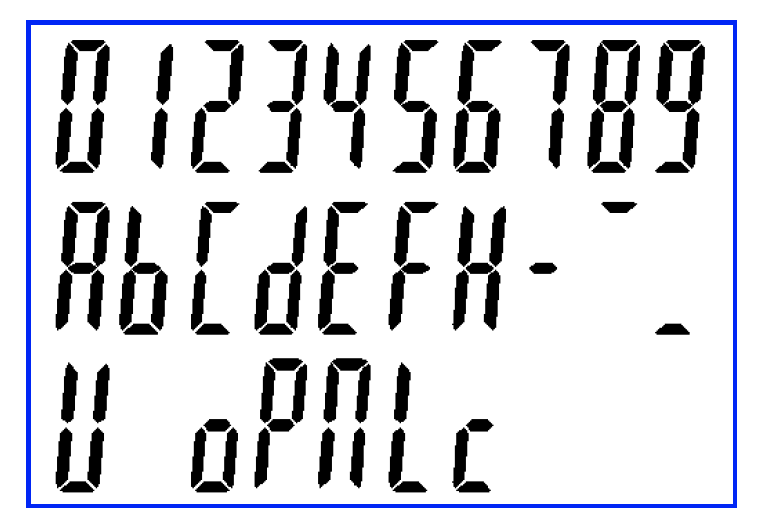 The characters are formed by straight lines. That is why what looks like a capital U is used for a V for version. For the initial setup, selecting a specific model number or trying to give it a 4 character name is not necessary. Start by binding the receiver(s). Since the pairing/binding/linking is global, not model select specific, all receivers can be paired at the same time using memory Model 1. If your system was supplied with the RZ8 receiver, review the binding procedure for it in the previous video. Avionic RCB6i binding video - RcBazaar: Nov 1, 2013 The video demonstrates how to Bind the RZ6. Be sure to observe the correct connector polarity for each type of receiver. Once the system is paired/bound/linked, a plane can be set up. Fly-Dream F6TB zmiana trybu "Mode" - Mechanical Mode Selection - Verid1st: Mar 24, 2013 The video shows the mechanical selection for the mode on the back of the transmitter. The stick mode electronic switching can be selected as describe in the manual, but the Country selection is not available in the Aloft hobbies version. The stick mode selection is determined by where the physical slider switch is set. Follow a manual's directions for selecting a Model memory number and naming it. Model naming is limited to the characters shown in the previous table and it does NOT show on the main screen. Only the model memory number shows on the main screen when the transmitter is turned on. Program the plane following the manual's directions. Be sure not to have the prop attached to an electric motor when programming it. REV - reverse can be used to reverse the direction of any servo that is going in the wrong direction. Fly-Dream F6TB DualRate - Dual Rate Demonstration - Verid1st: Mar 24, 2013 The video demonstrates the dual rates working. D/R - dual rates can be set up for channels, 1 (ailerons), 2 (elevator) & 4 (rudder). MIX - If necessary, select the type of mix required. LowP - If 4 Alkaline/NiMH batteries are not going to be used, select either a 1S or 2S LiPo to set the transmitters low voltage warning setting. If the transmitter is going to be powered by a LiPo battery, now would be a good time to install it. Exponential and End Point Avionic RCB6i exponential and end point setting - RcBazaar: May 8, 2014 The video demonstrates how to set up Expo and to adjust the End Points. Servo Sub-trims The servo sub-trim is used to accurately center the neutral point on the servos in relationship to the moveable control surface. To access the sub-trim menu, press the Down button and turn ON the transmitter to access the SUB-trim menu). The servo channel number is shown and switched to a different channel number using the Enter button. The UP/DOWN buttons are used to move the servo in the appropriate direction. This Website, copyright date 2018, notes that sub-trim is available as well as Expo and End Point. Timer The timer setting is model specific/assignable and available in whole minute increments. Fly-Dream F6TB Minutnik - Timer Demonstration - Verid1st: Mar 24, 2013 The video show how to set up the timer. Set up the timer for that specific plane. The timer is activated by its own switch and a loud alarm sounds when the time limit is reached. The timer keeps timing past that selected point until the timer switch is moved off. Setting Up the Failsafe Fly-Dream F6TB Procedura ustawiania FailSafe - Setting up the failsafe - Verid1st: Mar 24, 2013 The video demonstrates setting the failsafe. After a specific model is completely set up, set up the failsafe. Follow the directions in the manual. The range test is describe in all three manuals with the receiver manual noting the distances. Avionic RCB6i Range Test - 1.2 Kms range - abhinav srivastav: Feb 7, 2014 A full power, full distance, range check is shown above and described in the Avionic manual, page 12, and demonstrated in the following video. The antenna should be fully extended for the range test. The transmitter's transmitting power can be reduced to use a much short distance between the plane and transmitter. The antenna should be fully extended for the range test. 1. Hold the Enter button while turning on the transmitter.
After being satisfied with the range check, turn on the transmitter and then the plane and fly when it is safe to do so. Likes
Dislikes
(Keith actually put this system through its flight paces using the small 4-channel receiver. KM) Pros:
Cons: (very few and minor)
The only problem that I had was that I could not get the 8-channel receiver set to failsafe. The 4-channel was easy to do. I am planning to do a few minor switch changes to suit me. I want to move the channel 5 3-position switch to the D/R switch position. I'll use the 2-position channel 6 switch for landing gear and the moved channel 5 for flaps. Addendum 1 from Ken per a phone conversation with Keith Keith opened up the transmitter and 8-ch receiver. He found the that way that the units were assembled were very good with decent workmanship and components. Indoor Flying Season, 2018-2019, Southeast Michigan Tuesdays, October 30 through April 16, 10 a.m. - 1 p.m.
Ultimate Soccer Arenas
Single Flying Session - $10
All pilots MUST have proof of AMA Membership
Spectators Welcomed
More Information is available here.
Support your local hobby shop because they support us! Wednesdays, November 7 through April 24, 12:30 p.m. - 2:30 p.m. Legacy Center
Drop in Flying Session - $10 Spectators Welcomed and free There may be exceptions or changes around the holidays.
Return to "What's In This Issue" Avionics Radio System Update
Richard Utkan, EFO vice-president, called me on December 19, 2018. He had received an Avionics RCB6i from Aloft Hobbies with the RZ8 receiver and two of the tiny IS 4R receivers. Even though he was at the December EFO meeting, when I went over all the info on this system, he still had trouble binding his receivers. He noted that while the radio was only $37, the shipping was $14. It arrived in only two days from when he ordered it. It was packed well and there was no damage on the shipping box. I invited him over the following day to see if I could help get his receivers bound. We used the previously noted video to bind the RZ8, and we quickly bound it. To set the failsafe once it was bound, we turned on the transmitter, inserted a 1/16" dowel into the bind hole and then turned on the receiver with the switch on the switch harness. The LED blinked, the transmitter stick positions were at neutral and throttle down. The button inside the receiver was clicked again.
That was somewhat puzzling. Once the transmitter was turned off, to get out of bind mode, and then turned back on, the receiver showed its constant red light and that it was bound and moved the servos. The failsafe was then set following the directions supplied with the receiver. The binding and setting of the failsafe of the second receiver went quite smoothly. While this system is a bit more difficult to bind and set the failsafe than some, it can be completed rather quick. Using a switch harness, to turn on and off the power to the receiver, is a tremendous help. AMA Sanctioned Event (Proof of AMA membership require to fly) Saturday, July 13 & Sunday, July 14, 2019 Hosted by the: Ann Arbor Falcons and Electric Flyers Only The 7 Mile Rd. Flying Site, Salem Twp., MI, is Provided by the: Midwest R/C Society Contest Directors are: Ken Myers phone (248) 669-8124 or email Ken Or Visit the EFO Website for updates & info Keith Shaw (734) 973-6309 Flying both days is at the Midwest R/C Society Flying Field - 7 Mile Rd., Salem Twp., MI Registration: 9 A.M. both days Event Flying from 10 A.M. to 4 P.M. Sat. & 10 A.M. to 3 P.M. Sunday (Open Electric Flying after the Event Flying both days) Pilot Entry Fee - 18 and over, $15 Sat. - $10, Sunday, (ask about the family rate), Under 18, FREE Parking Donation Requested from Spectators Planes Must Fly To Be Considered for Any Award Saturday's & Sunday's Awards: Plaques for 1st in each category Open Flying Possible on Friday Night Flying Possible, Weather Permitting, Friday & Saturday Nights Refreshments available at the field both days. Potluck picnic at the field on Saturday evening. Come and join us for two days of fun and relaxed electric flying. Merchandise drawing for ALL entrants MORE INFORMATION IN UPCOMING AMPEERS AND ON THE EFO WEBSITE Return to "What's In This Issue" To Reach Ken Myers, you can land mail to the address at the top of the page. My E-mail address is: KMyersEFO@theampeer.org |