|
Flying High With Electric Power!
The Ampeer ON-LINE!
Fly the Future - Fly Electric! |
|---|
Site Table of Contents
| President: | Vice-President: | Secretary-Treasurer: |
| Ken Myers | Keith Shaw | Rick Sawicki |
| 1911 Bradshaw Ct. | 2756 Elmwood | 5089 Ledgewood Ct. W. |
| Commerce Twp., MI 48390 | Ann Arbor, MI 48104 | Commerce Twp., MI 48382 |
| (248) 669-8124 | (734) 973-6309 | (248) 685-7056 |
 | ||
| Board of Directors: | Board of Directors: | Ampeer Editor |
| David Stacer | Arthur Deane | Ken Myers |
| PO Box 75313 | 21690 Bedford Dr. | 1911 Bradshaw Ct. |
| Salem, MI 48175 | Northville, MI 48167 | Commerce Twp., MI 48390 |
| (313) 318-3288 | (248) 348-2058 | (248) 669-8124 |
| EFO Meeting: Wednesday, February 12 Time: 7:30 p.m.
Place: Ken Myers' house 1911 Bradshaw Ct. Commerce Township, MI 48390 Phone: 248-669-8124 Everyone with an interest is WELCOME | ||
By Ken Myers November 25, 2019 In the September 2018 Ampeer I wrote an article titled, "Flite Test Partners With amain hobbies". The first sentence in the third paragraph was incorrect. I stated, "Brands such as Great Planes, which no longer exits, showed up in many categories." I mistakenly thought that when Horizon Hobby LLC purchased Great Planes, including Tower Hobbies, that Great Planes, as an entity, no longer existed. That was not true! In my article, "Modifications to FliteTest's Simple Cub - Part 2", and on other linked pages from that article, I stated that the Great Planes GPMQ3901 Large Nylon 1 1/8" (29 mm) Long 2 pcs. were no longer available. That was incorrect, as of the Nov. 25, 2019. Scrolling down on the noted linked page shows that they are indeed still available. 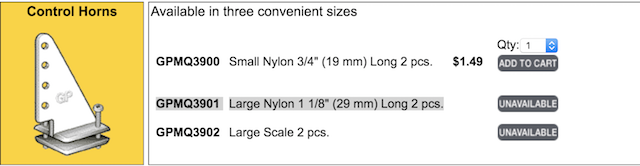
Screen Capture from the Great Planes Website - Nov. 25, 2019 The screen capture, on Nov. 25, 2019, shows the Great Planes homepage. The copy write is 2019 by Horizon Hobby, LLC. In the September 2018 article, I demonstrated, with provided links, that the Websites for amain hobbies, Hobby Town and Flite Test were the same. Links to the Flite Test Simple Cub were used as the example.

GP Homepage Screen Capture, Nov. 25, 2019 I did find an "interesting" anomaly on Nov. 25, 2019. Tower Hobbies, Hobby Town, Flite Test and amain hobbies all list the GPMQ 3900 Small Nylon 3/4" (19mm) Long 2 pcs. On their Websites. Only the amain hobbies and Flite Test sites listed the GPMQ3901 Large Nylon 1 1/8" (29mm) Long 2 pcs. If you search the Tower Hobbies or Hobby Town Websites for GPMQ3901, the search engine returns the "Item Not Found" page. The large GP control horns can also be ordered directly from the Great Planes Website. The identical Website page for the large GP control using the Flite Test link notes, "$2.99 Flat Rate Shipping!" while the link at amain hobbies notes "$1.99 Flat Rate Shipping!". Both the amain hobbies and Flite Test pages note that the large GP control horns are "In Stock Online!". Modifications to FliteTest's Simple Cub - Part 3
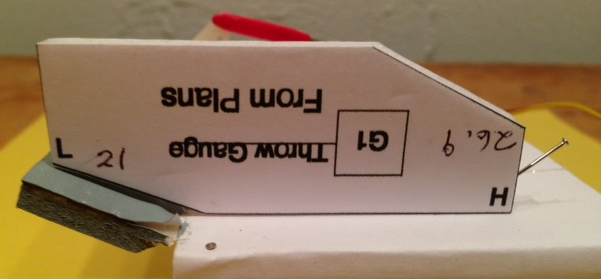
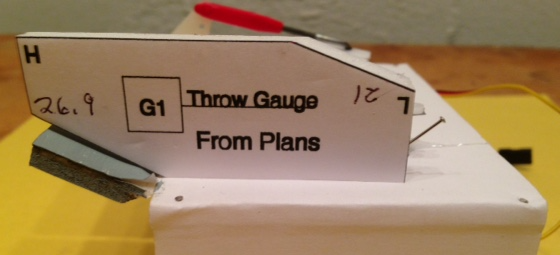
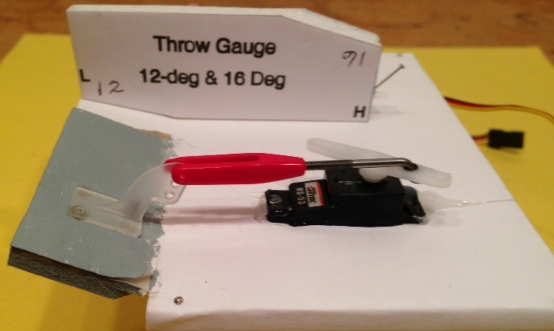
Last month I started to explain the modifications that I made to the surface control horn selection to be able to achieve the 12 degrees to 16 degrees of control surface throw, as recommended by FliteTest, and by me as well. I created a fixture where I could measure two movable surfaces side by side. The fixture contained two identical Hitec HS-53 servos. The HS-53s were used, as they were my choice for the final version. A control horn was attached to one moveable surface (painted gray) that had its outmost hole about 1/2" above the top surface of the moveable surface. It represented the FT control horn, as provided on their plans and in the kit. 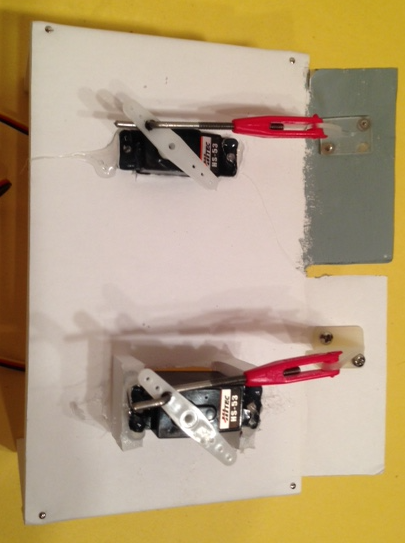 A second control horn, the Great Planes Large Nylon GPMQ3901, was attached to the other movable surface. Its outmost hole is approximately 1" above the top surface of the moveable surface. The servo, connected to the GP control horn, was raised so that the angle going from the servo arm connection to the control horn connection had approximately the same angle as the other servo arm connection to shorter control horn connection.  Each servo was independently moved by the radio system to the 'full up' position and left there, unplugged, for measuring purposes. It can be seen that the servo arms are paralleling each other. The photo clearly shows the surface with control horn representing the FT control horn, on the painted gray moveable surface, at a greater angle, more deflection, than the one with the GP Large control horn.
The FT gauge shows that the full surface deflection is greater than 21 degrees and a bit less than 27 degrees.
My gauge shows about 12 degrees for the outermost control horn hole (~1" above the moveable surface's top surface) and about 16 degrees when placed and adjusted in the second to outer most hole (~3/4" from the moveable surface's top surface). I originally used 12 degrees on the rudder, elevator and ailerons. The V4, 3-channel version, uses 12 degrees on the rudder and 16 degrees on the elevator. The 16 degrees of elevator movement is one of three modifications I made to help keep the plane from nosing in and then nosing over on landing. The first time the nosing in and over is shown is during a YouTube video of the first landing on grass of the prototype known as the Tubby Cubby. If you watch that short segment several times, you will note that the Tubby Cubby noses in, catches its landing gear and flips. Several YouTube videos show the Simple Cub, with landing gear, landing on pavement and not flipping, but I could not find any videos of it landing on grass and not flipping. Even landing on a paved surface did not guarantee that the plane wouldn't flip on landing. The linked video segment is from the end of the FliteTest build video. I demonstrated the mechanical method for setting up the throws because large control horns can be easily purchased to replace the provided plywood control horns and they provide the stated, and correct, throw for this plane. A person familiar with their computer radio COULD change the throws by adjustments in the transmitter. It is my belief that most beginners are not that familiar with their new computer style transmitter and that this would be difficult for them. I used pushrods similar to DuBro 12" 2-56 Rod w/ Nylon Kwik-Link.They come in a package of five. They were used on the rudder, elevator and ailerons. Each rod had a Z-bend on the servo end of the rod and adjustable nylon clevis/kwiklink on the end going to the control horn. DuBro E/Z Connectors:2-56 Rod can be substituted for Z-bends. Why modify the pushrods? 1. Shakeyjake, "After I crashed my Simple Cub several times I finally figured out that the rudder and elevator control rods were flexing so bad that in the right conditions the rudder would go slightly left even when I was full rudder right..."
2. Brett_N , "I second the better control rods. I'm only using the small gauge on the mini's and even then I zip tie them. They're OK for aeilerons on the bigger planes, but no good for anything requiring more than about 6 inches of length."
3. NATHANAEL 13th Aug 2017, "They bend
4. TooJung2Die: "Driveorange said: "Any suggestions on how a fix to keep the rudder control cable from flexing in the "push" direction? The servo "pulls" the rudder to one side just fine but flexes too much when pushing the the rudder doesn't register any movement in the other direction. I ran the cable/wire through a coffee stirrer and secured this to the fuselage where it daylights in front of the tail but it had no effect. Use full length guide tube for the push/pull control wire. This tubing came from a pack of dollar store shower caps. Slide the tubing up the guide wire inside the fuselage and glue at each end. Or you'll need to figure out a way to add more support where the wire is flexing, additional pieces of coffee stick tubing supported by pieces of foam board. Sounds like your rudder hinge is too stiff."
5. CarolineTyler "I was very unhappy about the pushrods in the 1st flexing under load so ran them in some carbon fibre tubes"
The Hitec HS-53 Budget Feather rudder and elevator servos were moved to the outside of the fuselage, near the tail feathers in V2, V3 and V4. The rudder and elevator servos were moved to the outside of the fuselage, near the tail feathers in V2, V3 and V4. Why? I installed the servos in V1 using the method described in the build video. I used the Flite Test recommended hot melt glue gun and hot melt glue that I had purchased directly from Flite Test. While MY V1 Simple Cub was being passed around at the April 2018 EFO meeting, the rudder servo fell off the inside side of the fuselage. Before doing the servo installation, I had my suspicions about the integrity of this type of installation, but I thought I just had to give it a try to be fair to Flite Test. I searched the Flite Test Forum and found a comment where a servo let go during the maiden flight. SPONZ, "About a minute or two into the flight, the elevator servo let loose inside the fuselage and I had no pitch control. Down she went."
There is a little irony in who it happened to. SPONZ is Dan Sponholz, the guy that creates the beautiful plans for Flite Test. 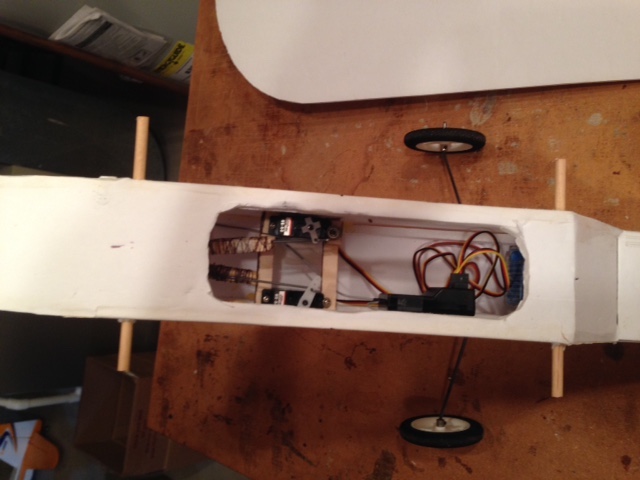 A new servo installation was used in the V1 fuselage. It used two plywood rails, run across through the fuselage sides and spaced a servo length apart. The servos were screwed to the rails, which was not an easy task in the confined space. 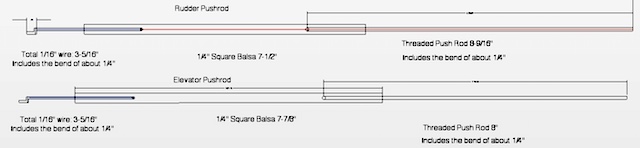 It also used "conventional pushrods construction" with 1/4" square balsa making up most of the pushrod. 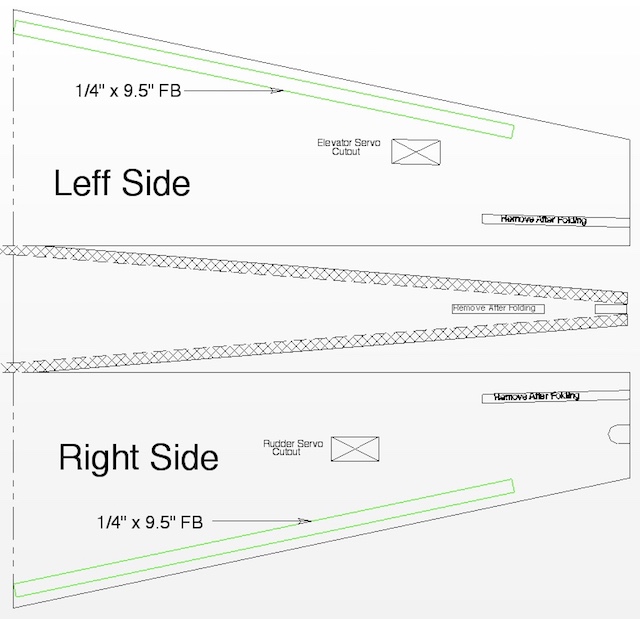 The rear plan for my revised V2 - V4 shows the final servo placement. It also shows a 1/4" x 9.5" DTFB rail glued to the inside of the fuselage sides. It is located a DTFB thickness from the bottom of the fuselage side. This keeps the rear fuselage bottom in place when using Tacky Glue or Titebond Original Wood Glue and pins. From Flying Magazine, The Truth about "Wing Incidence"
Wing Incidence (a.k.a., Decalage) Primer Improving Airplane Performance - Wing Incidence Neutral Pitch Stability, Right and Down Engine Thrust and Propwash and P-factor (Left Turning Tendencies) Dutch Roll
Adverse Yaw
How Adverse Yaw Affects Your Plane If the top of the Simple Cub's fuselage is considered parallel to the longitudinal datum line, then the bottom of the wing and horizontal stabilizer are both at 0 degrees, as both are parallel to the longitudinal datum line. In other words, there is no decalage. 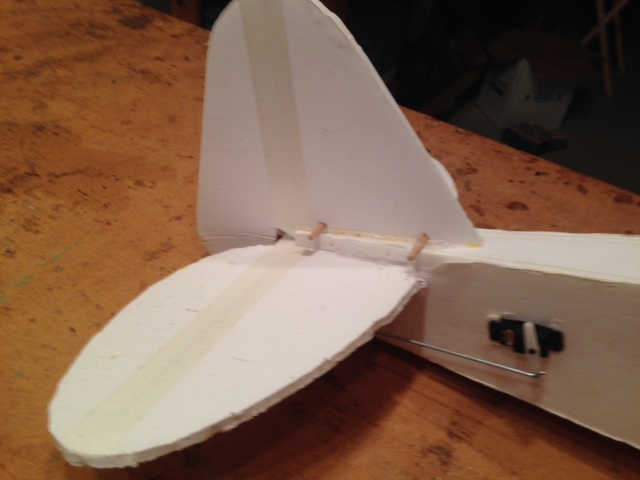 On fuselage V2, the horizontal stabilizer was cut off and reaffixed to the fuselage a couple of times to try different incidences for the horizontal stabilizer. That was a pain. The V3 fuselage had an adjustable horizontal stabilizer angle. The horizontal stabilizer was held on with rubber bands and different angle wedges could be positioned to yield different angles of incidence for the horizontal stabilizer. Trial and error, over many flights, showed that -1.5 degrees, with the wing sitting flat on top of the fuselage, was just about right. The V4 horizontal stabilizer now has an angle of -1.5 degrees, when using the top of the fuselage as the datum line. This was the second of three modifications I made to help keep the plane from nosing over on landing and also gliding better in the glide slope for landing. Why the decalage modification? Hai-Lee, "On my simple cub it was not very good at gliding and had a somewhat horrific climb response to full throttle. Both problems disappeared when I increased the main wing incidence."
By changing both the H-Stab incidence to negative and increasing the down thrust equally, the results were the same as increasing the wing incidence. This kept the design looking the same with no shim under the leading edge of the wing. All of my Plans Built, DIY versions, using the white Adam's Readi-board from the Dollar Tree Store, were assembled using Aleene�s Original Tacky Glue, 5-minute epoxy and a couple of dabs of hot melt glue from my wife's craft type, inexpensive, low temp, hot melt glue gun. I could have also used Titebond Original Wood Glue, as I had on my RUA 2-4-10, but I wanted to try the Aleene's, which worked well. Motor Recommendation Request
John is a long, long time Ampeer subscriber. I was a little surprised to receive this simple request from him. Good Morning Ken, Please recommend a brushless motor for 3S, direct drive, for the ancient Midwest Bebe Jodel kit. Thank you,
That wasn't very much information to work with, so I wrote back; Is this the one you are talking about?
He confirmed that it was. Using Google, I was able to locate some data about this kit. 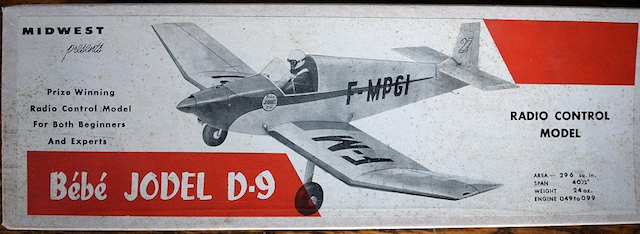 Area: 296 sq.in.
I tried to find a plan online where I could confirm the largest prop diameter that could be used, but I could not find a usable plan. Typically, the largest prop diameter that an 049 could use was a 7". On the other hand an 099 could easily use an 8" diameter prop. The FliteTest Simple Cub has similar specifications. Since I've recently been writing about the FT Simple Cub, my recommendation would be a similar motor to the one that I'm using in the Simple Cube. The motor that I used in the Simple Cub is a Cobra 2213/26. I use that motor with 9" or 10" diameter props, therefore I recommend using the Cobra 2213/22 as it has a higher Kv. Lucien's Motor Propeller Data for the 2213/22 and an APC 8x6E prop follows.
The Cobra line of motors is not easily accessible to John. The information on the 2213/22 page shows a weight of 60g and Kv of 1100 RPM per volt. Therefore, any 60g, 1100 Kv motor should work fine with an 8" diameter thin electric prop, NOT SLOW FLY TYPE. Why not the ST Type?
If the prop diameter can only be 7", then the Cobra 2213/18 with a Kv of 1350 would work well with an APC 7x6E.
Just remember that if the weight in grams is about the same and the Kv is similar, that motor can be substituted for the specific motors that I have noted. This is also a good time to remind Ampeer readers that I have an article online to help you select power systems for your desired plane. It is called "Selecting an Electric Outrunner Motor
There is a spreadsheet that can be downloaded to aid in the math that corresponds with the text in the article. The link for the spreadsheet is in the article. I've used that spreadsheet to get the following data. The spreadsheet workbook for this specific Jodel can be downloaded from here. The following is suggested from that the spreadsheet's results.
There is a table with Cobra motor weights on the spreadsheet. That table shows the following:
The Results on the spreadsheet show; Target Pin: 146W (Pin is power in) The selected prop was an 8x6. Target Flight time: 6 minutes (selected by the user) C-2208/34 47g, 1180 Kv, Win: 137.1, System eff.: 63%, ESC: 15A+, 3S 800mAh LiPo
The C-2213/22 provides the Pin closest to the target Pin of 146 Win. (watts in) If you desire to use a 7x4 prop, the downloaded spreadsheet for the Jodel can be changed for that. Both my "intuition", from doing this for a long time, and the spreadsheet, yield the same results, 60g 1100Kv, like the Cobra C-2213/22! Hello Ken, Thank you very much for your prompt and informative reply. The distance of the motor shaft to the ground on the Midwest model, is 6.75". Although it can allow for a 10" prop, the ideal diameter, which is closer to scale, would be a 7". Of course an 8" is also pleasant to the eye, but not the 10" even the 9". I have one flyable Bebe Jodel that I built in 1970. It was initially powered with an OS pet 0.09, but it is more recently powered by a speed 400 geared (110 grams), with a 7x5 prop. Unfortunately, the 8-cell NiCd 1.2Ah cells no longer alive. With a light (60-70 gram) motor and LiPo cells, nose ballast must be added, which is no problem, because the weight will top up again to the previous number (as with the heavier components). The smaller electric motor diameter, will help to achieve a smaller radius nose contour, but keep in mind that the full-size Bebe Jodel is a homebuilt project, with a variety of engines, so the nose contour can be of any shape and size. Best regards
What Does a Scale Model Builder Do With An ARF Fokker D VII?
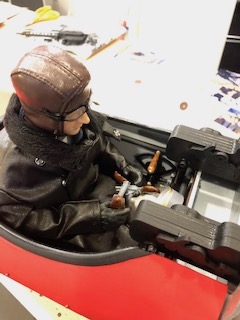
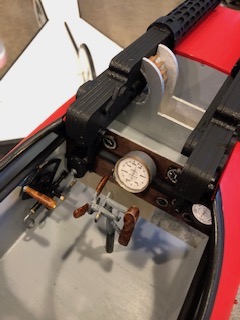
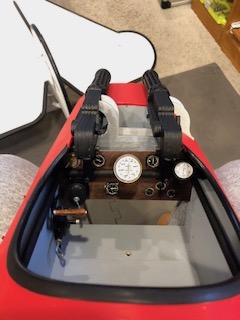
Dave has posted about his Hangar 9 - Fokker D.VII 30-60cc ARF, 87" on its RC Groups thread. Since Labor Day he has logged over 30 flights on this model. Each flight has been averaging about 10 minutes, but they could go longer. It's been quite fun, much longer flights than my EDF's. I just had to do it, a little work in the cockpit area. 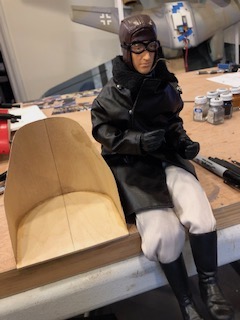
I added a pilot and seat and installed a new instrument panel including a tachometer, altimeter, fuel lever, fuel gauge, control stick, new ammo belts and magneto. I still need to install the compass. Hamburg Flyers RC Club Swap Meet Saturday, Feb. 1 (Superbowl Saturday) Whitmore Lake Elementary School
6' tables are $15, 8' tables are $20, and 8' tables along walls are $25. Vendor doors open at 8AM
Contact:
Return to "What's In This Issue" 2019 -2020 Skymasters R/C Club Indoor Flying/Driving at the Ultimate Soccer Arenas The Best Indoor Flying Venue Anywhere!
Located at 867 South Blvd., Pontiac, MI 48341 October 29th through April 14th
Spectators Welcome and FREE
Single Flying Session ONLY $10
Pay at the door or register online at:
Have Any Questions?
All Pilots MUST Have Proof of Current AMA Membership
* Consult the Schedule on the Skymasters' Website for Exact Times and Dates Indoor Online registration is open at: www.skymasters.org. Schedule JANUARY:
FEBRUARY:
MARCH:
APRIL:
Dates & Times Subject To Change. Please note that a special area is set aside for electric RC Drivers. Did you note that Driving was added to the title? Costs and dates are the same for drivers as fliers. Indoor Flying to Start Soon at the Legacy Center in Brighton, MI Start Date: Wednesday November 6 Time: 12 p.m.- 2 p.m. Place: Legacy Center Sports Complex 9299 Goble Dr, Brighton, MI 48116 Cost: $10 cost per session Don't let the cold keep you from flying For More Information Visit the Hamburg Flyers Website. Return to "What's In This Issue" The Upcoming Keith Shaw Birthday Party Electric Fly-in 2020 The Balsa Butchers are hosting the "Keith Shaw Birthday Party Electric Fly-In", for the 18th year, at their field near Coldwater, MI. The event takes place on Saturday, May 30, 2020. It is a one day event again this year. The event consists of Open Electric Flying with a "Special Guest of Honor Theme", Happy Birthday Keith Shaw [June 6]. Enjoy a day with the "Pioneering Master of Electric R/C Flight". 8 a.m. - 5 p.m., Saturday. NO LANDING FEE! Donations for field maintenance and lunch appreciated. For additional information contact;
The field will be open for guests to fly on Sunday as well. 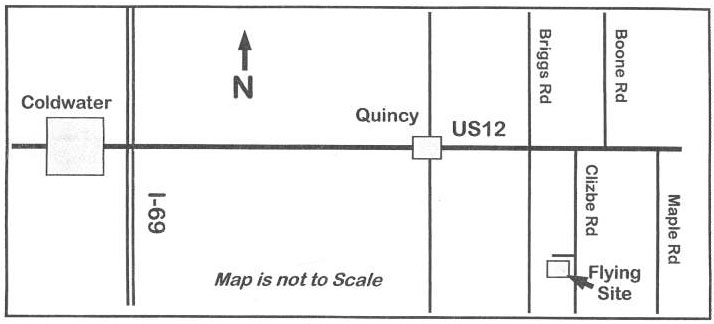
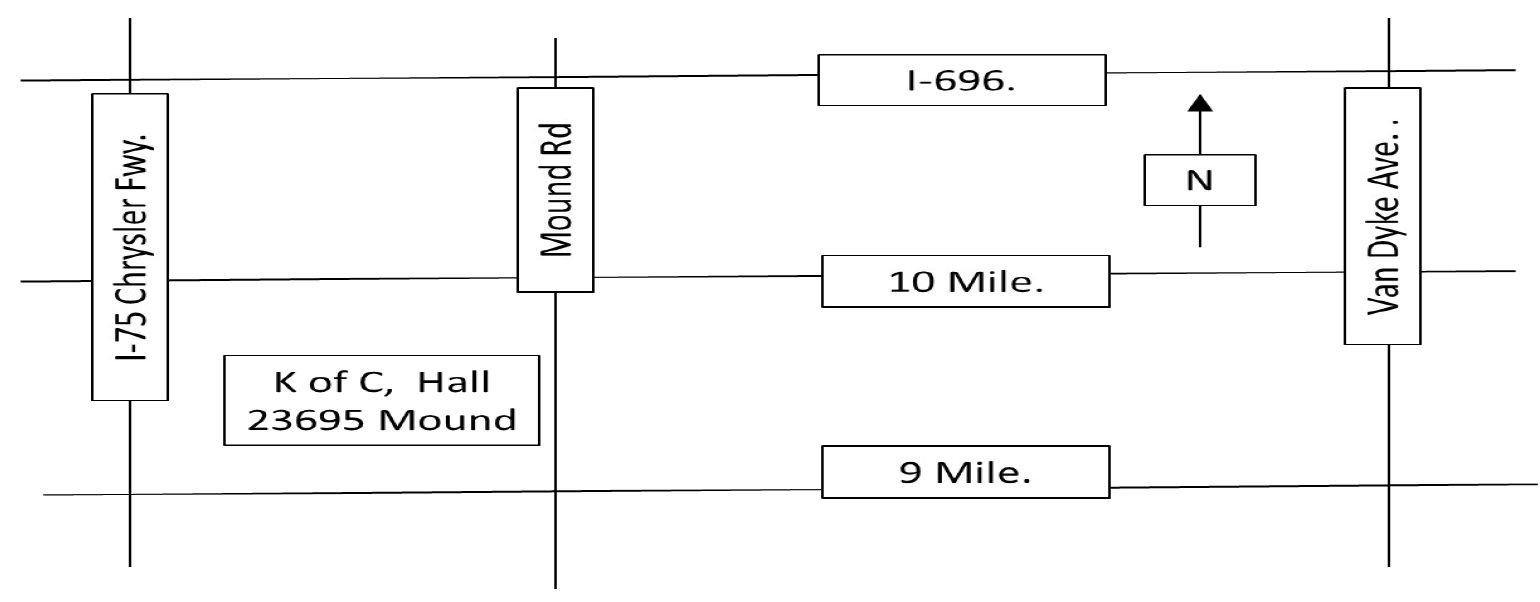
Return to "What's In This Issue" Time: 9 a.m. - Noon Location: Knights of Columbus Hall 23695 Mound Rd., Warren MI 48091 1/3 Mile North of 9 Mile Rd. on West side of Mound Rd.
Adults - $5.00
Food and Refreshments: $3.00 Waffle Breakfast 9:00 - 11:00 Contact info: To reserve tables or general info contact: Paul Newby at 586-747-7675 or email to: paul.newby51@gmail.com Vendors: Tables $20.00 each
More Info at: www.rccd.org Feb. 8, 2020 Flight Line Hobby & John Hoover's 2nd Annual Model Aviation Swap Meet 9:00 - 12:00 am
Show Only Specials
Local Vendors: Megajets & Aspect Aviation
Admission just $5
Event Location:
Questions? Call John at Flightline (248) 814-8359
Return to "What's In This Issue" To Reach Ken Myers, you can land mail to the address at the top of the page. My E-mail address is: KMyersEFO@theampeer.org |