|
Flying High With Electric Power!
The Ampeer ON-LINE!
Fly the Future - Fly Electric! |
|---|
Site Table of Contents
| President: | Vice-President: | Secretary-Treasurer: |
| Ken Myers | Keith Shaw | Rick Sawicki |
| 1911 Bradshaw Ct. | 2756 Elmwood | 5089 Ledgewood Ct. W. |
| Commerce Twp., MI 48390 | Ann Arbor, MI 48104 | Commerce Twp., MI 48382 |
| (248) 669-8124 | 734-973-6309 | (248) 685-7056 |
 | ||
| Board of Directors: | Board of Directors: | Ampeer Editor |
| David Stacer | Arthur Deane | Ken Myers |
| PO Box 75313 | 21690 Bedford Dr. | 1911 Bradshaw Ct. |
| Salem, MI 48175 | Northville, MI 48167 | Commerce Twp., MI 48390 |
| (313) 318-3288 | (248) 348-2058 | (248) 669-8124 |
| EFO Meeting: Wednesday, January 15 Time: 7:30 p.m.
Note that this is the 3rd Wednesday of the month for this month only Place: Ken Myers' house 1911 Bradshaw Ct. Commerce Township, MI 48390 Phone: 248-669-8124 Everyone with an interest is WELCOME | ||
| Modifications to FliteTest's Simple Cub - Part 2 Ken continues to explain the modifications that he made to the FliteTest Simple Cub | English Language Update to Lithium Polymer Battery Technology Article Frank Siegert's excellent LiPo information has now been translated into English by the author, Frank Siegert. |
| A LiPo "C" Rating Recommendation and Failsafe Warning Joe Hass shares a recommendation and a warning. | John Goodenough Wins Nobel Prize Find out why we electric fliers all owe this great man a HUGE thanks! |
| 2019 - 2020 Skymasters R/C Club Indoor Flying at the Ultimate Soccer Arenas Event Announcement & schedule | Indoor Flying Has Started at the Legacy Center in Brighton, MI Event Announcement |
| Info Upcoming Keith Shaw Birthday Fly-In for 2020! Event Announcment | A New Motor & ESC Line at Innov8tive Designs Lucien Miller continues to test the products that he sells. |
| Upcoming Radio Control Club of Detroit, 24th Annual Swap Meet Event announcement. | |
By Ken Myers Nothing Remains the Same Forever The Changes to the New FT Plans - v.1.1 I download the Simple Cub v.1.0 plans from FliteTest on February 19, 2018. The current version of the plans, as of November 2019, v.1.1, is available. The plans are located by clicking on the tab titled "Resources". I downloaded "4- FT Simple Cub v1.1 Tiled B Plans.pdf" on November 19, 2019. The changed, modified and added pages for v.1.1 include:
The total pieces of 8.5" x 11" paper, required to print the v.1.0 plans, is 63, but that does not include the graphics templates nor the floats. It requires 95 pieces of 8.5" x 11" pieces of paper to print all of v.1.1 including the graphic templates and floats. The current specifications are found on the previously noted store.flitetest.com Web site.
The float plans were originally available as a separate plan set. It was nice of FliteTest to include that option on the latest version of the plans. The window and windshield graphics, as well as the lightening graphic originally need to be sourced from the the FliteTest forum and the Internet. It is really helpful to have them included on the plans. When viewing the latest store/flitetest.com Website, I noted a statement, on November 18, 2019. "We can't wait to see how many memories, pilots, and modifications come from our great FT Family!" On November 18, 2019, there were two linked videos on the store Website Home page. DIY Beginner RC Plane - FT Simple Cub This is the introduction video. The wording on the screen capture indicates that this is a "DIY Beginner RC Plane". I previously noted the differences between the v.1.0 plans and the v.1.1 plans. I wanted to find out if there were any other changes. I printed out the pages from the v.1.0 and the v.1.1 pdfs, from FliteTest, that contained the throw gauge. Both printed throw gauges were identical in dimensions. I used the measurements from the printed throw gauge to create a CAD drawing. 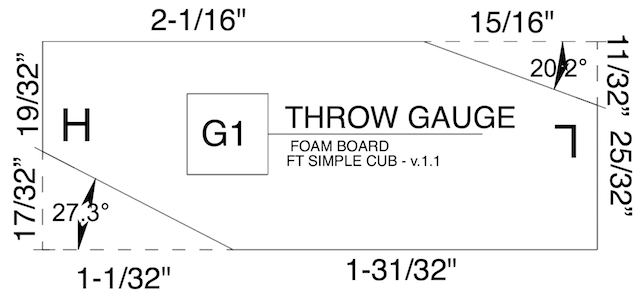 As previously stated, "Latest: Control Surface Throws - 12-16 Degrees". 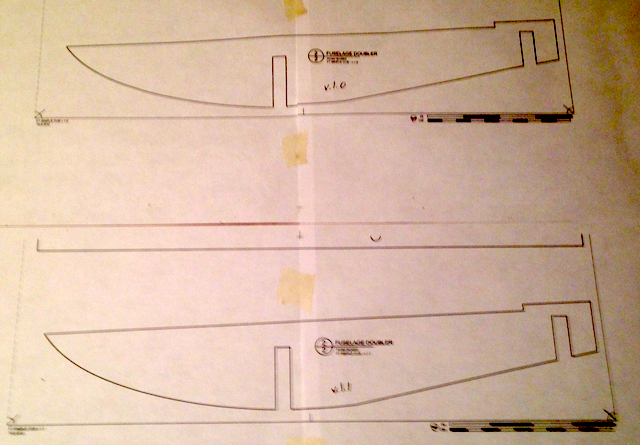 I also printed the v.1.0 and the v.1.1 sheets with the fuselage doublers. They were identical. Why this was important to me is discussed later. I was disappointed to note that the only significant change to the v.1.1 plans was the change in the length, and thus the angle, of the landing gear wire. On September 27, 2019, FliteTest posted a new video titled, "Smartphone Controlled Foamboard Plane? Power UP 4.0" to YouTube. While the video does not relate directly to the Simple Cub, it does relate to research and testing that I actually did while creating my modifications. The topic actually discussed is making "gliders" for glide testing a design and the importance of a "glide test" when prototyping. This seems to be a "lost art" in this era of ARFs. I hope that you took the time last month to look at my log of YouTube videos about the Simple Cub, while I was modifying my various versions. Watching some of those videos will demonstrate the "flyability" of the FliteTest Simple Cub. By Ken Myers The first draft of the final version was written in July of 2018, but I never published it. It has been revised and updated in November of 2019. A Beginning: My History With the Flite Test Simple Cub After discovering the FliteTest Simple Cub in October, 2017, I "borrowed", enlarged, extended and modified its wing design to create the wing for my RUA 2-4-10 trainer design. In April 2018 I did a presentation at the Midwest RC Society monthly meeting. The presentation was called "Who and What is Flite Test?" The highlights of the presentation were turned into an article in the July 2018 Ampeer. The article described who and what Flite Test is and what they aspire to be. Shortly after that meeting and presentation, I decided to build the FT Simple Cub from the free, online plans and Adam's Readi-Board from the Dollar Tree store. The ultimate goal, for my version of this plane, was to use it as a trainer with my student pilots. To achieve this goal, I originally planned to build it exactly as designed. The FliteTest build video was used as a guide during construction. Through the course of my journey with this design, I ended up building four versions of the Plans Built, DIY version of this plane. I kept a build and flying log for each of the versions. This diary contains what I did, when I did and why I did it. It is mostly complete, but it is long! You may, or may not, have the desire to read through the whole evolution of my modifications, but you should at least take a look near the end of the document where I use a video to show the outcome of my modifications. Because of my extensive research of this design, I went way off the rails with Version 1 (V1) and didn't end up with a FliteTest Simple Cub. I ended up with a Ken Myers', highly modified, Simple Cub before I'd ever have flown one. I wrote a first rough draft regarding this plane, but I was not satisfied with it, and therefore never published it. That draft can be viewed online. I made no attempt to correct factual, punctuation or spelling errors in the draft version. I did add a few comments to the document to somewhat update it. It is presented just to share my thinking. I decided that I had not stayed close enough to the FliteTest design and created a Version 2 fuselage for use with the Version 1 3-channel (3-ch) wing. With Version 2, I made every attempt to keep the design as close as possible to the original design. A second draft was created about my V2 modifications while working on Version 3. There were some changes regarding the specifications and information on the recently posted Flite Test Simple Cub Electric Airplane Kit (956mm) page. (The throw amount change was noted in Sept. 2018 Ampeer.) The original page can be found here. (included in Sept. 2018 Ampeer) 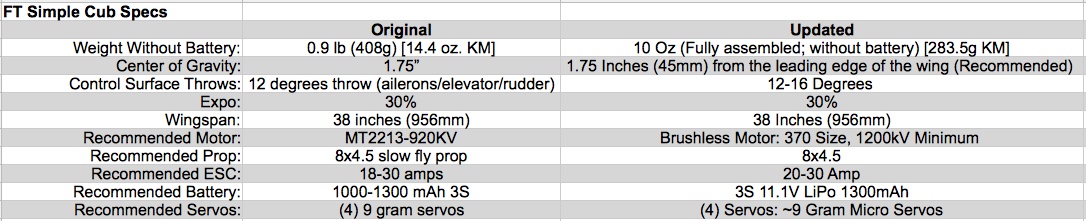
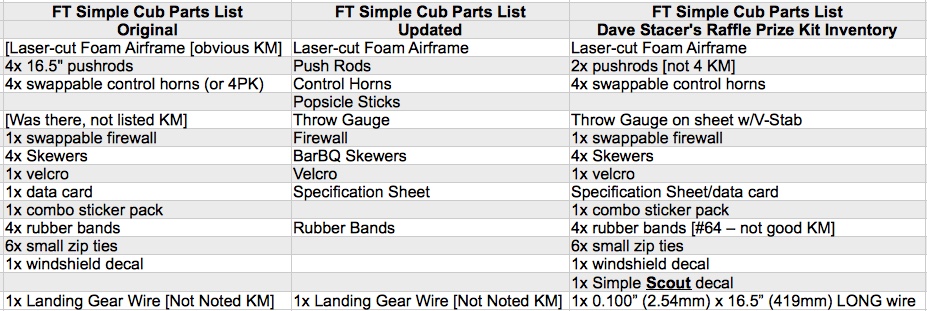
The tables illustrate the differences between the information on the original page and the updated page. The parts list also includes an inventory of a Simple Cub kit won by Dave Stacer at the 2018 Mid-Am. The kit arrived from Flite Test the second week of July, 2018. Under "Specifications"; the Control Surface Throws recommendation was changed from 12 degrees for all control surfaces to 12 - 16 degrees. (included in Sept. 2018 Ampeer) It is unclear if this means 12 to 16 degrees or 12 degrees Low rate and 16 degrees High rate. Under "Kit Includes"; popsicle sticks was added, but with no explanation as to why. They are used on the rear center section of the wing and the part of the wing panels that adjoin wing there to protect that area from the rubber bands. Note that the 2.54mm wire, for the landing gear, is missing from both Flite Test Web pages. It is included in the accessory pack. 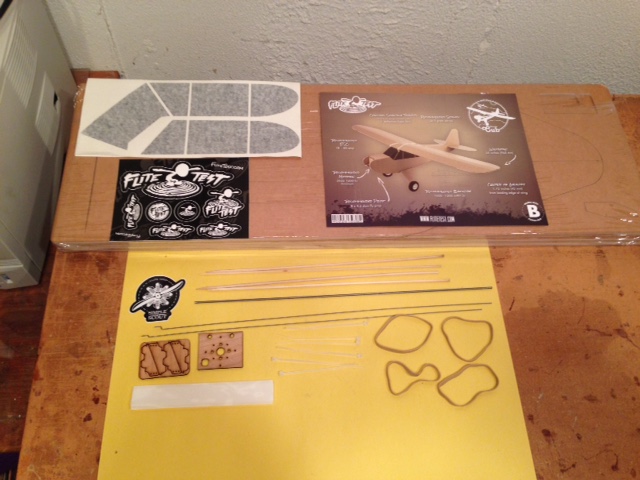
Photo of Contents of Dave Stacer�s Kit It appears that the accessory pack, included in Dave Stacer's kit, was for the Simple SCOUT not the Simple Cub. It included the Simple SCOUT decal. The biggest difference between the Simple SCOUT accessory pack and Simple Cub accessory pack is that it contained only 2 pushrods and #64 rubber bands. Like the popsicle sticks, the zip ties are never explained anywhere. The Spec sheet in Dave's kit noted that the recommended motor is a 2822 1200 kv minimum. The digits and letters in the previous sentence are copied exactly as printed on the Specification sheet. The Spec sheet on the DIY Plans and the plans themselves were not updated by July 21, 2018. The Specification sheet on the plans and in the kit notes the Weight Without Battery as 0.9 lb. (408g) which is 14.4 oz. The new store page notes the Dry Weight as 10 oz., but it does not note the weight without the battery. The Tail Skid I used a tail skid only on Version 2 (V2). It did not make a difference for me when flying from a short cut grass RC flying field. The plane doesn't take off so much as it leaps into the air. I don't try to taxi small planes on our grass flying field. I just set it onto the center line of the runway, pointed into the wind, whenever possible, and take off. The Simple Cub, flown at the end of the Flite Test build video, does not have tail skid on it. Most of the Simple Cubs, shown in YouTube videos of this plane, do not have the tail skid added, although a few have tail wheels added. The Build video does show the Tail Skid being added. Even when flown from a hard surface, the plane still leaps into the air. This can be seen in the Simple Cub videos found on YouTube when the plane is rising off the ground (ROG). This video shows the Simple Cub rising from a hard surface in some wind. The Simple Cub in the video also leaps, more than rises, into the air. I left the tail skid off on my V3 and my final Version 4 (V4). Instead of using a knife to try and cut the 45 degree bevels for the moveable surfaces, I beveled all of the hinge lines using the sandpaper method. The method is shown in this video from Flite Test. To get a 45 degree angle for the rudder hinge, I measured back 3/16" from the hinge line on the rudder towards the rear of the rudder and drew a line paralleling the hinge line 3/16" behind the hinge line. I cut only through the top paper along the line and removed only the top paper. The bare foam provided a sanding guide. The rudder was flipped back over the horizontal stabilizer and the unit placed near the edge of the building surface. A sanding block, held at an angle, was used to create the 45 degree bevel between the hinge line and the 3/16" line where the paper was removed. The same procedure was used for the elevator hinge bevel. The 4-channel (4-ch) wing aileron hinges were done in a similar manner. The 4-channel wing, with the 3-ch wing dihedral, was only flown on V2 and V3. The results were unsatisfactory. Staples Fiberglass Filament Tape, 0.9" x 60 Yds, Clear, 1/Roll (467886-CC) was placed across the top of the hinges on V1, V2 and V3. The final version, V4, didn't need the tape. The TopFlite EconoKote covered the hinges and the beveled edges and created the hinge. Large Great Planes Nylon Control Horns were used on all the movable surfaces; rudder, elevator and both ailerons on the aileron version of the wing. I always preferred the GP horns over the Dubro horns because the GP screw heads were the Phillips type, while the Dubro control horns use a slotted type head. The slotted type head can allow the flat, plain type screw driver tip to slip out of the slot and mar the surface. The large, nylon Dubro control horns can still be purchased from Tower Hobbies and used instead of the large GP control horns. As previously mentioned, the recommended control throws are now "12 - 16 degrees." The plywood control horns on the DIY plans, and provided in the kit, have the outer most hole of the control horn approximately 1/2" above the movable surface. In the build video, Josh notes that the servo end pushrods go into the innermost servo arm hole, the hole closest to the servo arm screw. He also notes that the elevator and rudder control horn ends go into the outermost hole of the control horns. There is a throw gauge provided on the DIY plans and in the laser cut kit. Josh is shown using the throw gauge when he talks about setting up dual rates. The provided throw gauge has one angle on it that is approximately 21 degrees for the low rate (L) and another angle on it that is almost 27 degrees for high rate (H). Those angles do not agree with the stated throw of 12 - 16 degrees. The angles on the included throw gauge provide too much throw for this type of aircraft and lead to over controlling the plane. The undesired results of having too much throw can be seen in many of the YouTube videos of the Simple Cub. 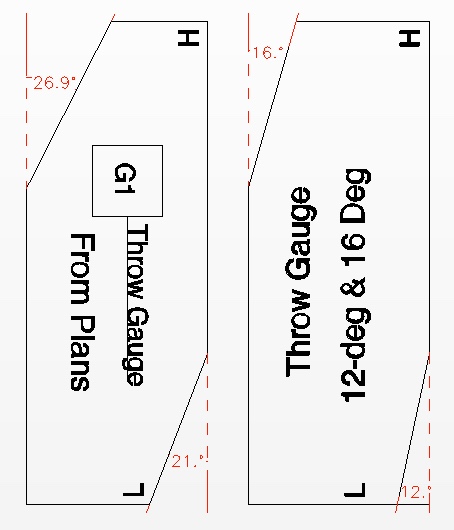 I created another throw gauge with one angle at 12 degrees and the other angle at 16 degrees. English Language Update of "Lithium Polymer Battery Technology - An introduction with special consideration of RC model lithium batteries"
I received an email from John Julian on October 3, 2019 about Frank Siegert's great article being updated to English by the author himself. The email had a link to John Julian's October 3 post on RC Groups. In his post, John noted that the original article was only available in German. He said, "I did a very crude transliteration into English which is in this thread and then Ken Myers cleaned it up a bit and published it in the Ampeer." In his recent post, John put a download link to Frank Siegert's English version. In the January 2019 issue of the Ampeer I wrote the following in the article titled, "Pack Test and Comparative IR Using Three IR Meters". In his Electric column, in the December 2018 issue of Model Aviation, Greg Gimlick started his discussion of several ways to obtain a battery's calculated internal resistance. Part 2 was in his column in the February 2019 issue. I also have discussed a battery's internal resistance, and how to measure it, in the September 2017 and October 2017 issues of the Ampeer. Measuring a Battery Pack's Internal Resistance (Ir)
If you need more background, these articles should be helpful;
Lithium Polymer Battery Technology: An Introduction by Frank Siegert
In his RC Groups post, John states, "It [Frank's article] was an invaluable source of authoritative information from a qualified professional who knew what he was talking about. It is a most useful summary of LiIon and LiPo technology if you are interested in how our flight packs work." If you want the "real" skinny, from someone who knows what they are talking about, read Frank's article, and more importantly, absorb it! While on the topic of LiPo batteries and internal resistance, please take note of Greg Gimlick's excellent article on the new version of the ESR meter in Model Aviation, January 2020, p. 76 - p. 78. A LiPo "C" Rating Recommendation and Failsafe Warning
I read through that latest AMPEER [October 2019]. I have one comment that is opinion. I always go with the highest C rating available at the price you can afford. Recent batteries are about the same size with 60 to 90C ratings. They never get hot but put out phenomenal performance. In fact, the price differential has virtually disappeared. The following comment is is a STRONG RECOMMENDATION / REQUEST. Always Rebind / Link after setting up an aircraft. On some radios throttle must be reversed to function correctly. If you don't rebind that failsafe function may wind up being reversed. That is in failsafe the throttle goes to full high instead of full low. Not that this has ever happened to me. Joe Hass
John Goodenough Wins Nobel Prize
On October 16, 2019, Keith Shaw sent me an email with a link to a DesignNews article about Dr. Goodenough. He is a "hero" to both Keith and myself and responsible for the "A123 cells" that we continue to use though this day. He was responsible for much, much more in implementing lithium technology into all of our daily lives. I highly recommend this short read about him because we owe so very, very much to this man and the technology he invented that has not only helped our hobby but our daily lives. Congratulations John Goodenough! If your are not familiar with John B. Goodenough's contributions to battery and other modern technology, you should check out this video. Are Solid State Batteries About To Change The World? | Answers With Joe 2019 -2020 Skymasters R/C Club Indoor Flying/Driving at the Ultimate Soccer Arenas The Best Indoor Flying Venue Anywhere!
Located at 867 South Blvd., Pontiac, MI 48341 October 29th through April 14th
Spectators Welcome and FREE
Single Flying Session ONLY $10
Pay at the door or register online at:
Have Any Questions?
All Pilots MUST Have Proof of Current AMA Membership
* Consult the Schedule on the Skymasters' Website for Exact Times and Dates Indoor Online registration is open at: www.skymasters.org. Schedule DECEMBER:
JANUARY:
FEBRUARY:
MARCH:
APRIL:
Dates & Times Subject To Change. Please note that a special area is set aside for electric RC Drivers. Did you note that Driving was added to the title? Costs and dates are the same for drivers as fliers. Indoor Flying to Start Soon at the Legacy Center in Brighton, MI Start Date: Wednesday November 6 Time: 12 p.m.- 2 p.m. Place: Legacy Center Sports Complex 9299 Goble Dr, Brighton, MI 48116 Cost: $10 cost per session Don't let the cold keep you from flying For More Information Visit the Hamburg Flyers Website. Return to "What's In This Issue" The Upcoming Keith Shaw Birthday Party Electric Fly-in 2020 The Balsa Butchers are hosting the "Keith Shaw Birthday Party Electric Fly-In", for the 18th year, at their field near Coldwater, MI. The event takes place on Saturday, May 30, 2020. It is a one day event again this year. The event consists of Open Electric Flying with a "Special Guest of Honor Theme", Happy Birthday Keith Shaw [June 6]. Enjoy a day with the "Pioneering Master of Electric R/C Flight". 8 a.m. - 5 p.m., Saturday. NO LANDING FEE! Donations for field maintenance and lunch appreciated. For additional information contact;
The field will be open for guests to fly on Sunday as well. 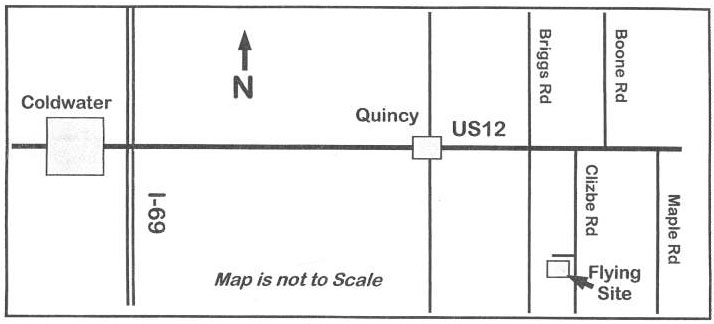
Return to "What's In This Issue" A New Motor & ESC Line at Innov8tive Designs
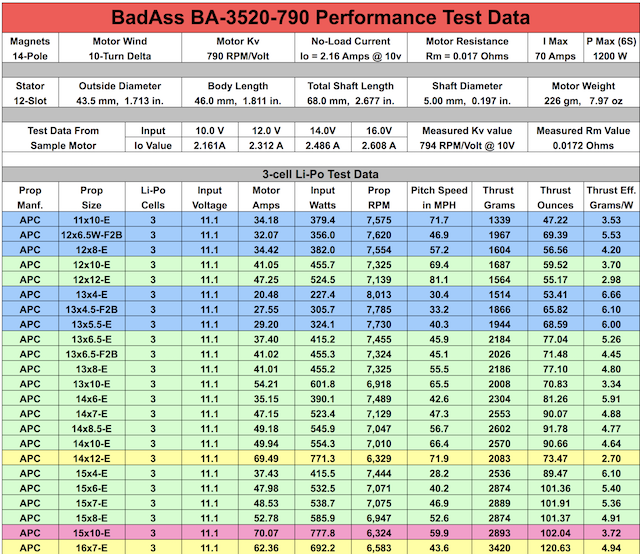
Lucien Miller has recently started carrying a new brand of outrunner motors and electronic speed controls (ESCs). The brand name is "Bad Ass". Yeah, I know! :-( Ampeer readers should know by now that I am a HUGE FANBOY of Innov8tive Design's Cobra line of brushless out runners. The reason is simple. He provides actual, real, measured data for each of the Cobra motors. He is now providing that same kind of data for his new line of motors. I recently received a mass email from Lucien regarding these new motors. The following is from that email. "Here at Innov8tive Designs, we are always amazed at the lack of performance data and specifications that most motor brand manufacturers provide for their motors. (Me too. KM) We're talking about Motor Specs and Prop Charts here guys and you should demand them. (Absolutely! KM) Innov8tive Designs wants you to get the ideal power system for your model every single time, and for that, you need highly detailed prop charts." He then provides some examples. 3520 size 800Kv motor Retail price $109.99 Voltage Range 11.1-14.8V / 3-4S LiPo Power System Recommendation: 45 Amp ESC, 4S LiPo, 12x6 to 13x8 Electric Prop Motor Brand "B" Prop Data
BadAss Brand Prop Data
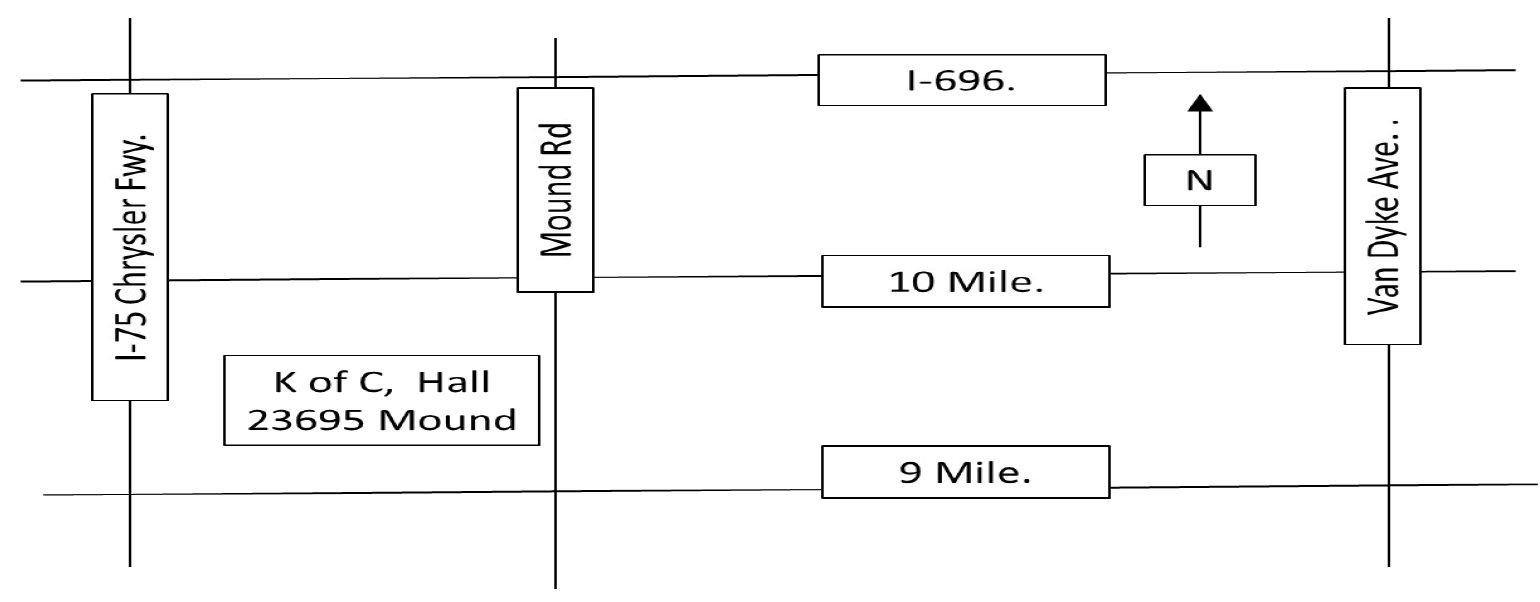
The screen capture shows part of that linked page of data. Clicking the link, "Our Prop Data....", will show the complete table for the data using 3S, 4S, 5S and 6S LiPo pack voltages. At this time, I have no experience with these motors, but I believe they might be worth considering for a future project. I truly appreciate Lucien's efforts to inform us about what we are purchasing. It requires a massive number of man-hours. Thank you so much Lucien. Okay, I have to say it, the name of the brand, I don't care for it. Guess I'm just too old to get it or think that it is "hip". Time: 9 a.m. - Noon Location: Knights of Columbus Hall 23695 Mound Rd., Warren MI 48091 1/3 Mile North of 9 Mile Rd. on West side of Mound Rd.
Adults - $5.00
Food and Refreshments: $3.00 Waffle Breakfast 9:00 - 11:00 Contact info: To reserve tables or general info contact: Paul Newby at 586-747-7675 or email to: paul.newby51@gmail.com Vendors: Tables $20.00 each
More Info at: www.rccd.org To Reach Ken Myers, you can land mail to the address at the top of the page. My E-mail address is: KMyersEFO@theampeer.org |