|
Flying High With Electric Power!
The Ampeer ON-LINE!
Fly the Future - Fly Electric! |
|---|
Site Table of Contents
| President: | Vice-President: | Secretary-Treasurer: |
| Ken Myers | Keith Shaw | Rick Sawicki |
| 1911 Bradshaw Ct. | 2756 Elmwood | 5089 Ledgewood Ct. W. |
| Commerce Twp., MI 48390 | Ann Arbor, MI 48104 | Commerce Twp., MI 48382 |
| (248) 669-8124 | (734) 673-6309 | (248) 685-7056 |
 | ||
| Board of Directors: | Board of Directors: | Ampeer Editor |
| David Stacer | Arthur Deane | Ken Myers |
| PO Box 75313 | 21690 Bedford Dr. | 1911 Bradshaw Ct. |
| Salem, MI 48175 | Northville, MI 48167 | Commerce Twp., MI 48390 |
| (313) 318-3288 | (248) 348-2058 | (248) 669-8124 |
| July 11 EFO Meeting: Midwest RC Society 7 Mi. Rd. Flying Field Time: 9:00 a.m.
Place: Midwest RC Society 7 Mile Rd. Salem Township, MI It's the Mid-Am!!! Phone: 248-669-8124 Everyone with an interest is WELCOME | ||
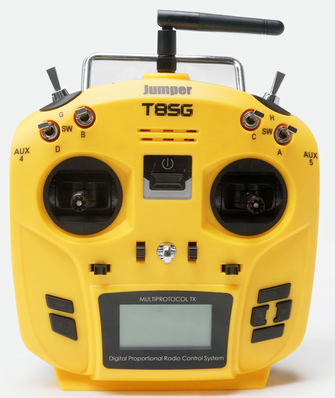
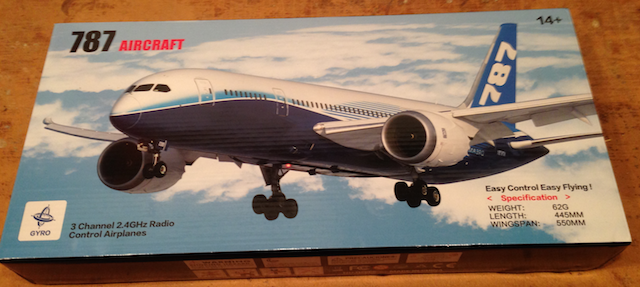
| A Note About the Jumper T8SG Walt Thyng discusses issues that he's had with his. | The QIFENG QF008 787 Ken Myers reviews this plane. |
| Congratulations Mark Freeland and Retro RC! Mark Freeland of Retro RC sets a new record in producing kits. | The GNAT Joe Hass shares details on this TINY biplane. |
| Upcoming 2020 36th Annual Mid-America Electric Flies Event Announcement with updated information | |
From Walt Thyng via email
I read last months intro to the Jumper T16 with more than usual interest as I have a Jumper T8SG. It is a cool system. As you noted, the various manuals that are available are almost useless. I downloaded one from their website and edited out all non-fixed wing sections. That helped a tiny bit. I have advanced to the point of being able to program aileron differential (at least, I did it once). I do have one BIG problem. My T8SG shuts off without warning! It also starts up without warning! I have lost at least one and possibly two planes to the shut-down and have a pair of pants with a badly shredded leg due to the unexpected start-up unexplained startup (I know I should have disabled the power before picking the plane up). Have you heard of this before? Is there some kind of low voltage shut-off that opens when the batteries recover? Right now I don't dare fly my Jumper. In the interest of full disclosure, one of my flying buddies also bought a T8SG and has had no problems with it. Walt Thyng My response: Hi Walt, I have not followed any information on the Jumper T8SG, so I've not heard of any problems with it. I have not flown my Jumper T16 outdoors or in any planes that I care about. I have only used it indoors for the little QIFENG products QF008-787 I have. That model comes with its own tiny transmitter, but appears to use the XK / WLtoys A100 protocol, which originally bound on the Jumper T16 using the V911S std protocol in the multi-module. Unfortunately, the latest version of firmware for the multi-protocol module changed that protocol and that little plane no longer will bind! The earlier versions of the multi-module firmware were sketchy when used with the SLT (Tactic) protocol, but now, in the latest version of the multi-module firmware, it seems better. My Jumper T16 has the second to the latest OpenTX radio firmware on it. During the very short time that I have had the radio, there have been three radio OpenTX firmware updates and at least as many multi-module firmware updates. "It also went "wonky" in the airplane setup screen on the radio and would not allow glider to be chosen and the screen icons switched positions. Very weird. A new version of OpenTX fixed that. FOR ME, this is just too much. I have absolutely no faith whatsoever in this system because of the numerous ribbon failure reports in the RC Groups threads, as well as the constantly changing operating system and multi-module updates. It is just the wrong system for me. I'm sure that some others may find it useful and totally disagree with my personal opinion. Grayson Hobby, where I purchased my Jumper T16, no longer carries it. They will be carrying, or are by now carrying, the new Jumper T18. I just recently purchased a Tactic TTX660 so that I can continue to use my Tactic (SLT) receivers. I've found my Tactic equipment to be quite reliable, overall. Later,
The QIFENG QF008 787
What is this plane? That is hard to say. Many online sellers note it with words similar to "QF008-Boeing 787 DIY Toys Aeromodelling", but a Google search for QF008-787 yields many sellers, as well as many iterations with various components included. Some versions, that I found only, include one battery, some include two batteries, some include a USB LiPo charger and some include two batteries, the USB LiPo charger and the "Light Bars". Even though the glue may not be listed, it might be included in the kit. Three "AA" batteries are required for the transmitter and not included. Prices vary by the online seller and also by the kit contents. It is not a true ready to fly (RTF) model, as most true RTF models can be removed from the box, the flight battery charged and transmitter batteries inserted and they are ready to fly. The plane kit resembles an almost ready to fly (ARF) airframe, which requires assembly with glue but it is packed with a transmitter and onboard control unit, that requires hooking up in the airframe. The airframe itself is made to somewhat resemble a 787 airliner. Yaw control is provided by differential thrust. The motor speeds are varied independently. There is no true rudder or aileron control. The elevator is controlled by a multi-wire "servo", and it does not provide true proportional control. The servo moves the elevator in steps for controlling pitch, both up and down. There is also a 3-axis gyro built into the onboard controller/receiver to provide stability. The plane was ordered from Amazon on Wednesday, January 29 at 2:45 p.m. The delivered price was $62.53. The kit arrived at 2:15 p.m., Saturday, Feb. 1, 2020. Amazon Descriptive Title: RC Airplanes 550mm Wingspan Glider 3CH 2.4Ghz DIY Remote Control Airplane Toy EPP Built-in Gyro QF008-787 Beginner Remote Control Plane with 2pcs Battery
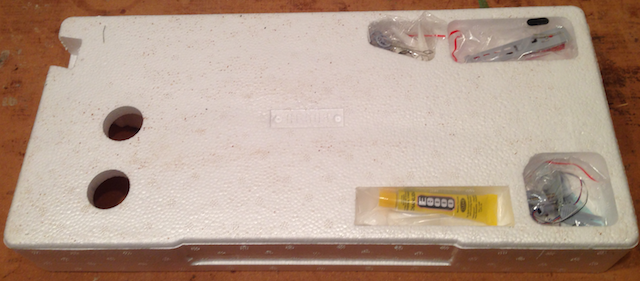
The Amazon description had some errors. It does not require four AA batteries, it requires three. Although a tube of glue was not noted on the seller's page, it was included in the kit. When the plane arrived, the kit box was packed inside a larger Amazon box, but there was no packing in the large box and the kit box could move side to side and end to end. 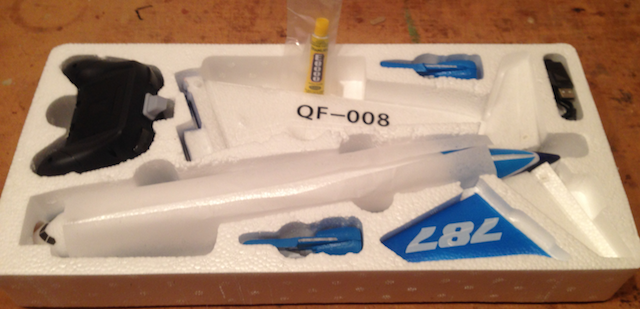
The kit box appeared to have no damage. The tape on each end of the kit box was cut. Trying to slide out the foam compartmentalized box from either end was harder than necessary, since a plastic handle, protruding from the top side of the box, had its securing ends in the kit box. The foam, compartmentalize, box got hung up several times on the handle ends when trying to remove it from the kit box. Why the handle is there is a mystery, as once the plane is assembled, it will not fit back in the box. As the compartmentalized foam box was removed, a tube of glue fell onto the building board. Glue was not listed as part of the contents on the Amazon page where I purchased the kit. The supplied glue is INDUSTRIAL STRENGTH ZHANLIDA E-8000 Medium Viscosity CLEAR with a plastic application tip. The small, tiny, minute, microscopic, diminutive manual was unreadable. On the cover of the manual it says, "Thank you for buying QIFENG products. QF008 is the latest technology in RC models." I used Google to search for QIFENG QF008 and found a pdf of the manual on the FCC Website. QIFENG TOYS FACTORY:
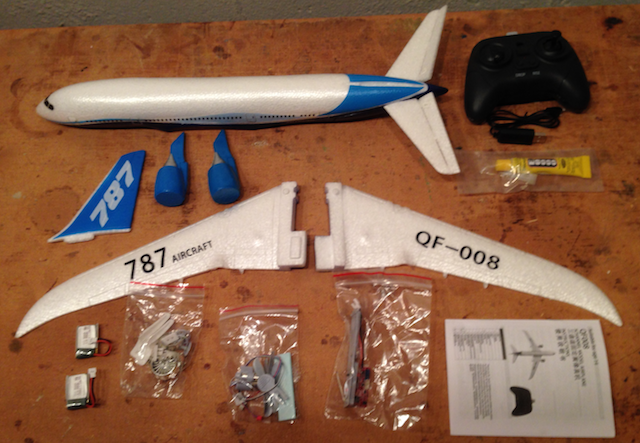 I removed the parts from their compartments in the foam and set them aside. The two supplied YiYi 8528251S 3.7V 300mAh LiPo batteries were removed from the fuselage. I used great care in removing them so as not to pull on their wires. There is a small amount of some type of adhesive along the narrow edge of each battery, so they were a little difficult to remove from their positions in the fuselage. As received, each battery's resting voltage was checked. One showed 4.001V and the other was at 4.031V. That is well above the typical shipping and storage voltage for LiPo batteries. I used a squared piece of 24" by 10" Dollar Tree foam board to calculate the wing area. After weighing the 24" x 10"o; piece of foam board, the wing planform was drawn on the piece of foam board and then cut out and weighed. The planform wingspan was also measured and came out just slightly longer than the noted 550mm in the specifications, which I believe was an estimate based on the wing having dihedral built in. Planform Wingspan: ~22" about 559 mm.
The components were weighed in groups, as noted below. Weights:
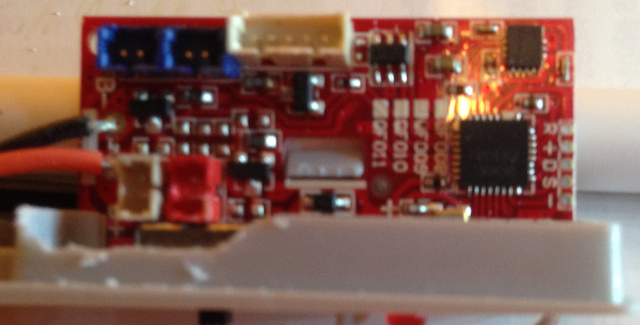
The radio system was tested before the assembly of the airframe, just in case there might be something wrong with it and it wouldn't fit back in the box in case a return was necessary. The transmitter requires three AA batteries, not four, as noted on the Amazon sellers page. The 3 AA batteries were inserted into the transmitter, following the correct polarity noted on the battery box. The preinstalled connectors, on the leads of the motors, are tiny. At first I just tried to insert them into the connectors on the flight controller board, but it was very frustrating because there is a "lip" of plastic on the controller/receiver/battery hatch plastic mounting piece that makes inserting them difficult, as the lip is in the way. 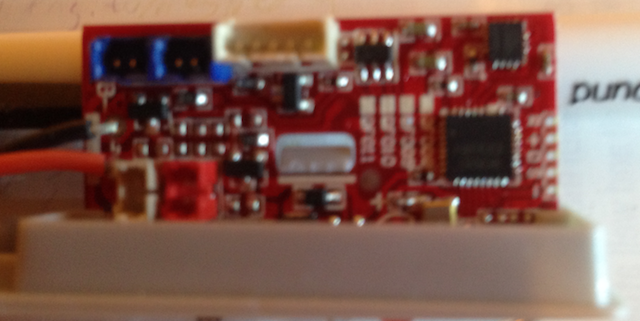
I used a Dremel tool with a small cutter bit to open a bit of the "lip" where the connectors plug into the circuit board. 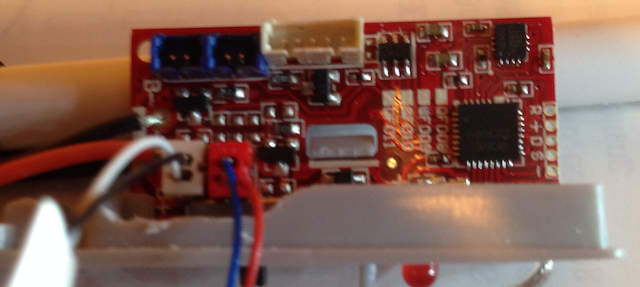 With the "lip" lowered, it was much easier to plug in the connectors to the motor. Once the motors were plugged into the circuit board, the servo connector was plugged into its connector on the circuit board. The motors were taped to the building bench. One of the 1S LiPo batteries was plugged in. Following the directions in the manual, the controller/receiver was turned on first and then the transmitter. The system bound fairly quickly. Both motors and the elevator servo worked. The controller/receiver was turned off and then the transmitter. The connectors were removed from the controller/receiver circuit board. The plane was assembled using the supplied glue while trying to follow the directions that I found online. All of the parts were dry fitted first to learn how they fit. I found it necessary to use blue painter's tape to hold the mount in place in the fuselage because the mount is straight but the fuselage bottom is curved. Unfortunately, the painter's tape pulled several spots of the navy blue paint from the bottom of the fuselage around the controller/receiver mount. Luckily, I had some Testers navy blue enamel to touch it up. The supplied Boeing graphics are very easy to apply. They are NOT waterslide decals. The clear plastic is removed from one side. That exposes the graphic with a sticky backing on it. The graphic is aligned onto the fuselage and pressed on. I used a sponge with hot water in it to release the bluish backing paper from the graphic, which was already stuck to the fuselage. Be sure to get the top of the graphic letters towards the top of the plane. Once on, the graphic will not come off. Don't ask, but how on earth could I do it wrong TWICE! My plane does not have the Boeing graphics on it, only dark blue model paint to cover the inverted graphics. At that time, I was also able to bind the plane to my Jumper T16, and that is what I used to fly the plane. I have only flown the plane indoors at the Legacy Center in Brighton, MI. The plane wouldn't take off of the artificial turf, so Roger Wilfong hand launched it for me. It porpoised a lot at first, but I soon got that under control. It behaved itself much better on flights 2, 3 and 4. The elevator was a bit too sensitive. The fourth flight was best of all. The plane flies well, and is not too difficult to control. It has to fly relatively quickly, as it does not slow down and stay in the air. The plane needs to be flown faster than the indoor venue allowed and it had a tendency to wallow in the corners. It would be nice if it could fly slower. Could a beginner fly it? Probably, but it takes a lot more area to fly it in than might be expected. For me, it was a fun plane to fly indoors on the cold winter days. There are some spare parts available. 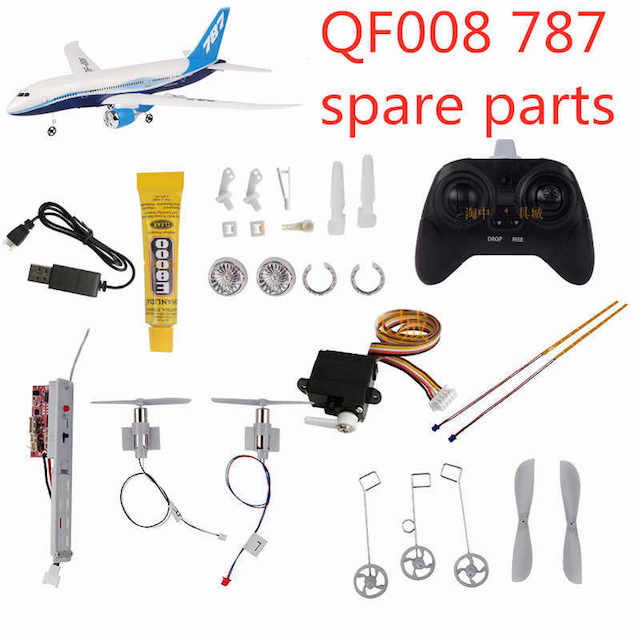 Batteries are not included in the spare parts listing. "Light Bars" are shown and seem to be optional with some of the kits containing them and some not. Because glue was not listed as part of the kit contents, I researched glues for EPP foam before my purchase. The YouTube video, "EPP glue test", suggested that epoxy and hot glue worked best. The YouTube video, "EPP Foam Repair Tips", suggested that Goop and hot glue worked best. Reference videos: $40 RC Smart Jet Micro Boeing 787 - Auto Take Off & Stability Control RTF - TheRcSaylors This is the video that I watched before purchasing mine. The video notes that it is a kit and requires assembly. The author of the video noted that the transmitter stick "tops" were found inside the battery box. Mine were already on the transmitter sticks. QF008 Boeing 787 3 Channel RC Flying Scale Model Flight Test Review The author of the video notes how the radio works with the button for dual rate elevator. Only throttle is on the left stick and "yaw" is on the right stick. The buttons along the bottom of the face of the transmitter appear to be trim buttons. He shows the arming process; turn on plane and place on level surface, turn on transmitter. He notes that the construction might be EPP foam and that glue required. He also notes to make sure to plug corresponding motor connector colors to the matching color connectors on the PCB. He got 6 min. 28 sec. of flight time outdoors out of the 300mAh battery. Interesting, as inside, I am getting much longer flight times, almost double that. QF-008 AKA Boeing 787 Unbox, Assembly, and Windy Maiden Flight!!! This is a really LONG video that includes the unboxing. The author of the video notes that two 1S 300mAh batteries are packed in the fuselage. He does a non-foam safe CA test. The non-foam safe CA worked better for the construction than I thought it might. He checked the motor rotation BEFORE gluing on the right wing panel. He did the bind process in the wrong sequence, according to what the manual states, and turned on the transmitter first. He believes that the supplied graphics are water slide decals, but they are NOT. They are self-stick graphics with water used to release the graphic from the sheet after the self-stick graphic is affixed to the fuselage. QF008 Boeing 787 RC Airplane Fixed Wing RTF Build & Maiden The glue he used was melted the foam. He also did get radio system to bind by turning on the transmitter first. QF008 RC 787 Dreamliner plane. Gyro stabilized. Has loop and stunt mode. Needs some assembly. The author of the video noted that he used hot-melt glue. He notes that the top, right button on the transmitter acts as an elevator dual rate. Boeing 787 Mini RC Airplane Set 8/2019 The author of this video demonstrates the binding sequence of the plane on first and then the transmitter. He demonstrates that the elevator is not truly proportional. He also explains the "drop" and "rise" feature buttons on the transmitter and how they control the elevator only during the descent when the motors are off. He said that he didn't think the buttons on the top did anything, but they do. The top, left button turns on lights, if light bars are added. The top, right button acts as dual rates. He recommends NanoTech batteries for replacement batteries. Airbus A380 (XK A120) VS Boeing 787 (QF-008) - Calm Comparison Flights The author of the video notes that the QF008-787 is similar to the XK 380 and that the controllers are interchangeable. To me, the control modules look the same in both planes. He does a throttle up and down twice during binding. I don't believe that is necessary from the other videos I've watched. RC Boeing 787 - Awesome toy grade RC plane! The author of the video notes that when the throttle is advanced for take off, the elevator goes up automatically. He says, "It is also a surprise that the glue that came with QF is holding up." He also does a few "loops". It looks like the top right button turns off pitch stabilization and allows for more throw on the elevator for loops. THIS YOUNG MAN IS REALLY GOOD AT EXPLAINING WHAT HE IS DOING WHILE FLYING THE PLANE! Smallest MICRO RC Boeing 787 Dreamliner Passenger Jet (EASY TO FLY and CHEAP TO BUY !) Shows this plane flying outside in a "bit" of wind. The pilot notes that "the gyro won't let me loop." That is not true. He didn't read about the top right button on the transmitter. Congratulations Mark Freeland and Retro RC!
At the beginning of 2020, Mark Freeland, Mr. Retro RC, shipped his 10,000th kit. That is a phenomenal accomplishment for a one man operation. On Monday, January 20, 2020 a celebration of this accomplishment was held at the Ultimate Soccer Arenas in Pontiac, MI. There was a surprise cake for Mark as well as coffee to go with it. 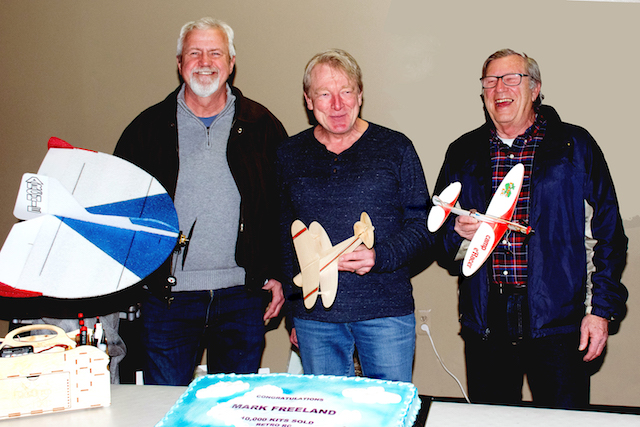 George Maiorana took the photo of John Hoover (left), Mark Freeland (Middle) and Ken Myers (right) enjoying the celebration. Again Mark, Congratulation on a Job Well Done! The GNAT
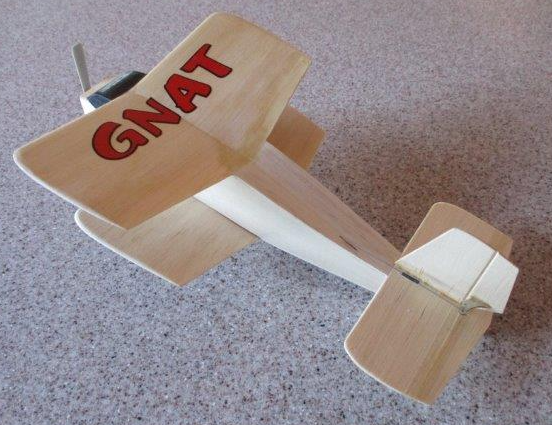
A gazillion years ago I built a GNAT powered by a Tee Dee .010 with a Citizenship MDL single channel receiver (pulse) and a relay as the actuator. I finished it with Hobby Poxy. It was incredibly heavy. I never flew it but still have it, well worn with massive hanger rash. I don't know why I kept it. Recently I looked at it and decided to build another but with modern equipment. I started cutting out pieces then, while looking at some old magazines, I found the original drawings. They appeared in the December 1964 Model Airplane News. A trip to Staples got an an enlargement that gave me perfect plans. 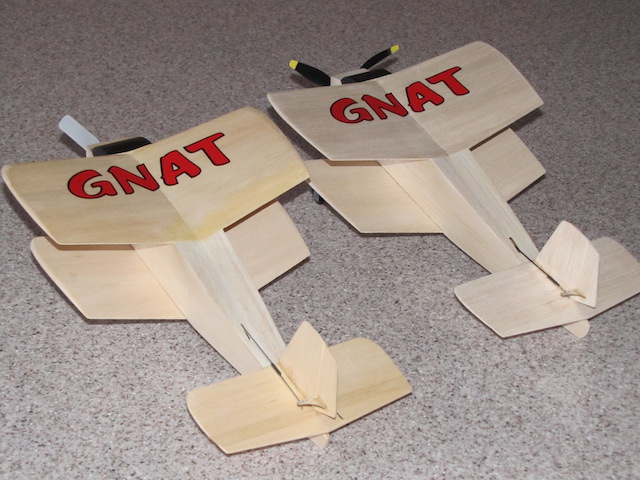 First attachment is a picture of my GNATS. The one on the left is the first "new" one I built. I didn't pay any attention to the wood density so it came in "heavy" at 2.4 ounces with 2 servos, receiver, brushless motor, ESC and a 2 cell 180mAh Li-Po. While tricky from a hand launch it does fly well and will loop. Most of the flight is at 1/2 throttle as it is VERY fast and hard to see.�Take offs from a hard surface are actually easy. Guess what, it doesn't glide. Landings are an "arrival". Trying to save some weight I built another (aircraft on the right) with better wood, a Park Zone brick and a Park Zone geared motor from their Trojan, three bladed prop and a single 220mAh Li-Po. Unfortunately I had to add 0.25 oz. to the nose to get the initial balance correct. 2.0 ounces all up weight with a fully charged battery. I haven't flown the second one yet. Hopefully I can remove some weight after I test it a bit. In the text for RC News in that issue, the GNAT was designed to challenge the Ken Willard "Worlds Smallest RC". I remembered the article but none of the details. 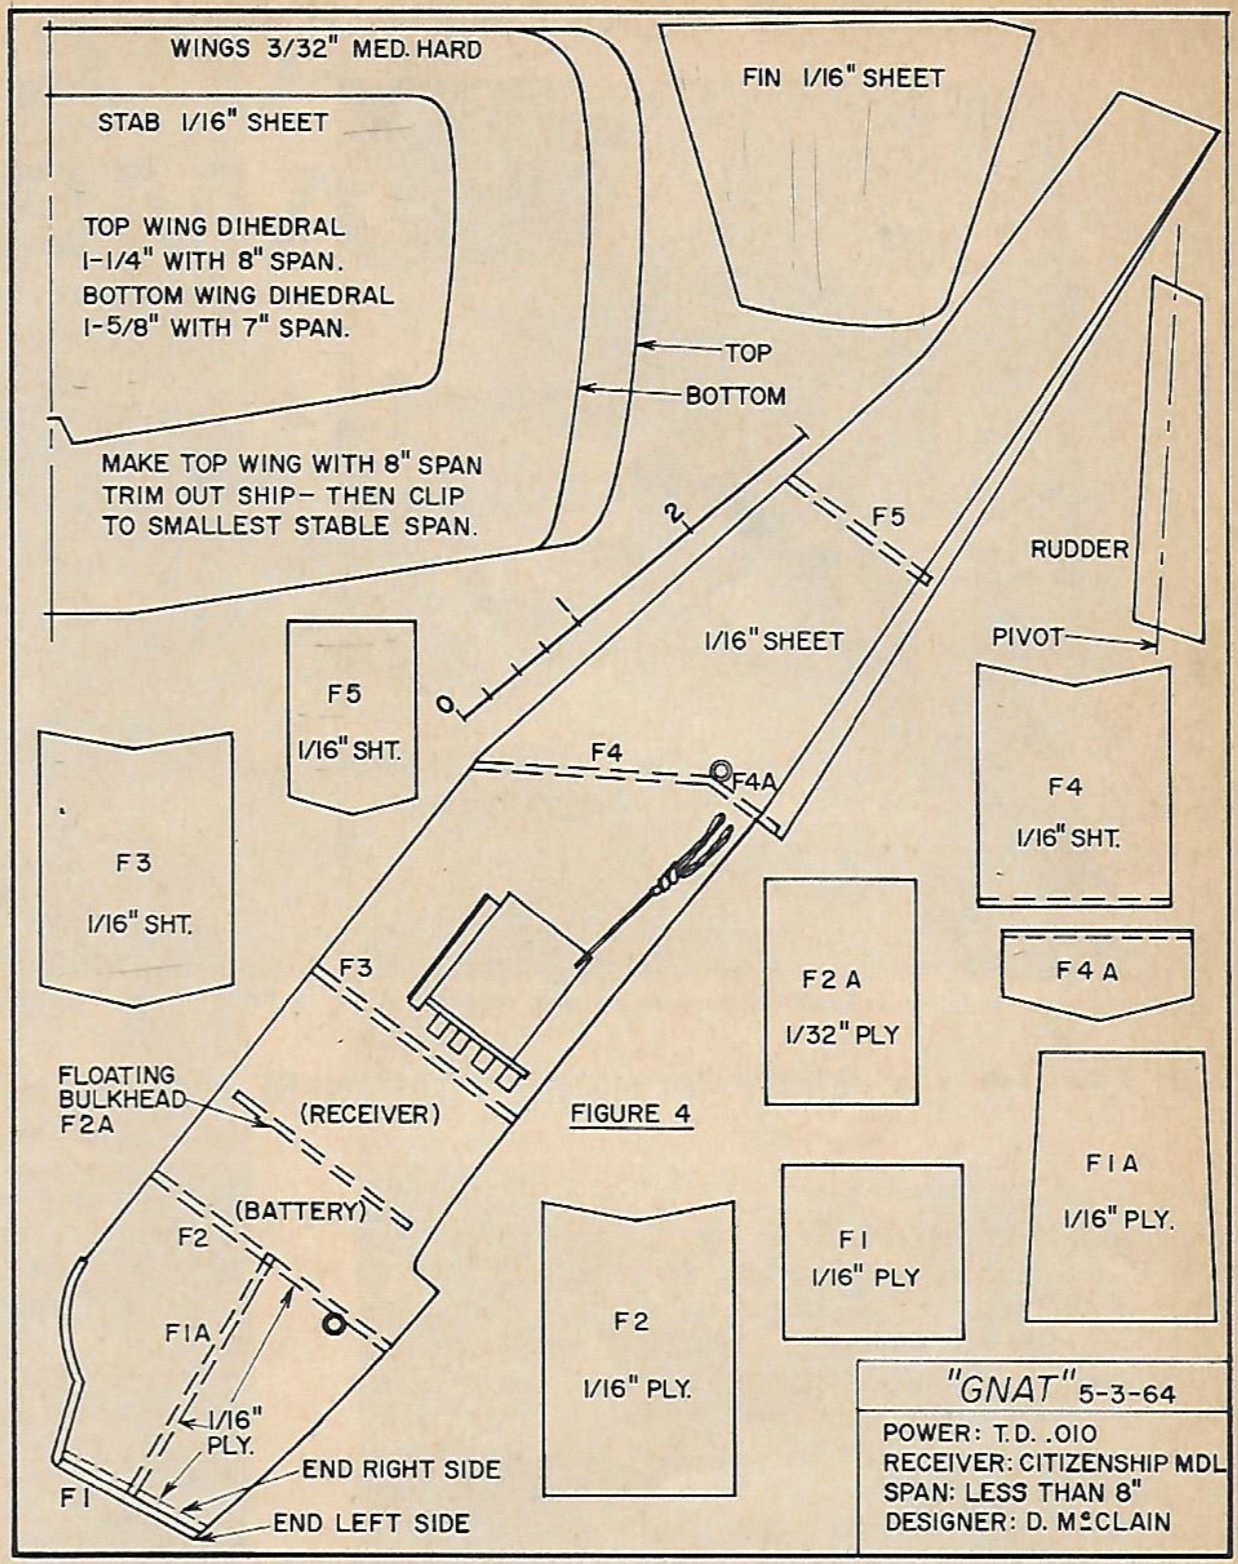 Take a close look at the plans for text about the wingspan. I don't know how you "clip to the smallest stable span" Do you glue some of the wood back after it is no longer stable? 36th Annual Mid-America Electric Flies 2020
Information Modified June 1, 2020 Due to the Virus
Special Note: Mid-Am 2020 Due to Covid-19 Everyone needs to be mindful of other's concerns for social distancing. VERY IMPORTANT! If you wish to eat or drink while at the field, please bringing your lunch and or dinner as well as pop and water. We will have as much hand sanitizer available as possible, but consider bringing some for your own for personal use. Bringing and wearing your own face-masks is required. Please bring your own ink pen to use for pilot registration, we will have extra pens as needed, but if you use one of ours, please take it and keep it. Again, No specific landing fee, but we will have a container for donations for the upkeep of the Midwest flying field. The pilot and spotter distancing should be at least 6 ft. Please fly only from the designated areas. We intend to space the car parking out to allow more spacing between cars. Several "rows" are possible. If you have items you wish to sell, feel free to bring them. Ann Arbor Falcons and the Electric Flyers Only (EFO) The 7 Mile Rd. Flying Site, Salem Twp., MI, is Provided by the Midwest R/C Society Contest Directors are:
Pilot Landing Fee - NONE
Awards on Saturday Only
Their will be a pilots' raffle for all registered pilots Planes Must Fly To Be Considered for Any Award
The Field is Open for Open Flying All Day Friday and Night Flying is Possible, Weather Permitting, Friday & Saturday Nights NO FOOD OR BEVERAGES WILL BE AVAILABLE AT THE FLYING FIELD
No trash cans will be available, so please take your trash with you. There will be NO Potluck on Saturday The NCM (Not Conventional Materials) Event:
Foam Flurry for NCM aircraft:
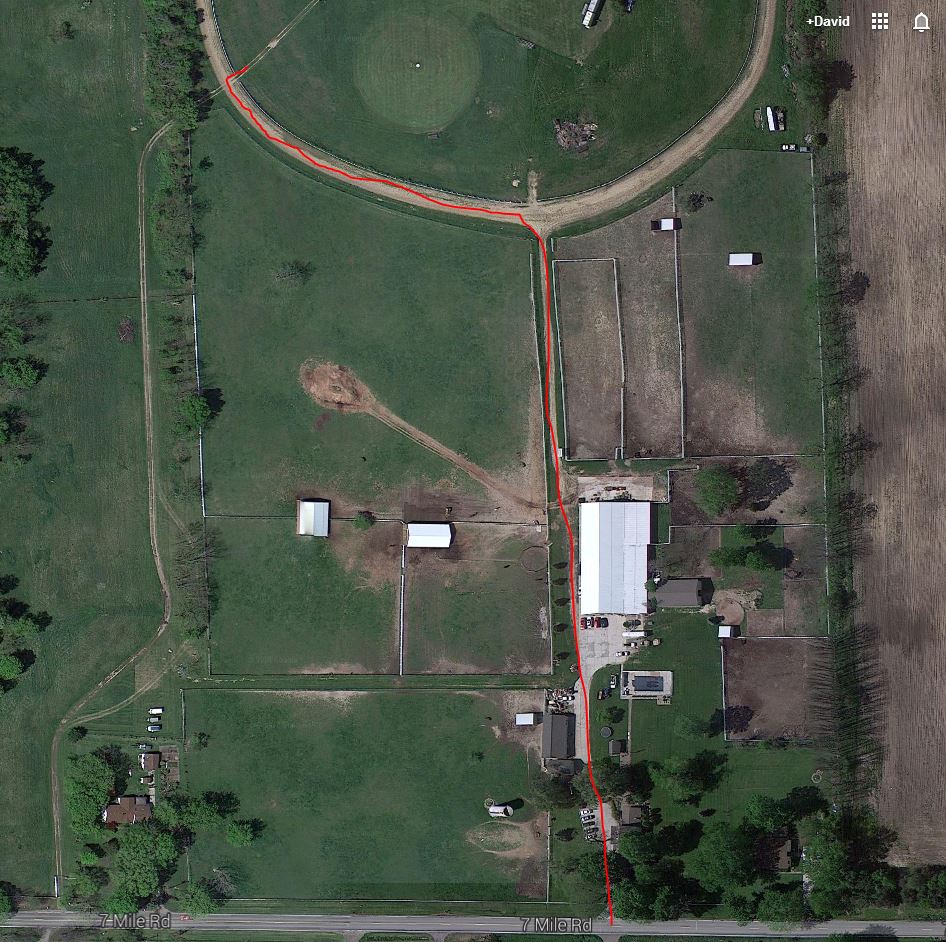
The old entrance to the Midwest RC Society flying field is permanently closed!!! DO NOT ATTEMPT TO USE IT!!! To locate the Midwest R/C Society 7 Mile Rd. flying field, site of the Mid-America Electric Flies, look near top left corner of the map, where the star marks the spot, near Seven Mile Road and Currie Rd. The field entrance is on the north side of Seven Mile Road about 1.5 Miles west of Currie Rd. entrance is on the north side of Seven Mile Road about 1.6 Miles west of Currie Rd. 
The address is 7621 Seven Mile Road, Northville, MI 48167. The entrance is through a private residence drive and out past the barn.
Because of their convenient location and the easy drive to the flying field, the Comfort Suites and Holiday Inn Express in Wixom, MI have been added to the hotels' listing. They are only 10 miles northeast of the field and located near I-96 and Wixom Road. See the map-hotel .pdf for more details. Special Note: Mid-Am 2020 Due to Covid-19 Everyone needs to be mindful of other's concerns for social distancing. VERY IMPORTANT! If you wish to eat or drink while at the field, please bringing your lunch and or dinner as well as pop and water. We will have as much hand sanitizer available as possible, but consider bringing some for your own for personal use. Bringing and wearing your own face-masks is required. Please bring your own ink pen to use for pilot registration, we will have extra pens as needed, but if you use one of ours, please take it and keep it. Again, No specific landing fee, but we will have a container for donations for the upkeep of the Midwest flying field. The pilot and spotter distancing should be at least 6 ft. Please fly only from the designated areas. We intend to space the car parking out to allow more spacing between cars. Several "rows" are possible. If you have items you wish to sell, feel free to bring them. To Reach Ken Myers, you can land mail to the address at the top of the page. My E-mail address is: KMyersEFO@theampeer.org |