|
Flying High With Electric Power!
The Ampeer ON-LINE!
Fly the Future - Fly Electric! |
|---|
Site Table of Contents
| President: | Vice-President: | Secretary-Treasurer: |
| Ken Myers | Keith Shaw | Rick Sawicki |
| 1911 Bradshaw Ct. | 2756 Elmwood | 5089 Ledgewood Ct. W. |
| Commerce Twp., MI 48390 | Ann Arbor, MI 48104 | Commerce Twp., MI 48382 |
| (248) 669-8124 | (734) 973-6309 | (248) 685-7056 |
 | ||
| Board of Directors: | Board of Directors: | Ampeer Editor |
| David Stacer | Arthur Deane | Ken Myers |
| PO Box 75313 | 21690 Bedford Dr. | 1911 Bradshaw Ct. |
| Salem, MI 48175 | Northville, MI 48167 | Commerce Twp., MI 48390 |
| (313) 318-3288 | (248) 348-2058 | (248) 669-8124 |
| EFO Meeting: Wednesday, March 11 Time: 7:30 p.m.
Place: Ken Myers' house 1911 Bradshaw Ct. Commerce Township, MI 48390 Phone: 248-669-8124 Everyone with an interest is WELCOME | ||
| Electric Powered Beaver Worth Noting Ken shares some information regarding and electrically powered full-scale Beaver. | December 2019 EFO Meeting Planes, folks and fun at the December 2019 EFO meeting. |
| Modifications to FliteTest's Simple Cub - Part 4 Ken continues with his design considerations and information on his version of this plane. | 2019 - 2020 Skymasters R/C Club Indoor Flying at the Ultimate Soccer Arenas Event Announcement & schedule |
| Indoor Flying Has Started at the Legacy Center in Brighton, MI Event Announcement | The Upcoming Keith Shaw Birthday Party Electric Fly-in 2020 Event Announcement |
| Upcoming 2020 36th Annual Mid-America Electric Flies Event announcement. | |
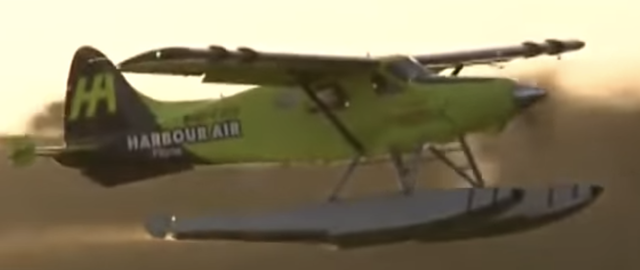
There have been several prototype full-size airplanes that have been using electric power for quite awhile now. On December 10, 2019, the British Columbia, Canada, based seaplane airline Harbour Air made a successful test flight of a retrofitted, all-electric commercial seaplane, a 1956 de Havilland Beaver. It was piloted by Greg McDougall the CEO of Harbour Air. The flight covered 16 km, about 10 miles, and was four minutes long. A bit shorter than our typical flight times. ;-) The plane's range is said to be 160 km, or just a tad shy of 100 miles. Harbour Air plans on converting their entire fleet in the next two years. The December 2019 EFO Meeting The meeting was held on the very cold evening of December 11, 2019. Unfortunately, the first order of business was to elect a new vice-president for the EFO, due to Richard Utkan's untimely death. After describing the vice-president's duties, Ken asked for any volunteers. Keith Shaw volunteered. No one else volunteered, so a brief election was held, and Keith Shaw is now the EFO's vice-president. 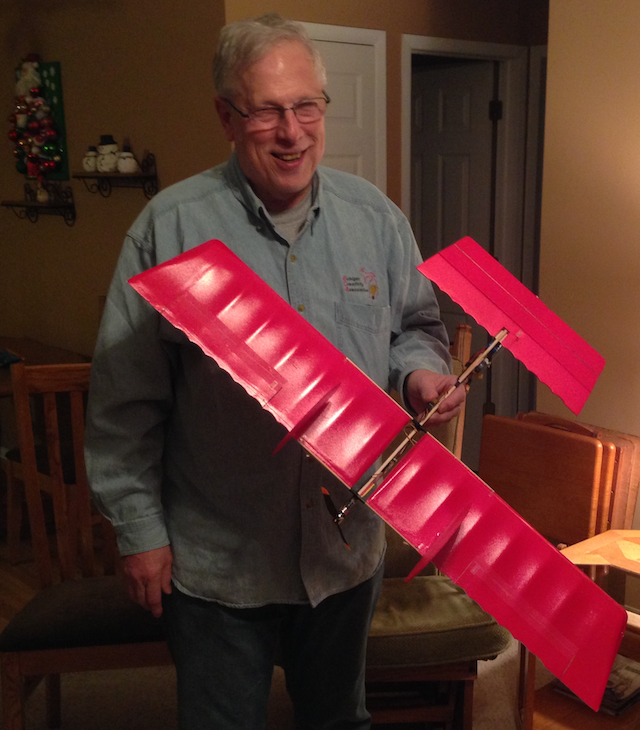 Roger Wilfong lead off the evening by sharing his canard stick. Roger designed his canard stick using parts that he found in his attic for an old Wattage Lite Stick. He had previously researched canard design and assembled and built parts to create his little canard, based on the research. The original stick used a geared IPS brushed motor, but Roger is using a small outrunner on his with a 3S 500mAh LiPo pack. The prop he is using now is a 6x3. It uses three servos, for elevons and canard control. It's "legs" are a bit longer than required for the 6x3 prop, as he'd originally planned for a much larger diameter prop. Yes, that is the front of the plane pointed toward the ceiling in the photo and the motor is in pusher configuration. The vertical fins have no moveable surfaces on them. I sent an email to Roger after the meeting to clarify whether the parts that he used were GWS or Wattage. His reply follows. The parts came from both GWS and Wattage Pico/Lite sticks. They are the same except for the stickers (the Iron Crosses are the same, the Brand stickers are different). Back in the Oakland Yard days, I kit bashed a half dozen into various configurations. The spare parts got stuck in a couple of the kit boxes - that's what I came across in the attic rafters. There were no straight sticks in the boxes, so the stick is a composite of a spruce square core with hard balsa strips laminated on top and bottom and then sanded to size (the originals were metric dimensions - my replacement was slightly oversize.) Everything is original GWS except for a small brushless outrunner replacing the geared IPS drive. The foam pieces are the stock wing and stab (with a slight mod with an 1/8" square spar in the stab). The two fins are stock GWS with fixed rudders. The under carriage uses the GWS wire and wheels for the mains, the front uses a custom bent wire and a smaller Wattage wheel. The nose wheel is not steerable, so ground handling is virtually nonexistent, but fortunately, it tracks straight on takeoff. Roger
Keith Shaw shared the details of his little Avro Arrow. The plane is constructed from Depron, which is no longer available. Keith noted that he really liked working with that material, because. for a "foam" material, it actually sanded quite well. The "guts" were from an ill-fated Great Planes Micro F-86 Sabre. Keith retrieved the parts from a trash bin at the Legacy Center, in Brighton, MI and its former owner also gave Keith the box that it came in. He uses that box as a carrying case for his Arrow. While his version is almost in perfect scale, he did have to foreshorten the nose, in front of the wing, to fit in the Sabre's box. He noted that the plane is extremely noisy in the air, even for a small plane. He also noted that it is EXTREMELY rudder sensitive, and that he has the rudder "toned down" a lot to fly it without being surprised the gyrations caused by too much rudder input. Both Keith and Ken discussed the very sad history of the Avro Arrow, which surprisingly, several of the EFO members did not know about. This is one of the best planes ever designed for its purpose, but it never had a chance for a service life.
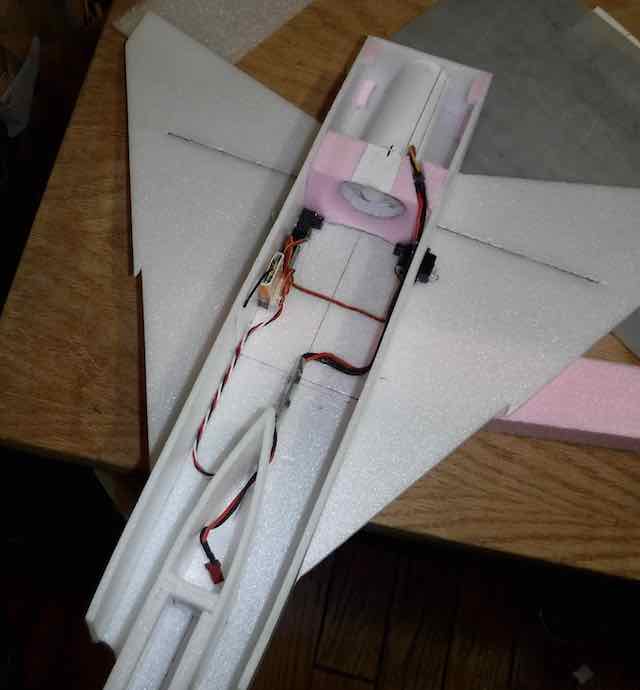
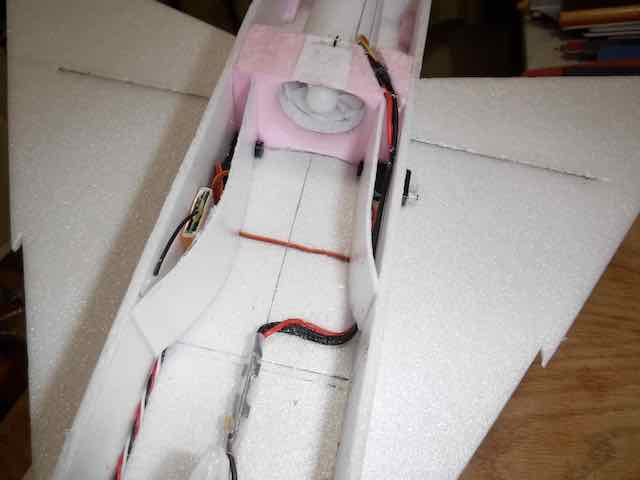
Way back on May 19, 2019, I received an email from Keith titled, "It's an Arrow!" Here's what Keith had to say about this project with some of the accompanying photos. I needed to take a break from a major project I am working on, so decided to make a Peanut Scale (13") Canadian Avro Arrow. I always liked the Arrow and was crushed by its untimely cancelation and destruction at the hands of a disastrous Prime Minister who hated any technology more advanced than a farm tractor. What initiated the project was the remains of a Great Planes Sabre Jet that I retrieved from a trash can at our winter indoor flying site. The owner's bad hand launch reduced it to shredded rubble due to the very brittle foam used in its construction. I kept it to become an organ donor. The Sabre had a 15" span, about 45 sq.in. and weight of 2.6 oz. I couldn't test the thrust on the Sabre due to the state of destruction. The Arrow is built mostly from 3mm Depron with a few bits of pink styrofoam for the nosecone, tail-cone, and canopy. 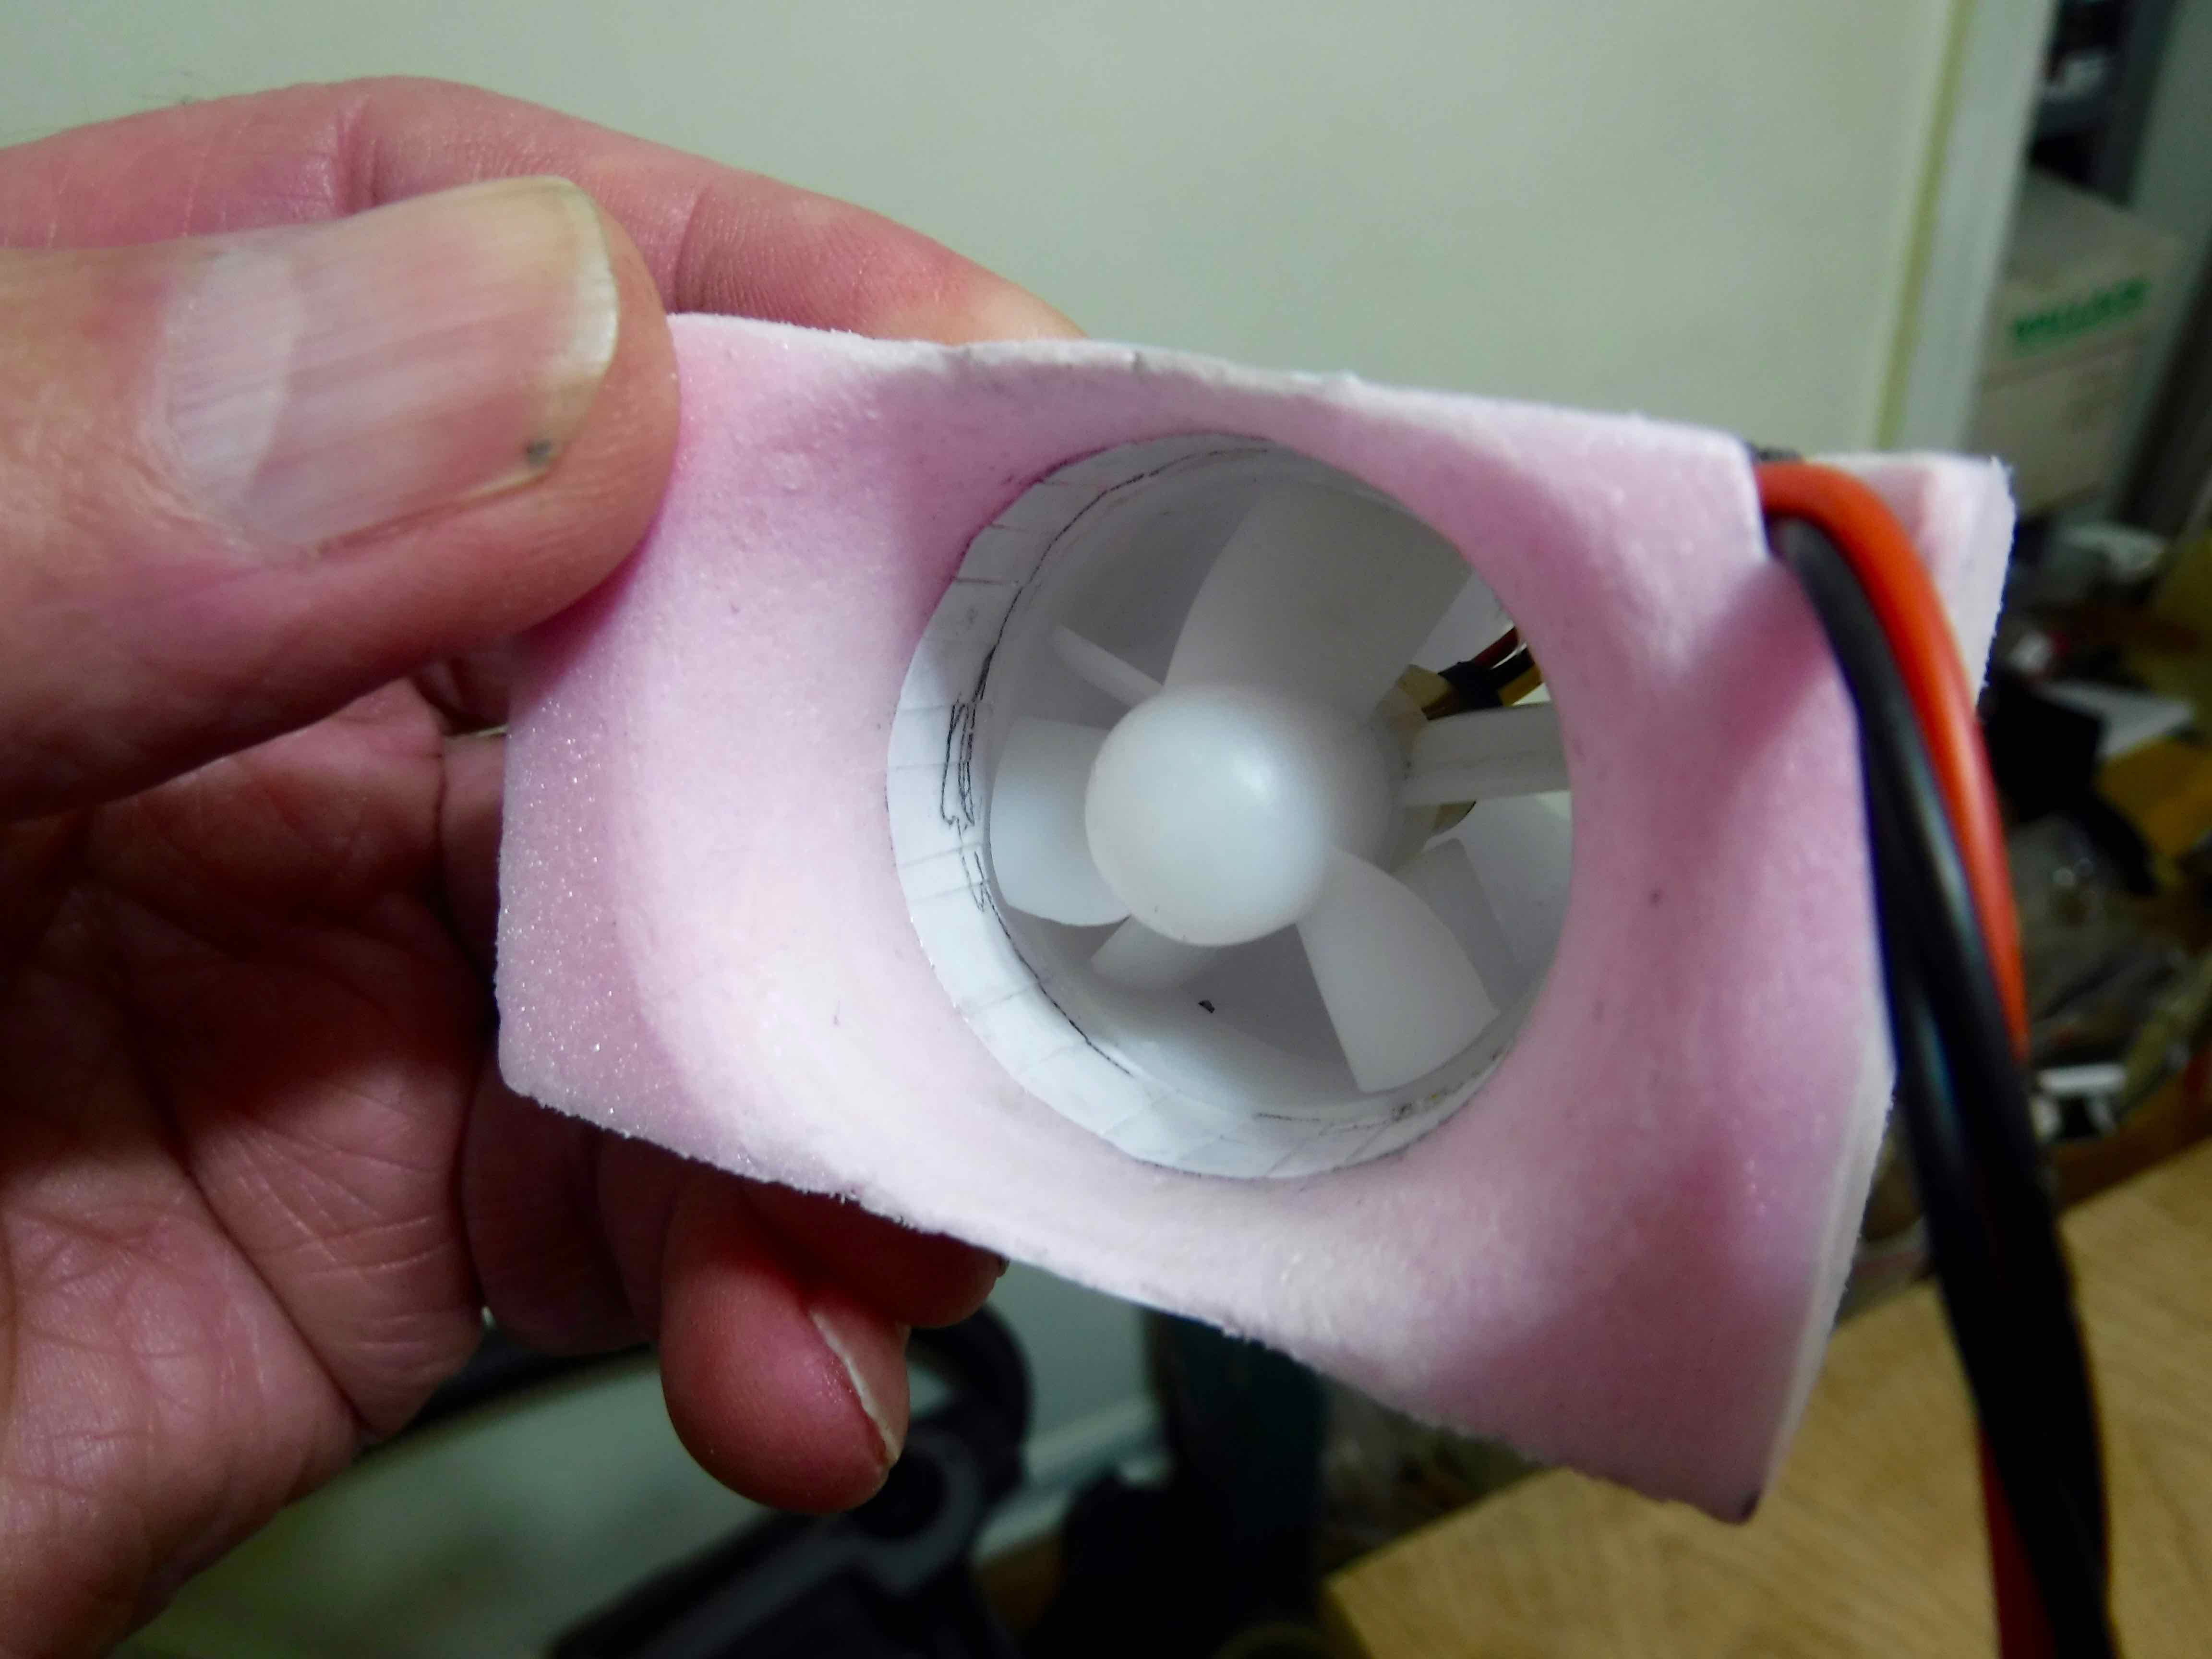 I made a bell mouth for the fan and arranged the equipment to get best possible air passage. It has almost 90 sq.in. yet weighs only 2.1oz with the 2 cell 250mAh LiPo. Static thrust is 1.9 oz. I kept it quite close to scale except for a few things. The nose is shortened by 1" (between the cockpit and leading edge) so that it could fit in the original box, the exhaust area simplified, and fuselage depth increased by 0.1". All other shapes and cross-sections are reasonably close to scale.
It is basically a three day plane: one to design and draw the plans; one to cut the parts out and assemble and install the equipment; and one day to paint details and cut out film for the Maple Leaf markings. I am looking forward to a calm evening to do a test flight. These small quick projects can be very worthwhile and rewarding. I now feel like returning to the (secret) project with renewed vigor... Keith It has been flown many times since Keith sent the email and it does fly very well. In that email, Keith also included comments about his "trash can parts" Taube. He shared the Taube project at the March 2016 EFO meeting and the report appears in the May 2016 issue of the Ampeer. Old habits die hard My parents hated to see anything go to waste. Even though we were quite poor, my mother would meticulously repair clothing and donate it to charity. My father would go down the street on trash night and bring back anything he thought he could fix, either for us or to give to a neighbor in need. It was absolutely forbidden to sell any item, just a thank you was enough. I was enlisted to repair anything electrical/electronic as that was beyond my Dad's ability. Later we would work on things together as his vision and health began to fade. I still carry on that tradition for my neighborhood and it has also become part of my modeling. I pick up trashed planes and either repair them to be used as club trainers, or strip them of parts for my own use. Rarely do I have to buy any hardware, such as kwiklinks, wheel, spinners, bolts/ nuts, etc. It also gives me perverse pleasure to turn an ARF into a handmade plane. I've included a couple of photos of my Jeanin Taube that began life as a Flyzone Albatros. It is also made of 2mm and 3mm Depron. Keith After the sharing of the projects, Ken started researching the kinds of radio systems we are flying today. He asked each member present what they are flying now, and may have flown in the past. Denny Sumner is currently using a Spektrum DX9 silver transmitter. He is using a Lemon receiver in his Parkzone T-28, and a pair of Lemon receivers in his glider using 9 servos. He noted that he uses the Lemons in glider to use the vario function as well as the mixing that he wants. He found that trying to program the 9 servos with the two receivers difficult. I sent him an email the next day and asked for more specific information about the Lemon receivers. Denny's response follows. I've used the LM0044D Stabilizer in a few of my models. The LM0052U is the Telemetry Receiver we use in our gliders, 7 channels, Vario and altitude Telemetry. I used their 10ch, LM0040 as a second receiver in our gliders with six servos in the wing. This receiver was velcroed to the wing, and connected to the LM0052U with a 2 wire servo extension to get power from the 7ch receiver in the fuselage. The last Lemon Receiver I've used is the 7ch LM0051U which has Telemetry but only LiPo voltage. They have an optional energy module that can give you current from your battery. Roger Wilfong noted that the radio system used in the canard is a Spektrum DX8 with an Orange Rx, two BlueBird 3.7 gram servos for the ailerons and a 4.3 gram for the elevator. Battery is a 3S 550 mAh LiPo. A followup email from Roger noted; I have a Futaba 8AUS transmitter on 72mHz for outdoor models. I use a mix of Futaba, Hitec, and Berg receivers with it. Also, for outdoor I have a Tactic 850 using a mix of TR624, TR625, TR624 & TR625 modified for end-pins, and a couple of TR825 receivers. For Indoor flying I used to use a Futaba 8AU with a Spektrum module for the UMX planes. Also when we started up at Ultimate, I bought a bunch of Orange and Lemon receivers to replace the GWS 72 mHz receivers that were in the planes I used to fly at Oakland Yard - the 8AU I used there got the Spektrum module. I also use a Tactic TTX 660 indoors. Keith Shaw noted that the early problems that Spektrum had had kept him away from them. He still uses his Multiplex, FrSky QX7, and Avionic transmitters. He also noted that he wishes that he could get more the small receivers Avionic/FlyDream, as he really likes them. Bob Blau had been using a JR on 50/53 MHz as he was a ham. His first 2.4GHz radio was also a JR. He has a Spektrum DX8 Silver and uses Spektrum receivers. Ken Myers uses a pair of Tactic TTX650s and Tactic TR624 and TR625 receivers. He also recently finished up using a FlySky FS-i6X radio system with a FlySky receiver. He'll report on that system soon. Modifications to FliteTest's Simple Cub - Part 4
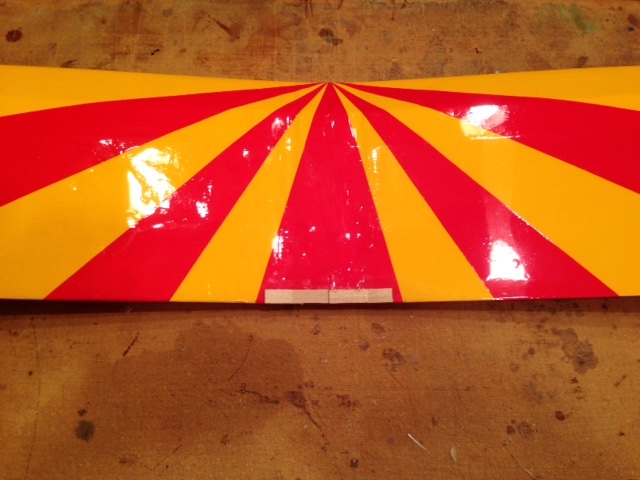
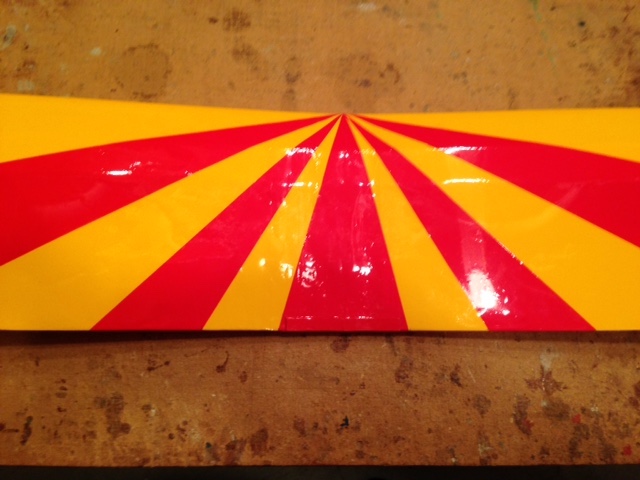
Continuing My Modifications The horizontal stabilizer was not glued onto the fuselage until the wing could be put into position with rubber bands. That allowed the H-Stab to be aligned correctly to the dihedral angle of the wing panels. The wings were rubber banded onto the fuselage. The horizontal stabilizer was slipped into its rear slot. The plane was held in front of me so that I could see the dihedral angle of the wing panels and the horizontal stabilizer. An X-ACTO knife with a #11 blade and emery board were used to adjust the horizontal stabilizer slot so that it looked like it had the same angle on both wing panels. The top of the horizontal stabilizer was marked along the fuselage sides and then removed. Tacky glue was applied inside the marked lines on the horizontal stabilizer and the horizontal stabilizer slid back into the slot. The stabilizer was aligned again and pinned into position. A dab of hot melt glue was placed in several positions and the stabilizer alignment rechecked. With the few dabs of hot melt glue in place, and satisfied with the horizontal stabilizer alignment, beads of hot melt glue were run along the top and bottom of the horizontal stabilizer joint and fuselage. The vertical stabilizer assembly was Tacky glued into place, aligned 90 degrees to the horizontal stabilizer and hot melt glued into place. After flying the V3 and V4 versions of the plane for most of July, I decided that I wanted to try and fix the Dutch roll. Flite Test Simple Cub 3-channel Version, Modified, take offs and landings As seen in the video, the Dutch roll was very apparent in the second take off of the V4 when flown for the second time by Dave Stacer. The second take off appears right after the first takeoff. While insignificant compared to the Old Fogey, I just didn't like the way it looked when it was wagging its tail at times, especially after take off. I arbitrarily added 14.5% more vertical fin/rudder area. 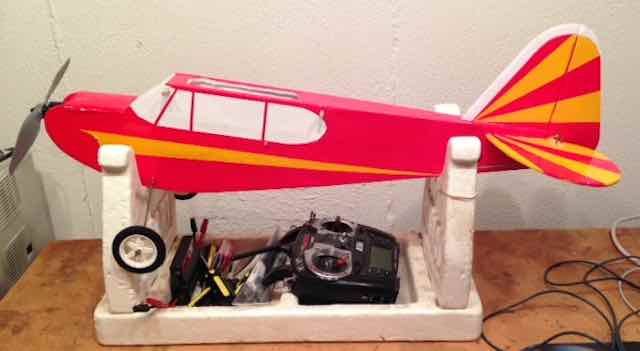 I pinned the new area onto the existing vertical stabilizer of Version 4. The plane was flown with the increased vertical stabilizer and rudder area. When the increased area appeared to correct the Dutch roll, it was covered with EconoKote to match the existing vertical stabilizer and rudder. 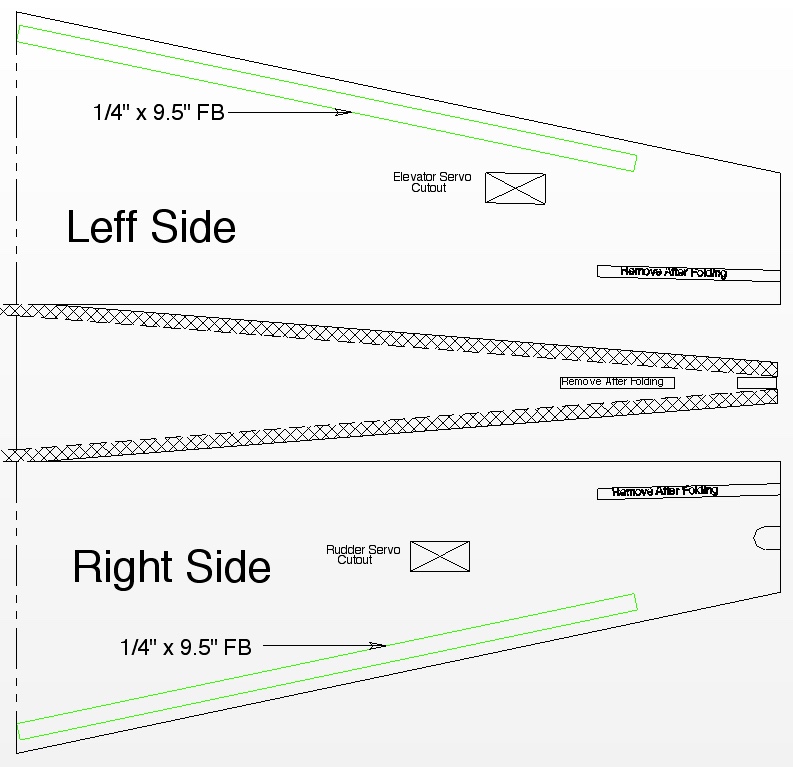 The fuselage rear has the servo holes cut out using the actual servo as a template. It also has a 1/4" x 9.5" piece of DTFB glued up from the the bottom rear a thickness of the foam board (FB). This keeps the rear bottom from pushing into the fuselage when it is glued on with Alenne's Tacky Glue. The wing hold down dowels were made from 3/16" wooden dowel that I had on hand.
1/16" x 3/8" plywood strips were used to create rubber band protectors for the rear center section of the wing. They were glued onto the rear of the center section using low-temp hot melt glue.
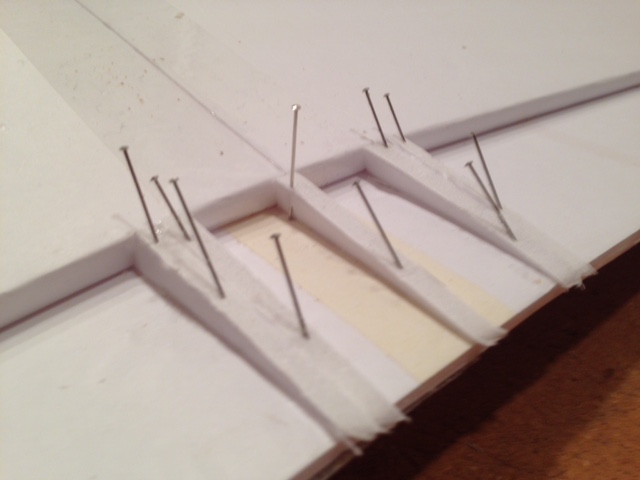
There is a gap between the "rear spar" of the wing and its trailing edge. I cut 5 triangles from DTFB that fit under the wing's surface and flat along the top of the fuselage. One of the triangles was aligned on the center line of the center section. Two of the triangles were located at the joint between the wing panels and the center section, and finally a triangle was glued onto each side of those, on the wing panels themselves. The rubber bands no longer "deform" the rear of the wing on the 4-ch version wing. #64 rubber bands were used on V1. A combination of the #64 and #33 rubber bands were used on V2 and V3. Six #33 rubber bands are used on V4 and have proved more than adequate. Using them also helped to not pull down so hard on the rear of the center section. The #64 rubber bands caused severe deforming of the center section and proved a real problem when the 4-ch wing was used on V2 and V3. To assist the foam board to achieve the angle between the flat center section of the wing and angled panels, "V" slots were cut into the trailing edge "spar"p, the fold over part and the main "spar" verticals. The "V" slot in the top, fold over section of the rear "spar" was cut in the top thickness. The "V&qupt; slots in the main spar were placed in the verticals and run about half way through them. All of the "V" slots were aligned with the straight line forming the joint with the center section. The angles for the leading edge fold over were sanded angles, as previously mentioned. Before doing the wing fold over, the wing was flipped over on the building surface and packaging tape run along the leading edge before trying to bend the wing into shape. During the fold over to create the airfoil, the wing was not forced down over the spars. It was eased down, and if any resistance was felt, the angles forming the leading edge were sanded more. By V4, instead of using the laser-cut dihedral guides, I used 2 x 2 lumber, which is actually closer to 1.5" x 1.5". The pieces were slid into the point on the wing tips where the folded bottom of the wing stops. This yields the same height at the actual wing tips as the guides and gives more support. 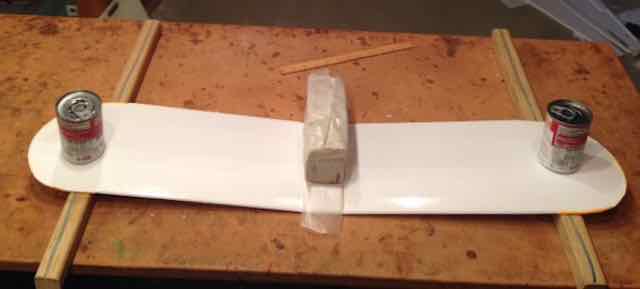 A brick was also used to weight the center section as I lifted both wing panels equally to encourage the dihedral bend. Once the center section remained on the building surface without having any weight put on it, the panels were glued to the center section using epoxy. Weights were placed on the tips and center section as the epoxy cured. 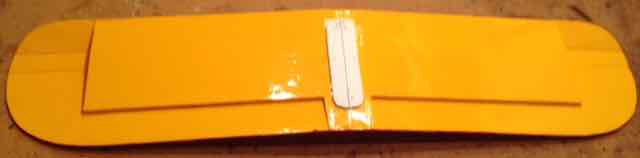 The last modification for the wing was to use the section of foam board, from the top of the fuselage where the wing attaches, as an alignment guide for always getting the wing on the plane in the same position every time.
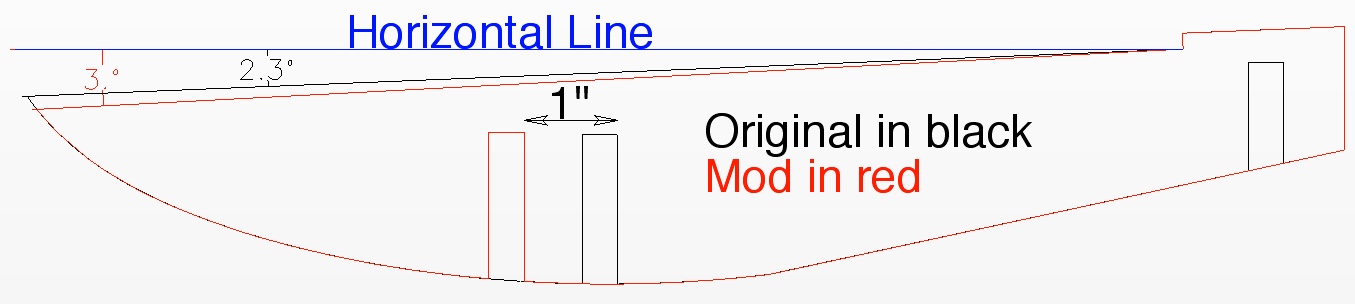
The modified fuselage doubler is shown in red. There is no rear slot for pontoons and the front landing gear slot was moved forward 1". Moving the gear forward 1" was the third modification to get the plane to land without flipping up on its nose. The 1" forward position was NOT arbitrary. V2 had the original gear position available and a forward position about 1/2" forward of it. A spacer was used and switched when the gear was relocated. After flight testing V2 and finding the gear placement still a problem, the V3 used the original position and a position 3/4" forward. light testing demonstrated that it was 'just about right' but a bit further forward wouldn't hurt. Therefore it ended up at 1" on V4. 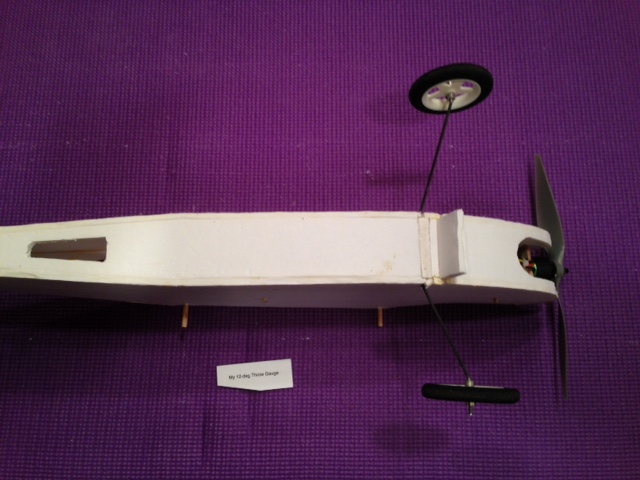 The photo shows V2 with the landing gear in the original position and the filler sticking out of the forward slot for the photo. Flite Test Simple Cub 3-channel Version, Modified, take offs and landings The video shows Dave Stacer doing five landings in a row. He had NEVER flown that plane until the video was taken. The V4 version lands consistently on grass without flipping. Shortly after the video was taken, I did five touch and goes in a row with no problems or flipping. The angle that the power pod sits on was also changed from 2.3 degrees to 3 degrees. The horizontal line parallels the fuselage top. On V4, 1/2 degree of right thrust was added to the power pod. This was not necessary, as thin washers could be placed under the left side of the motor cross mount. The modified firewall was made out of 1/8" plywood and is only 1/32" higher than the 3/32" swappable firewall shown on the plans and provided in the laser-cut kit. 1/8" was used so that the firewall thickness would accept blind nuts. The stock swappable firewall could be used with wood screws of the appropriate size. V2 used 3/32" plywood for the firewall and wood screws to hold the cross mount. I had an incident with V2 that pushed in the center of the firewall, but did not break it. V3 and V4 used the 1/8" plywood firewall with 4-40 cap head screws and blind nuts. The 1/8" plywood firewall was epoxied to the power pod. The bottom of the firewall was aligned to the bottom of the power pod. 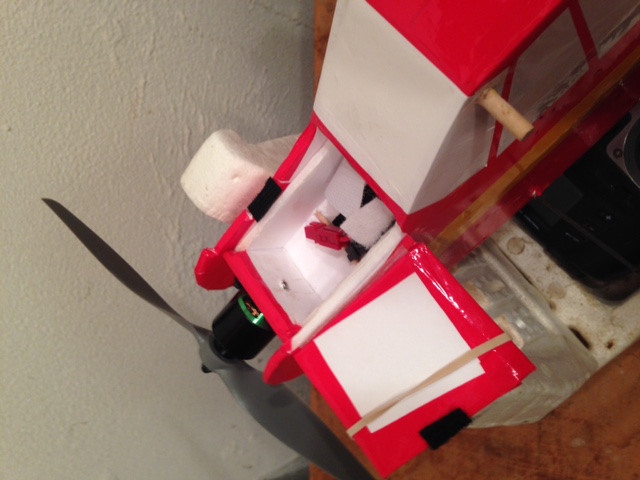 A new piece of DTFB, that I call the battery protector, was cut to fit and glued behind the firewall. It fits behind the firewall and has a hole for the motor shaft. It serves two purposes. It provides more area for the firewall attachment and, since the battery set in the hatch area, which is on top of the power pod floor, it acts as a battery protector so that the motorŐs turning shaft does not rub against the battery. 2019 -2020 Skymasters R/C Club Indoor Flying/Driving at the Ultimate Soccer Arenas The Best Indoor Flying Venue Anywhere!
Located at 867 South Blvd., Pontiac, MI 48341 October 29th through April 14th
Spectators Welcome and FREE
Single Flying Session ONLY $10
Pay at the door or register online at:
Have Any Questions?
All Pilots MUST Have Proof of Current AMA Membership
* Consult the Schedule on the Skymasters' Website for Exact Times and Dates Indoor Online registration is open at: www.skymasters.org. Schedule FEBRUARY:
MARCH:
APRIL:
Dates & Times Subject To Change. Please note that a special area is set aside for electric RC Drivers. Did you note that Driving was added to the title? Costs and dates are the same for drivers as fliers. Indoor Flying to Start Soon at the Legacy Center in Brighton, MI Start Date: Wednesday November 6 Time: 12 p.m.- 2 p.m. Place: Legacy Center Sports Complex 9299 Goble Dr, Brighton, MI 48116 Cost: $10 cost per session Don't let the cold keep you from flying For More Information Visit the Hamburg Flyers Website. Return to "What's In This Issue" The Upcoming Keith Shaw Birthday Party Electric Fly-in 2020 The Balsa Butchers are hosting the "Keith Shaw Birthday Party Electric Fly-In", for the 18th year, at their field near Coldwater, MI. The event takes place on Saturday, May 30, 2020. It is a one day event again this year. The event consists of Open Electric Flying with a "Special Guest of Honor Theme", Happy Birthday Keith Shaw [June 6]. Enjoy a day with the "Pioneering Master of Electric R/C Flight". 8 a.m. - 5 p.m., Saturday. NO LANDING FEE! Donations for field maintenance and lunch appreciated. For additional information contact;
The field will be open for guests to fly on Sunday as well. 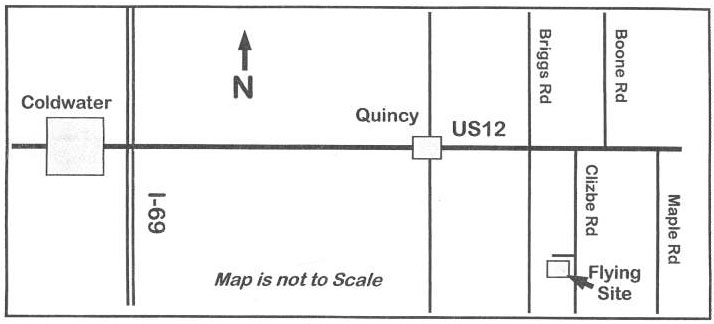
Return to "What's In This Issue" Upcoming 2020 36th Annual Mid-America Electric Flies The 36th Annual Mid-America Electric Flies are scheduled for July 11 and 12, 2020 at the Midwest RC Society 7 Mile Road flying field. More details will be available in next month's issue of the Ampeer. To Reach Ken Myers, you can land mail to the address at the top of the page. My E-mail address is: KMyersEFO@theampeer.org |

 <
<