|
Flying High With Electric Power!
The Ampeer ON-LINE!
Fly the Future - Fly Electric! |
|---|
Site Table of Contents
| President: | Vice-President: | Secretary-Treasurer: |
| Ken Myers | Richard Utkan | Rick Sawicki |
| 1911 Bradshaw Ct. | 240 Cabinet | 5089 Ledgewood Ct. W. |
| Commerce Twp., MI 48390 | Milford, MI 48381 | Commerce Twp., MI 48382 |
| (248) 669-8124 | (248) 685-1705 | (2480 685-7056 |
 | ||
| Board of Directors: | Board of Directors: | Ampeer Editor |
| David Stacer | Arthur Deane | Ken Myers |
| 16575 Brooklane Blvd. | 21690 Bedford Dr. | 1911 Bradshaw Ct. |
| Northville, MI 48168 | Northville, MI 48167 | Commerce Twp., MI 48390 |
| (248) 924-2324 | (248) 348-2058 | (248) 669-8124 |
| The Next Meeting: Date: Wednesday, January 13 Time: 7:30 p.m.
Place: Ken Myers' house (address above) | ||
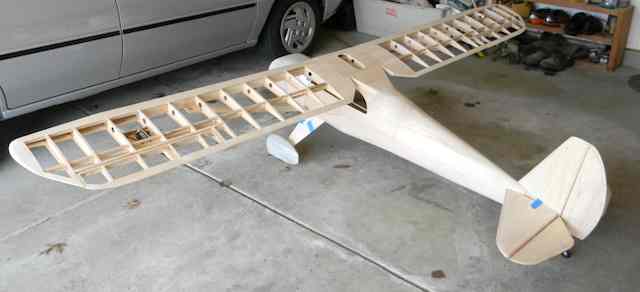
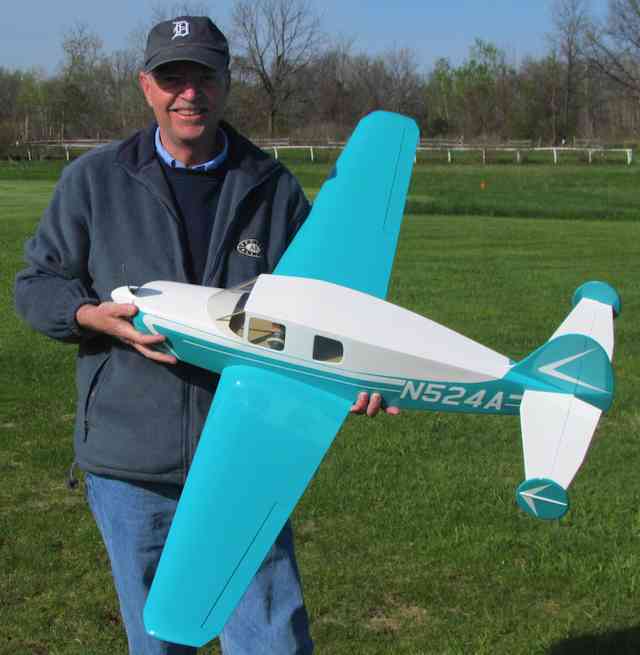
| Inside Don Belfort's Luscombe Silvaire 7E Some nice photos of the bare airframe. | Denny Sumner's Bellanca Cruisemaster Info and link to video of this great plane. |
| Collecting Motor Data for Input Into Drive Calculator Ken Myers' How to for adding tested motor data to Drive Calculator. | What Happens When An ESC with a BEC Stops Working? Ken Myers attempts to answer this question. |
| Flying Efficiently Keith Shaw describes how efficiently his planes can fly. | A Building Tip or Two Dave Stacer shares a couple of good building tips for this building season. |
| A HobbyKing.com Charging Board Warning Rick Sawicki warns us about a possible charging board reverse wiring. | A HobbyKing.com Gripe Ken Myers complains about HobbyKing.com service. |
| Happy Holidays Happy Holidays from the EFO. | |
From Don Belfort via email
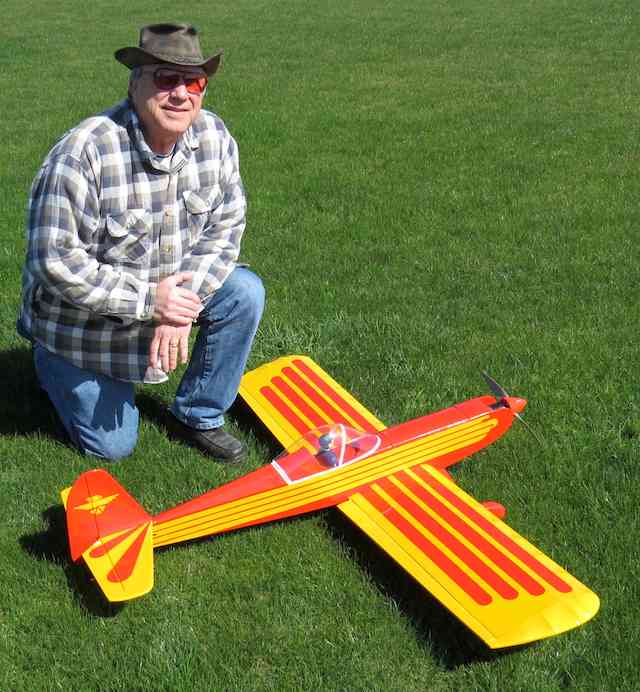
Don's beautiful, award winning, Luscombe was featured on page 2 of the August 2014 Ampeer in the write up on the 2014 Mid-America Electric flies. While cleaning out my email inbox, I found a couple of photos that Don had sent me of this great plane in 'bare bones'. Enjoy. Denny Sumner's Bellanca Cruisemaster
Denny started flying his beautiful, scratch-built Bellanca Cruisemaster in May of 2014. "His build thread is on RC Groups. "There is video of the 2nd flight posted on YouTube. It weighs 3 lb. 6 oz. with a wing area of 403 sq.in. That yields a 19.3 oz./sq.ft. wing loading and a wing cube loading factor of 11.5. It is a great flying plane and Denny has enjoyed flying for the last two years. I just found the link to the video, shot by EFO member Roger Wilfong. It was buried in my inbox. Sorry guys!!! Collecting Motor Data for Input Into Drive Calculator
Drive Calculator is a computer program that allows the user to run virtual simulations of various motor, prop and battery combinations without necessarily having the physical prop, battery or motor on hand. There are versions of the program available for Widows, Macintosh and Linux operating systems. Here are the steps to add information about a specific motor to the extensive Drive Calculator database. Step 1: Download the test data spreadsheet. The spreadsheet already has motor information filled in as an example. A copy of the spreadsheet can be created and the data input for the new motor. Step 2: Fill in all of the known information on the spreadsheet including supplier data, elevation, ambient temperature and air pressure (air pressure may be taken from weather.com during the testing period). All data input fields on the spreadsheet have a green background. The Drill Press Kv test:
Verify the drill press RPM using a strip of white paper affixed around the chuck of the drill press. An optical tachometer is used to take the RPM reading. There will be some RPM variation of the drill press. A couple of examples:
The two examples demonstrate the differences in the two tachometers as well as the RPM variation. If 1545 was chosen, because only the Hobbico tach was used, then the mathematically determined Kv would be slightly lower than using 1560 RPM or even 1590. After the motor data collection has been completed and the data entered into Drive Calculator, Drive Calculator calculates the Kv. Drive Calculator's computed Kv is shown in the Motor Window as Kv [rpm/V]. 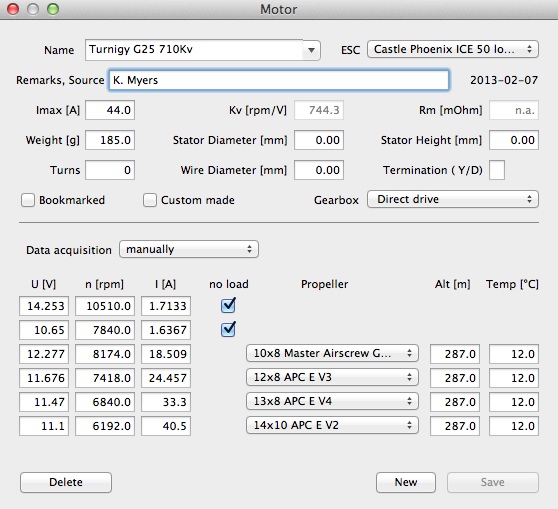 The drill press mathematically derived Kv can be compared to Drive Calculator's estimate. If desired, the drill press RPM can be 'recalibrated' to the Drive Calculator prediction by varying the RPM on the spreadsheet. If the drill press RPM is calibrated to yield approximately the Drive Calculator Kv, they should stay closely in sync. Once the drill press RPM is known, it doesn't really need to be checked again. Step 4: Chuck the motor shaft into the drill press. For an outrunner, use paper clips and a rubber band to secure to "+" mount around the drill press pole. 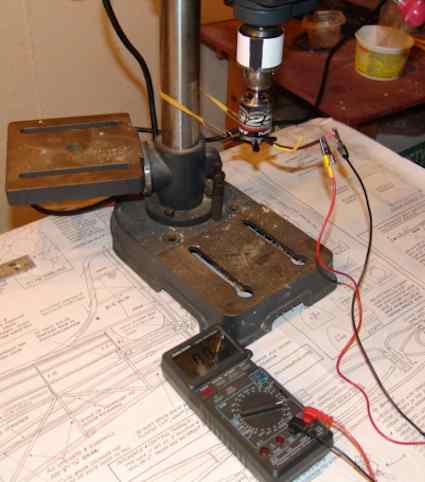 For a brushless motor, set a multimeter to AC volts. Try the lowest voltage scale first to get the most accuracy in the displayed reading. Turn on the drill press and let the motor 'warm up' for about 10 seconds. Next, take three AC voltage readings of each of the three lead combinations and then average them. Input the averaged voltages and measured RPM data to the spreadsheet. The Kv will be mathematically determined. Step 5: If the mathematically derived Kv is within acceptable limits, about 5% of the advertised K The No Load Tests
Selecting props to provide various loads to the motor
Step 8: Solder appropriate bullet connectors to the ESC, if necessary. Mount the motor, ESC, and data capturing instrument to a secure test stand. The data capturing instrument MUST be able to capture volts, amps and RPM all at the same time and over time. (See Note 2 in the Notes section) When using brushless RPM sensors, not an optical tach, it is imperative to set the number of poles correctly in the data capturing instrument. The term poles means how many magnets.
Gathering the no load data
Step 10: Connect the 'other' pack and capture the no load data for approximately 10 seconds. Disconnect the pack, but do not recharge it.
Gathering the Loaded Data
Step 12: Repeat the process for the remaining three props moving from the next lightest load prop to the heaviest load prop. This process is completed using the same pack without recharging.
Step 13: Enter the captured data into the spreadsheet. The the data to be entered into the spreadsheet may be averaged if desired. (See Note 3 in the Notes section)
Step 14: Using the spreadsheet recorded data, captured data, Open Drive Calculator and then select Edit, Motor..., New. Input the data for the New motor and Save it.
Comparing the mathematically derived drill press data with Drive Calculator's computed Kv
Step 16: Verify that the new data is reasonably accurate. None of the Computed values shown at the bottom left of the Drive Calculator window should deviate by more than 3% plus or minus. The Motor calculation reliability slider should be between medium and high. The closer the slider position to high, the better.
If a Computed value variation is greater than 3%, check the logged files and redefine the value range by not including the highest and lowest values. Enter the new average values.
Note that changing one line of data in Drive Calculator causes the other Computed values to change as well. Other 'adjustments' may also be necessary It may also be necessary to 'retest' the load that exceeds the 3% variance.
Notes:
1. Prop selection for various loads using Drive Calculator, an example:
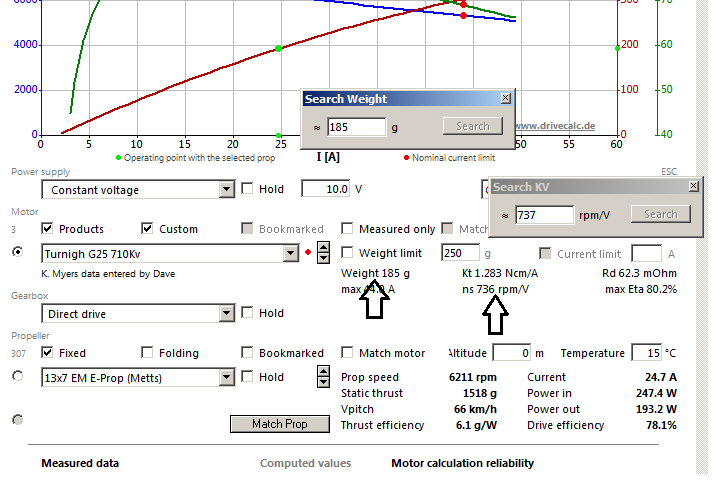
Open Drive Calculator and then open the Search Weight box of Drive Calculator with a double click on the word Weight under where it says Weight limit and insert 185, the motor weight in grams. Double click on the number next to ns and the Search Kv box opens. Type 737 and press Enter.
Drive Calculator filters the list of motors so that only motors that weigh approximately 185g and have an approximate Kv of 737 are available in the drop down Motor menu. For this example, there were two motors available in the Motor drop down menu; AXI 2826-12 & Gens-ace iMars 3749. Either could be used.
The Gens-ace iMars 3749 was chosen.
A constant voltage of 11.1 was chosen because it supplies about the same voltage a 4S A123 2300 pack or 3S LiPo.
he props that I had on hand, and that I chose to give good load range, are listed in the order they were used; lightest to heaviest load.
This prop selection process also demonstrates that motors with about the same weight and Kv produce about the same results.
All of the prop data collection is taken from one battery pack charge, so as the props get bigger, the voltage will be lower and the 'expected' amp draw will be lower as well. That doesn't matter. Four different loads are required for the Drive Calculator inputs.
2. Data capturing instruments that can capture useful data for Drive Calculator are the Hyperion Emeter, Hyperion Emeter 2 with either an RDU, MDU or LDU and phase tachometer sensor or the Eagle Tree Systems Data eLogger with Brushless RPM sensor. It is possible that the Spektrum air telemetry system with the brushless RPM sensor, voltage sensor and current sensor might be acceptable. The onboard data collection of the Castle Creations ICE ESC and Jeti Spin ESC DO NOT provide usable data for input into Drive Calculator.
3. Data loggers capture data over time and save it to some type of file. The file name extension my be specific to the logger, but it is usually some type of comma separated value (csv) file, as used by the Emeter 2 or a space delimited file, as used by Eagle Tree's eLogger.
The Emeter 2 saves the logged data with the extension log. The file can be opened in a spreadsheet by replacing the log extension with a csv extension. The eLogger's FDR extension opens directly as Delimited with Spaces.
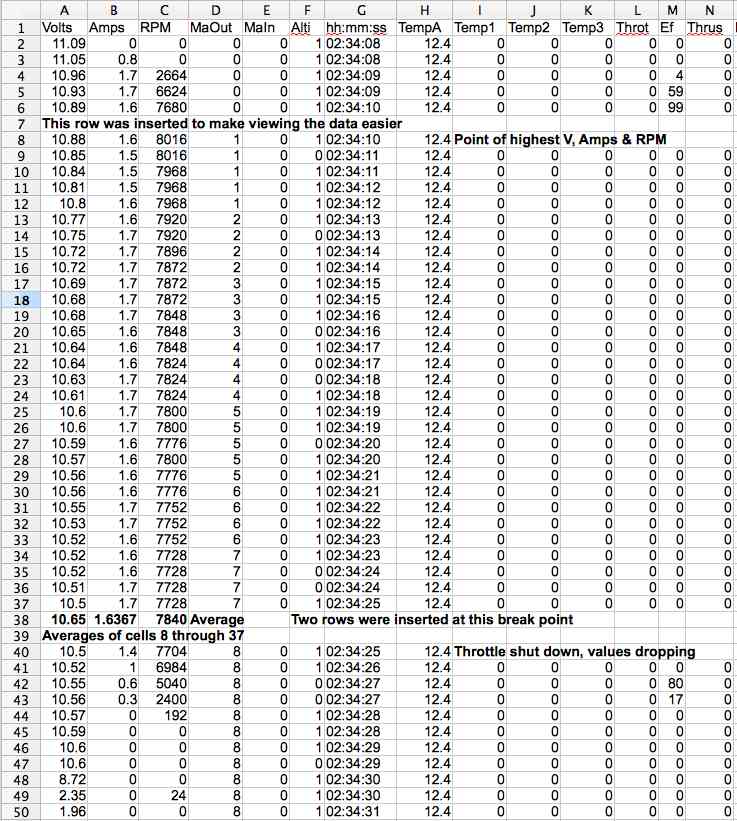
The point in time when the motor reached the greatest power and RPM was identified, and a row inserted. Two rows were inserted at the throttle shutdown point, which can be seen by the sudden decrease in power and RPM. The data was averaged between the two points. That averaged data was placed into the spreadsheet and later into Drive Calculator.
As an aside, other information can be observed in the logged file. The Emeter 2 is logging data twice a second. The ambient temperature of the RDU (remote data logger) was 12.4-deg C. The data collected between row 8 and row 37 was for a time period of 15 seconds, 30 samples divided by 2 samples per second.
How Drive Calculator Can Help In Prop Selection even if the Motor is Not in the Database
The Feather Merchant and Using Drive Calculator
What Happens When An ESC with a BEC Stops Working?
Hi Ken,
Thought I'd share with you something I noticed. Last week I was going up to spin my rather elderly Clancy Bee (Wattage Super 400 Cobalt 27T brushed motor, Turnigy brushed 30A ESC, Sky LiPo 1300 mAh 40C battery & APC 8X3.8SF prop). I go up in steps to baby the motor and as I leveled off at around 150 feet I saw a 20 foot trail of the magic white smoke pour out. I cut the throttle and dead-sticked it in OK, but the motor was unresponsive even though rudder�and elevator worked fine.
Later, at home, a closer inspection showed the windings to be dark (but not crumbly) and the ESC dead on the motor side.
Cutting the plastic shrink rap off the ESC reveled no burned components and the motor magnets are still very strong. From the amount of smoke, I suspect it came from the motor but the lack of charred windings is rather puzzling. It now has a geared out runner in the nose but flies the same, strangely enough.
Last Sunday the wife and I went to a model fly-in at a small airport and an outrunner powered model suffered an ESC failure that took out both the motor AND BEC (battery eliminator circuit - km). It was going downwind when it failed and angled in toward the concession stand and some rather expensive equipment. Fortunately it didn't hit anybody or anything but that was just the luck of the draw.
My question is do some brands/models of ESCs fail completely while others just burn out the motor side and leave the BEC operational?
Unfortunately, I don't have any particulars on the failed unit other than it appeared to around a 40 size low winger and was running on four cells.
I've attached a few photos, but I don't know if they can help or not. If there are brands, or models, of BEC equipped ESCs that are more likely to fail completely rather than only on the motor side I sure would like to know which ones they are.
Thanks,
Hi Dennis,
The basic answer is yes, sometimes the whole ESC including the BEC goes, and sometimes it doesn't. I don't know of, or haven't heard of, any one brand being worse than others. All of Hobby Kings' ESCs are produced by other Chinese companies and branded Turnigy for Hobby King. Many, if not all, of the Chinese ESCs are made from a combination of new and recycled parts. Recycled electronic parts are sold in bulk in China and then picked through for the components they are looking for. The ESCs from Tower Hobby and Horizon Hobby are also OEM'd in China.
To the best of my knowledge the European and Castle ESCs are made from all new parts that are world sourced.
Later,
Thanks for the answer. That's about what I figured about Castle. Almost makes a fella want to go back to simple things like diesel engines. What I saw at the Dog's Show and this fly-in has made me a more cautious flier, for sure (around other people, anyway). I noticed at both venues everyone flew a race track pattern with the down wind turn toward the crowd and not the horizontal eight pattern with both turns away from the crowd. Probably less chance of a collision that way. Except for one or two clubs on Air Force bases I've always flown alone (since the 1950's) but in the last year or so I've joined local two clubs to fly bigger planes here in the crowded New England seacoast area.
Thanks again,
I think you might be interested in the Scorpion Backup Guard. It is a relatively inexpensive device that kicks in to provide servo power if the ESC's BEC power is lost.
Thanks, that's one great idea!
I actually purchased one of these units and used it all this past season in my Four-Star Forty. I can't say whether it ever worked or not, but I can say, my Four Star is still in great shape!
Flying Efficiently
Flying efficiently is a combinaton of choosing the correct power system, the aircraft's design and the pilot's skill in using appropriate throttle management. Here's Keith's take on it. He'd been to a meet and the following is a report on his findings. KM
It was great seeing you today at the meet, in spite of the weather worries. A few musings on the day's flights.
I just finished recharging the A123s from today's flights. I was quite pleased with the performances, in spite of the consternation of seeing lightening in the NE skies. I felt reasonably relaxed and enjoyed flying energy-conservation aerobatics.
The Stomo: 28% scale model of the rare 1932 German homebuilt. 85" span, 1180 sq.in., 7.3 pounds, eight A123-M1A and a Hacker A40 motor, 15x10 prop, 600 watt WOT. The 8.5 minute routine used 1.570 Ah out of the 2.1 Ah cells. Calculated average current equaled 11 amps, and the average power was 267 watts.
The Sausewind: 1/5th scale of the even rarer 1925 German racer. 71" span, 780 sq.in., 6.5 pounds, seven A123-M1B cells on a Cobra 3525, 15x8 prop, 450 watt WOT. The 6.5 minute routine used just 0.926 Ah out of the available 2.5 Ah cells. Calculated average current is 8.5 amps, and the average power was 180 watts.
The Nomad: 1960s Ted Strader design flying with its original Adams magnetic actuator, Astro 010, 6x4 prop, two small A123s rated at 1.1 Ah. The 10 minute flight consumed a whopping 174 mAh. Calculated average current was 1.0 amp, average power was 6 watts. And by the way, I think the actuator current is 200 mAh, so the real average motor current was 0.8 amp, and the flight power about 4.8 watts !!!!!!!!
Even though I didn't fly it at the meet, I thought I'd add one other to put it all in perspective. CzechMate is 1/6th scale, 62" span, 10 pounds, Astro Monster motor on ten 5.0 Ah LiPo batteries. It turns a 16x16 prop at 11k+ at 4200 watts (38 volt x 110 amp). I go throughout 4 Ah in 6 minutes, so the average current is 40 amps and 1500 watts.
A Building Tip or Two
This might be an old tip that I saw somewhere or something new.
The attached photos show how to hold stuff where there are strange angles or just no good place to place clamps.
I'm using elastic cord. It stretches, you can pull it more for more pressure or less for a light hold. I first started using it to glue on the front strip on a wing. In these photos I'm using it to glue on a wing tip. This elastic string was used to repair tent poles.Its about 1/8" diameter.
I'm using white glue so it takes a little while to dry so this elastic cord works great.
I'm building a replacement Fusion to replace the one that I had a few years ago.
My comment back to Dave was, "Too bad that when we are 'gone', there won't be anymore of us to pass all this good info on." KM
A glue question for a cold (but warming) Saturday.
In a couple of place the plan calls for Epoxy. I hate using Epoxy. It's messy, stinks up the basement and I think I'm developing a sensitivity to it.
The landing gear mounting box assembly and tail wheel assembly are all made out of lite ply and the plan calls for using epoxy to bond everything together.
I took two scrap pieces of lite ply and glued them with PVA type glue. I guess this is the technical name to the traditional white glue that we know.
As you may already know, the wood broke around the glue joint. The PVA joint was stronger than the surrounding wood.
If the wood pieces fit tightly, would PVA be good enough?
In what cases should I use epoxy?
Is there much difference between Elmers white, Titebond etc and other brands of PVA?
Response from Denny Sumner
I use epoxy for the firewall and landing gear mounts on larger airplanes like my 4 Star Forty. I guess I like it in those places from past experience. Titebond or medium CA should work too.
Getting back to epoxy, it really doesn't take much and because of its viscosity, it can fill small voids, especially when pulling the sides together for firewall gluing. I always wipe any excess that weeps out of the joint away during drying. I also always use epoxy for gluing hardwood wing hold hold down blocks to the fuse sides.
I know our electric airplanes don't vibrate that much compared to the glow versions but for me old habits (for me) are hard to break....
A HobbyKing.com Charging Board Warning
Rick spotted these reviews on the HobbyKing.com Web site and I wanted to pass them along as a warning. The authors of the comments appear to be English as a second language writers, but their point is made.
schmekerasch
deadduck
There is no way to tell the dates of the postings. It appears that some of these boards were sent out correctly wired, and others were not. Just take this as a warning to always check the polarity of all 'boards' and your batteries as well. I have read reports of balance connectors wired in reverse. Watch yourselves. KM
A HobbyKing.com Gripe
I am in the process of some experiments and learning about Lithium Polymer (LiPo) type batteries.
I needed batteries with all of the same capacity and number of cells for my data collecting.
On November 24, 2015 I placed an order for three 3S 1000mAh LiPo batteries, using the East Warehouse (AR). I checked to make absolutely sure that all three packs were in stock. I know their reputation concerning out of stock products. HexTronic, the parent company in China, took my money on that date.
The packs ordered were:
I checked on December 14 and the first two were still in stock, but the nano-tech 1000mAh was said to be out of stock. When I ordered, it WAS in stock or I would not have ordered it!
On December 16, I checked and 3 were said to be in stock, but nothing shipped to me and I have received no notification from them, except they accepted my money.
December 17, checked warehouse east stock and it was down to 1.
December 18, warehouse east stock, 0.
Hopefully mine shipped, but I've received no notice.
This is really one crappy company!
Happy Holidays to All
To Reach Ken Myers, you can land mail to the address at the top of the page. My E-mail
address is:
KMyersEFO@theampeer.org
|